Expert advice on waterproof basement systems, controlling moisture in basements and crawl spaces, with foundation water management diagrams.

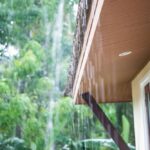
Does your basement or crawlspace resemble a swimming pool in the winter? Heavy winter precipitation is a real threat to basements and crawlspaces in many parts of the country. The problem is this: Rainwater or snowmelt spills off the roof, pours down gutters and downspouts, and saturates the ground. Eventually, water pressure builds in the ground and squeezes water through foundation or slab cracks. The result is a flooded crawlspace or basement.
The best first step toward solving this problem is to control water flow off of your home’s roof, gutters, and siding. Another important step is to seal up or repair cracks in your home’s foundation walls or slab.
If, despite diverting water flow and sealing up cracks and fissures, water continues to pool in your basement or crawlspace, you have a couple of options. One is to consult a basement waterproofing contractor about how waterproofing or new drainage systems might solve the problem. This can be very expensive, so get two or three bids.
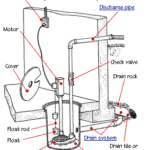
Another option is to automatically expel the water from the basement before it has a chance to collect with the aid of a sump pump. A sump pump system utilizes drain rock and tile along the foundation and/or under the floor to collect groundwater. Drain tile carries the water to a basin buried at the low point of the basement floor. When water fills this basin, or “sump tank,” to a certain level, a pump turns on. This pump, which is partially or completely submerged in the basin, discharges the water away from the house or into a sewer through a hose.
Depending upon where and when your house was built, it may already have a sump pump. If you’re unsure about whether or not your home does, look in the basement for a heavy cover with a discharge pipe sticking out of the top (it’s usually at the lowest point of the floor). If you can’t find one and basement water is a severe problem, seriously consider installing one. Please see Sump Pumps Buying Guide for more.
If a damp crawlspace is the extent of your home’s moisture problems, make sure that none of the foundation vents are blocked—improper ventilation can cause chronic dampness.
To kill mold or mildew, mix about 3/4 cup bleach with 1 gallon of water in a clean garden-style sprayer, and, wearing old clothing, goggles, and a respirator, spray the area (don’t breathe in the spray). Following application, wipe off the mildew with a rag, or scrub with a brush, if necessary. Then spread 6-mil polyethylene (plastic sheeting) across the dirt area so that it reaches up to the top of each foundation wall and staple it to the mud sills. Be sure to cut it away at foundation vents and openings so it doesn’t block airflow.
—Don Vandervort
Crawlspace Moisture Control
—Information courtesy of EERE
To effectively insulate your crawlspace for energy efficiency and to create a comfortable home, you need to properly control moisture in it. A crawlspace is susceptible to moisture and deterioration problems because of contact with the earth.
The best approaches for preventing these problems will depend on your local climate and the style of your home’s construction. However, the following general guidelines for creating a water- managed foundation system apply to most crawlspace designs:
1Keep all untreated wood materials from direct contact with the earth.
2Provide rain drainage, such as gutters, to conduct rainwater away from the house.
3Slope the earth away from the house for at least 5 feet at a minimum 5% grade (3 inches in 5 feet). Establish drainage swales to direct rainwater to desired locations around the house.
4Add a sill gasket to provide air sealing.
5Install a protective membrane, such as an EPDM-type membrane, to serve as a capillary break that reduces wicking of water from the masonry wall. This membrane, in addition to metal flashing, can also serve as a termite shield.
6Damp-proof the below-grade portion of the foundation wall to prevent it from absorbing ground moisture by capillary action.
7Install drainage plane material or gravel against the foundation wall to relieve hydrostatic pressure and channel water to the foundation drain.
8Provide a foundation drainage system at the bottom of the footing, not on top, when the foundation floor (interior grade) is below the exterior grade. Surround a perforated 4-inch drain pipe with gravel, and cover with filter fabric.
9Install a 6-mil polethylene vapor diffusion barrier across the crawlspace floor to prevent soil moisture from migrating into the crawlspace. Overlap and tape all seams by 12 inches. Seal the polyethylene 6 inches up the crawlspace walls. As an option, pour 2 inches (51mm) of concrete over this to protect the polyethylene from damage.
Concrete Slab Moisture Control
—Information courtesy of EERE
To maximize your home’s energy efficiency and to protect its foundation, you should use the following moisture and air leakage control techniques when installing slab-on-grade floors:
1Keep all untreated wood materials away from the earth.


2Install well-designed guttering and downspouts that are connected to a drainage system, which diverts rainwater completely away from the house.
3Add a sill gasket membrane between the slab and bottom plate to provide air sealing.
4Install a protective membrane (such as rubberized roofing material or ice-dam protection membranes) to serve as a capillary break that reduces wicking of water up from the foundation. This can also serve as a termite shield.
5Install a foundation drain directly beside the bottom of the footing. The foundation drain assembly includes a filter fabric, gravel, and a perforated plastic drain pipe typically 4 inches in diameter. Locate the drain beside the footing, not on top of it, to avoid water flowing against the seam between the footing and the foundation wall, and to prevent wicking from a web footing through the stem wall.
6Install a capillary break and moisture barrier under the slab floor, consisting of a layer of 10-mil polyethylene vapor diffusion retarder over at least 4 inches of gravel.


")