A tile backsplash is a relatively easy project for a do-it-yourselfer. As with most projects, preparation is key. Be sure to remove any existing tile and scrub the surface of the wall. You may need to fill in small holes and sand or scrape the area to make it level.


As for your choice of tile, glazed varieties work better for kitchen applications than unglazed tiles, which can absorb grease and moisture. You may need to rent a wet saw to cut the tiles; be sure to wear safety goggles when working with this tool.
When applying mastic to the wall, spread the mixture evenly and moderately. If you apply too little mastic, your tiles will not adhere properly. Too much mastic will mean your tiles will take a long time to set and could be uneven. Wear gloves when working with mastic, and follow label directions carefully.
1Plan your layout. Identify the center of your design using a tape measure or ruler. Use a level to mark a line at that spot, and then continue to draw a grid of one vertical column and one horizontal row intersecting at the central point of the backsplash.
2Apply mastic where the central tile will go, and adhere the tile to the wall.
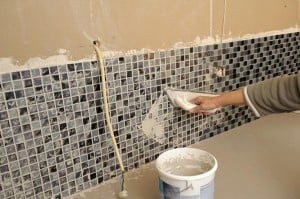
3Lay out the tiles from the center for the first column and row, applying enough mastic to the wall to lay out two tiles at a time and using spacers between the tiles for uniformity. Press firmly on each tile to adhere it to the wall but not so hard that mastic oozes between the tiles. Wipe off any mastic that makes it onto the face of tiles.
4Continue to apply tiles to the wall. If you know you will need to cut tiles for the edges of your backsplash, do this before completing your final two columns and rows. You can mark where the tiles will need to be cut using a wax pencil and then use either a wet saw or a snap cutter to cut or break the tile.
5Let the mastic dry according to the manufacturer’s recommendations. It will usually take about 24 hours for the mastic to set completely. Remove the spacers once the mastic has dried.
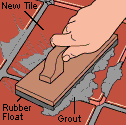
6Apply grout between the tiles with a blade float. After the grout sets (about 15 minutes), clean off any excess with a sponge. Let the grout dry for the amount of time recommended by the manufacturer.
7Once the grout has dried, apply a bead of caulk around the edges of the backsplash as well as to where it meets the countertop.
Featured Resource: Get a Pre-Screened Local Tile Installation Contractor


")