This guide will teach you how to create a living garden path, a beautiful and functional way to add greenery to your walkway. Includes DIY step-by-step instructions.

Once spring has sprung, it’s time to begin thinking about outdoor projects. With sunny but not too hot weather, longer days, and rain-softened soil, this is the perfect season for improving the yard.

To provide proper footing through your gardens, establish borders, and create a handsome new accent, what could be a more fitting yard improvement to tackle than a garden path?
Garden Path Materials
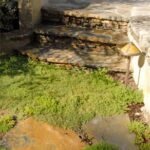
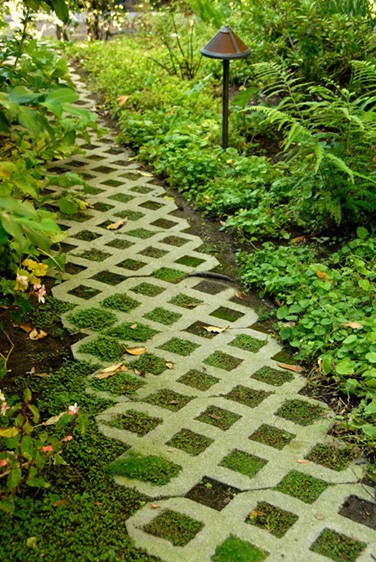
For garden paths, you can use anything from pea gravel to steppingstones to brick. For this project, we chose a material that is solid underfoot but especially friendly and natural. It’s a flat concrete paving block with a grid of 3 1/2-inch-square holes for grass or groundcover. The result is a “living” path.
Though several similar products are available, the one we used is called Turfstone. It is a 16-by-24-by-3 1/4-inch thick paver originally designed for commercial landscaping and driveways. This and related materials can be ordered through landscape supply outlets or masonry yards.
Preparing the Path
To simplify the project and eliminate the need for working with mortar, we installed these units on a firm, flat bed of sand. Once all of the pavers were in place, we planted their pockets with Veronica repens, a hearty ground cover that doesn’t need mowing.
How to Install the Path, Step-by-Step
First, stake out the path’s perimeter and then figure the number of blocks required, adding 5 percent to cover waste and breakage. Then figure out how much masonry sand you will need; it takes 1/2 cubic yard of sand for every 30 blocks.
1. Lay out the path.
- Wearing work gloves, set two or three blocks in position at each end of your intended pathway. These become reference points for layout stakes, which should then be driven into each corner. Stretch taut mason’s lines between the corner stakes to define the sides of the path. Because the pavers are quite long, making a straight path is simple, but if you want curves, they have to be long and gradual.
2. Prepare a smooth surface.
- Excavate with a flat-bladed shovel to create a flat-bottomed trench about 4 3/4 inches deep to allow for the 3 1/4-inch thickness of the pavers plus a 1 1/2-inch-deep sand base. Sand provides a firm, stable base that drains well. For poorly draining soil, you might have to add an extra 6 inches of gravel beneath the sand.
3. Screed sand on the surface.
- To create a perfectly flat sand base, set up “screeding rails” by digging the trench a little wider than the path’s width to allow for placing 2-by-2 rails along each side. Then stake these rails in place. Working in 3-foot-long sections, shovel sand between the rails and draw a short 2 by 4 across the tops of the rails to level the sand. As voids appeared, add sand and repeat the screeding action. Once you have flattened a 3-foot section, install blocks on it. When you near the ends of the rails, extract them, shift them forward to the next section, and fill their vacated positions with sand.
4. Cut or break blocks to fit.
- Unless you have a power saw with a diamond blade, you should only cut the blocks where the patterns intersect. Otherwise, more often than not, they will break. If you do use such a saw, be sure to wear protective goggles and follow all of the tool manufacturer’s directions for use. To cut a block, we placed one of the intersections over the edge of a 2 by 4 and, using a brickset and hammer, scored the cutting line. Then you just break off the unwanted piece with sharp blows. Once all the blocks are in place, use a water-filled lawn roller (you can rent one inexpensively) to evenly compact the blocks to keep them from settling over time.
5. Plant the blocks.
- You are now ready to plant. Fill the cavities to about 1 inch from the top with a 50:50 mixture of sand and potting soil. Then, cut 3 1/2-inch squares of ground cover from flats, using a sharp knife and a 2-by-4 as a guide. Plug the cavities with the greenery, allowing it to mound slightly above the surface, and water. With regular watering, you will have a beautiful “living” garden path.
If you’d like a new pathway but prefer the classic look of brick, see How to Build a Garden Path.