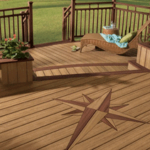
Expert advice on how to install and work with TREX and other composite decking materials, how to cut and fasten TREX, and framing for composite decking.

If you’ve ever wondered what becomes of your recycled grocery bags, check out your neighbor’s deck—it might be made of them. More than 70 percent of recycled plastic bags (over 1.5 billion of them!) are converted into composite decking, fencing, and similar outdoor materials by the U.S.’s largest manufacturer of these materials, Trex Company.


Trex and several other manufacturers, including Weyerhauser and TimberTech, combine landfill-bound plastic, wood scrap, and sawdust into low-maintenance outdoor materials that imitate the look of wood somewhat convincingly but are far superior to natural wood in their ability to stand-up against the damaging effects of sun, rain, salt air, and insects. Though not meant for structural purposes, these products are plenty strong for decking, fencing, and railings.
Builders like composites because they are relatively easy to install–the materials are very consistent in size and quality, come in lengths up to 20 feet long, and are not prone to warping and cracking. Composite decking won’t rot or splinter (an extra bonus for bare feet). New styles also have fire prevention technology incorporated into the composite, which reduces the risk of house fire during cookouts and makes them less of a fire hazard where wild fires can be a threat.
On the downside, composite decking is susceptible to stains (especially grease stains) and may fade over time. Perhaps the most serious limiting factor is cost. Quality products cost more than softwoods such as treated pine. But they last longer with far less maintenance, so this premium is offset by their durability.
Composites come in both solid and hollow-core versions. Solid “boards” are simpler to deal with, but heavy, hollow types are lighter but fussier to install.
Some composites look like real wood—at least from a distance. For families with young children, these synthetic boards have the additional advantage of being splinter-free. With others, it’s best to simply view them as a new material. If you’re not satisfied with the color choices, or if you would like your deck to match your house, most products can be stained or painted, as specified by the manufacturer. Some may fade more than others.
Vinyl decking is yet another low-maintenance option, although one that offers a particularly non-traditional deck. Installation differs as well. In general, first an aluminum or vinyl track is installed across the joists, and then top pieces are snapped into place. From an environmental standpoint, composite decking is considered a “green” product because it is constructed with recycled materials and is very durable.
Working with Trex & Composite Decking
Composite decking such as Trex can be cut, drilled, and fastened just like traditional wood, but there are a few tricks you should know to make your project easier, and provide a more professional finish.

It is important to recognize that composite decking expands and contracts with heat and cold. This fact will greatly influence how you go about working with the material to reduce waste and make your project easier.
After purchasing the material, store the composite decking flat and bundled, if possible, in the area where you will be cutting and installing it. The decking should be at the same temperature as the area where it will be installed.
Working in the morning when the material is still cool will make your work much easier. As the composite decking heats up it not only expands but also becomes more pliable. This can make cutting and securing more difficult. If the decking material begins to get warm to the touch as the day goes on, you may want to stop work and continue the project the next morning.
How to Cut & Fasten Composite Decking
You can make simple cross cuts in composite decking the same way you would cut any soft pine—a power circular saw will work fine. A power miter saw can provide very accurate, straight cuts, and a table saw with support extensions can make all types of cutting easier. Carbide tipped blades are suggested—the fewer teeth the better for smooth cuts. Don’t allow blades to get overly hot when cutting as this can cause cuts to be warped or wavy.
Ripping a composite board (cutting lengthwise) is trickier. Even the most experienced carpenters have found that when the power saw’s blade heats up, it creates slight waves along the cut line. Whenever possible, try to avoid ripping composite decking and use full boards for your surface. If you do have to rip, put the rough, exposed cut side where flaws will be least noticeable.
If installing the decking around an existing structure, a simple router can be used to make curved cuts. Again, treat the material just like you would soft pine.
A clean cut should not leave any loose material, but if you need to clean up an edge, do not use a sander. Sanders will mar the finish and in many cases void your warranty. A hand coping saw will work well to smooth finished edges if needed.
One of the most critical steps for properly securing composite decking in place is to make sure you have a 1/4-inch to 3/16-inch gap between the decking boards (don’t exceed 1/2 inch). This space is important for two reasons. First, it allows for proper drainage and keeps the deck cleaner, safer, and less prone to moisture problems. Second, because composite decking expands in hot weather, the space ensures that extra stress won’t be placed on the fasteners.
Extra spacing is also important between board ends and where boards meet a wall when decking runs perpendicular to the wall. Between end-to-end boards, allow a 3/16-inch space. Where board ends meet a wall, leave a healthy 1/2-inch gap to ensure the material can expand and contract without coming into contact with the wall. This will increase the longevity of the deck and also prevent bowing during the hottest part of the day.
Composite decking can be fastened to treated wood joists with screws or with hidden fasteners. Using composite deck screws is critical because they are specially designed to help hold the material in place. Though common wood screws might seem like they would work as well, they tend to “mushroom,” or bore out the holes rather than set into the material. Composite deck screws are designed so that they do not push the material out and will create a much more uniform and tight fit.
Though composite decking is more stable than regular pine, it still can break when driving fasteners close to the edges. Pre-drilling pilot holes can prevent this from happening and make installation go much faster and smoother. Instead of pilot holes, some manufacturers suggest drilling a starter hole about 1/8 inch deep into the material. Select a bit size that is the same diameter as the screw’s inner core and take care not to go too deep into the material.
Countersink the screws but no deeper than the screw’s head. Besides creating a rougher finish, deep countersinking can reduce the effectiveness of the fastener and void the warranty. It is also important that all screws be secured at a 90-degree angle to the boards. Fastening from the side can cause dimpling in the composite surface and mar the finish.
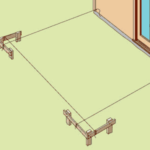
Framing for Trex & Composite Decking
Composite decking is a great alternative to traditional wood decking, but does have some limitations. Composite decking cannot be used as structural material. This means that any load bearing area will need to be framed and supported before the composite material can be attached.
When building your deck and railing, it is recommended that pressure treated wood be used as the framing and floor joists. This wood is protected against the elements and insects and will provide a solid support for your decking material.
Be sure to check with the manufacturers instructions when planning the substructure of your composite deck—proper sizing and spacing of beams and joists is essential.