This step-by-step DIY guide will teach you the basics of building a horse barn for your horses. Includes diagrams of the basic construction components and building methods for a barn.

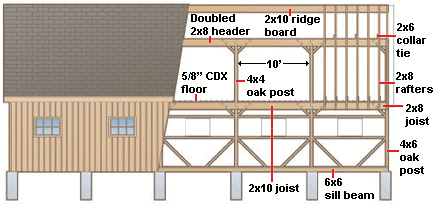
The sturdiness of this horse barn comes from the use of oak for the heavy beams and from the board-and-batten siding. The use of any other lumber or siding in any other dimensions would require a complete re-engineering of the framing. The roof is steeply pitched at 9-in-12.
Barn Construction Diagrams
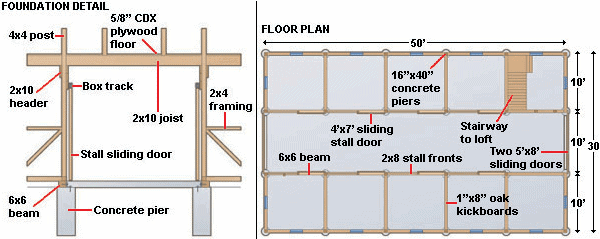
The heaviness of such a structure necessitates that its weight be evenly supported by the footings, which is why each vertical beam rests on its own concrete pier, as shown in the foundation detail below.
The 6-by-6 horizontal beams span the footings and are joined at the corners with shiplap joints and 1/2-inch carriage bolts, as shown in the floor plan below.
Barn Construction Sequence
The beams are attached to the concrete piers with 5-by-5 3/16-inch-thick angle plates and bolts. The 10-foot section between the two stall sections is a poured concrete slab reinforced with welded wire mesh. (Most stall floors are left as dirt, but if you are considering an eventual re-use of the barn you may want to pour concrete floors in the stalls.)
The exterior wall of each 50-foot-long stall section is constructed from a 4-by-4 top plate that rests on 4-by-6 oak posts at the corners and 4-by-4 posts every 10 feet in between. All of the posts rest on 2-by-4 mudsills, as shown in the wall section below. Three equally spaced 2-by-4 cross braces run horizontally between each pair of posts. 4-by-4 cross braces also run at the top of each wall panel and from post to mudsill at the bottom to form a letter V.

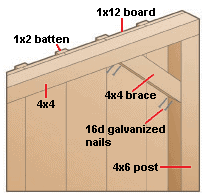
Once all of these pieces are assembled and squared, 1-by-12 boards and 1-by-2 battens are attached to the exterior, as shown in the corner detail below. Two scraps of 1 by 2 are nailed onto each wall panel, one underneath the top horizontal brace and the other on top of the middle horizontal brace, to act as a track for the sliding-window sash.
The interior walls of the stall sections are framed similarly to the exterior walls except that the tongue-and-groove pine siding is attached horizontally instead.
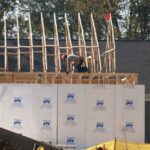
Raising the Walls
Because of the walls’ size and weight, raising them requires many hands and possibly a block and tackle. Position one wall section on the 6-by-6 sill beam, attach it with nails, and temporarily brace it up until the gable end walls can be attached. Install 2-by-10 headers on the inside tops of the exterior and interior walls to serve as supports for the ceiling joists. Then install 2-by-4 double top plates. Repeat for the other wall section.
Connecting the Walls
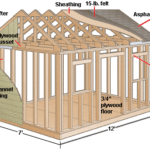
Connect the two wall sections by attaching 2-by-8 ceiling joists every 16 inches on center through the headers and into the walls. Cover the ends with rim joists. Then install 5/8-inch tongue-and- groove CDX plywood flooring for the second-floor loft. Add stairs or a simple ladder to access the loft.
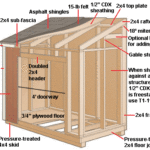
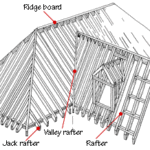
Building the Roof
Position a 2-by-10 ridge board and temporarily brace it in place. Attach 2-by-8 rafters to the ridge board and double top plate. Build and attach eave extensions at the front and back of the roof so they overhang the gable ends. Install the fascia, sub-fascia, and soffits. Cover the roof frame with 7/16-inch plywood sheathing and 15-pound roofing felt; install asphalt shingles and ridge caps.

Install 4-by-4 posts, 10 feet on center, directly over the posts on the first floor. Install double headers, attaching them to the posts and rafters, as shown in the header detail at right.

Frame the second-floor gable ends as you would a standard wall, including top bracing and collar ties, and leave rough openings for a door and two windows.
Finishing the Barn
Install board-and-batten siding to the framing, just as you did with the ground-floor walls.
Add 6-light barn sashes to the partitions between the stalls, as well as sliding doors to the stalls. Construct and install doors for both gable ends of the hayloft out of board-and-batten, and install two pairs of sliding doors to the gable ends on the ground floor. Install simple trim around all windows and doors, and, if desired, cover the interior walls with plywood.
![]()
![]()