Learn to install vertical vinyl siding in this expert guide. Includes steps for base trim strips, corner posts, J-channel, and vertical sliding panels.

The installation of vinyl siding that’s designed to be installed vertically on walls is handled a little differently than conventional horizontal siding at certain stages of the installation process. Please see the articles How to Install Vinyl or Aluminum Siding and How to Prepare Walls for Vinyl or Aluminum Siding before moving on to the information below.

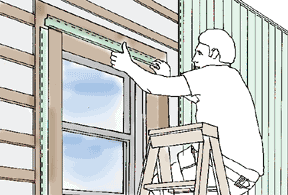
One significant difference during the wall preparation state is that, if you use furring strips instead of sheathing as a base, you install the furring strips horizontally across the wall as shown in the illustration here.
Installing Vertical Siding
Installing vertical siding, like horizontal siding, begins with the trim and then the corner posts. When all of those pieces have been installed, you move on to installing the panels.
Base Trim Strip
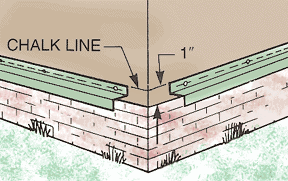
When installing vertical siding, you begin by running a special base trim strip along the base of the wall. The vertical siding panels sit on top of this strip. Run these strips as shown in the illustration, beginning at a corner. Hold them back 1 inch from every corner to allow for the corner posts.
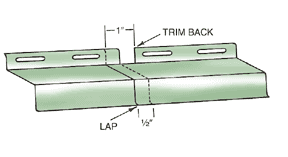
As you install these, you’ll need to overlap two lengths end-to-end. Cut succeeding strips so they will rest on the base trim and have 1/8 inch at the top for expansion, as shown.
Corner Posts
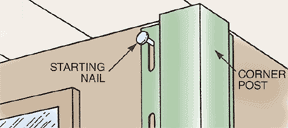
Install corner posts as described in the article, How to Install Vinyl Siding Starter & Trim Strips. Hang the corner posts from a starting nail, as shown here, check for plumb, using a level, and then nail them in place.
J-Channel
To receive the top end of the vertical siding panels, install a J-Channel or Under-sill Trim along the top edge of the wall. For more about the various types of trim pieces available, see Vinyl Siding Buying Guide.
Vertical Siding Panels
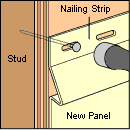
Working out from the starter, insert the top of each panel into the J-channel at the top of the wall and rest the other end against the base trim. Measure to find the mid-point of each wall, and draw a plumb line down the center using a straightedge as a guide. Center the starter panel on the line, cut it 1/8 inch short to allow for expansion, and nail every 8 inches into the top of the nailing slots.
Lock each panel into the previous one as you go, and then drive nails into the centers of the nailing slots every 8 to 16 inches as recommended by the manufacturer. For more about attachment, see How to Nail Vinyl & Aluminum Siding. Install panels around windows and doors.
As you approach a corner post, you will install a J- or U-panel or under-sill trim in the slot on the post, whichever is recommended by the manufacturer. Shim a J-panel about 5/16 inch to keep it on the same plane as the other channels. Uncut panel edges insert into the J-panel; cut edges insert between the J-panel and the outer flange of the post.