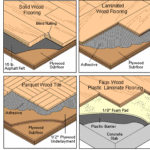
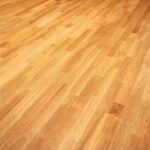
When dealing with a concrete slab base, proper preparation is imperative. Though do-it-yourselfers can install wood flooring on a concrete slab, this job is not for the novice. At issue is the fact that moisture is the enemy of wood—it causes warping, twisting, expansion, and contraction. Even if a concrete slab appears to be dry, groundwater can seep up through it and damage the flooring from underneath. To block moisture and provide a sound, flat base for flooring, a variety of tools and skills and a fairly high level of experience are required. Note that these instructions are for strip or plank flooring, not parquet.
Expert tips and techniques for installing new solid- or engineered hardwood flooring on a concrete slab, including preparation, using a plywood base, and sleepers
Solid-wood flooring should only be installed over an above-grade concrete slab. Engineered-wood flooring can be installed below grade. The slab should be at least 60 days old, dry, flat, have a trowel finish, and be free of high or low spots. Low spots can be filled with patching compounds and high spots can be ground down, but this is a difficult, dusty job—and you must wear an approved respirator to protect your lungs. The entire slab can also be flattened with self-leveling concrete; again, this is a job for professionals.

Professional installers use a moisture meter and other methods to test the body and the surface of the slab for excessive moisture. If you are concerned that your slab may contain excessive moisture, have it professionally tested.
Wood flooring does not go directly on the slab but rather is fastened to plywood or oriented-strand board (OSB) sheets that are secured either directly to the slab or to a base of 2-by-4 pressure-treated “sleepers.” The plywood-only method raises the floor level by the thickness of the plywood plus the wood flooring—a total of about 1½ inches. The sleeper-plus-plywood method adds another 1 1/2 inches, raising the floor level a total of about 3 inches. Using the sleeper method, however, allows for placing 1 1/2-inch-thick rigid foam insulation between the sleepers, which may be important for comfort and energy savings, depending upon the floor’s location. (For more about this, see Insulating a Concrete Slab Floor.)
Preparing Plywood-on-Slab for Hardwood
After sweeping the slab clean, brush on a coating of asphalt primer to serve as a bonding agent. Be sure to follow all label directions. Allow this to dry.
In regions where rainfall is moderate to heavy, use a fine-tooth trowel to apply cold, cut-back asphalt mastic over the entire slab (figure about 100 square feet per gallon). Allow this to dry for an hour. Where rainfall is light, you can leave out the mastic coating.
Roll out 6-mil polyethylene sheeting over the entire slab, extending it about 4 inches up the perimeter walls and overlapping the edges 6 inches. Walk all over it to flatten it to the floor and squeeze out any large air bubbles (if necessary, slice the air bubbles with a utility knife to release trapped air).
Next, cover the polyethylene with 4-by-8-foot-by-5/8-inch plywood (grade CD Exposure 1) or 3/4-inch OSB panels. Allow 3/4 inch of space at the walls and about 1/8 inch of space between panels. Stagger the end joints so they do not align. Where cutting a panel is necessary, measure for size, snap a chalk line across the panel, and then use a power circular saw with a plywood-cutting blade to cut it.
The best way to fasten down the panels is to use a powder-actuated fastener tool, which can be rented from an equipment rental firm. This is a gunlike tool that uses .22-Short, firearm-like cartridges to fire a naillike fastener. Be sure the tool rental company trains and tests you for safe usage, and follow all safety precautions, including wearing ear protection and safety glasses. Other fasteners you can use include pneumatic concrete nails, concrete screws, and similar concrete fasteners. (Do not use any type of naillike fastener if your slab contains radiant-floor-heating tubing. In this event, you will need to glue down the panels.)
Using the powder-actuated fasteners, secure the center of each panel first and then place fasteners 12 inches apart. Along panel edges, place one fastener every 6 to 8 inches, positioned about 2 inches from the edge.
During the flooring installation stage, layers of 15- or 30-pound asphalt felt will be applied over the subfloor panels as an additional vapor barrier.
Preparing Plywood & Sleepers for Hardwood
Using a combination of sleepers and plywood as a base for hardwood flooring raises the floor height significantly, potentially making the ceiling in that room too low or creating step-up problems at doorways and transitions to other rooms. (Most codes require the minimum ceiling height of a room to be 7 feet, 6 inches.)
For sleepers, choose flat, preservative-treated, kiln-dried 2 by 4s in lengths of about 48 inches.

HomeTips Pro Tip: Sometimes it can be difficult to find treated 2 by 4s that are not bowed, twisted, or warped. If this is the case, opt for kiln-dried Douglas fir, yellow pine, or other framing species if the slab is dry.
Prepare the slab floor as discussed in “Preparing Plywood-on-Slab for Hardwood” (above), but instead of rolling out polyethylene sheeting on the concrete slab, embed the 2-by-4 sleepers in thick lines of asphalt mastic.
Place the sleepers in mastic around the room’s perimeter, abutting their ends. Secure them to the slab with 2 1/4-inch powder-actuated fasteners or masonry nails. Using the same methods, place sleepers across the slab on 16-inch centers, perpendicular to the direction the finish flooring will run. Use a long, straight board and a carpenter’s level to check for any dips as you work, adding small cedar shims beneath the sleepers to adjust heights if necessary.
You can insulate the floor by cutting 1 1/2-inch-thick foam insulation to fit between the sleepers. Always measure and cut for a snug fit. Then cover the sleepers with 6-mil polyethylene sheeting, overlapping the edges by 6 inches and extending the material 4 inches up the perimeter walls.
Next, cover the sheeting and sleepers with 4-by-8-foot-by-5/8-inch plywood (grade CD Exposure 1) or 3/4-inch OSB panels, centering their long edges over the sleepers. Allow 3/4 inch of space at the walls and 1/8 inch between panels. Where cutting a panel is necessary, measure for size, snap a chalk line across the panel, and then use a power circular saw with a plywood-cutting blade to cut it.
Before installing wood flooring on the sleepers, add a layer of 15- or 30-pound asphalt felt over the subfloor panels as an additional vapor barrier.
For complete, step-by-step information on installation, next see How to Install Hardwood Floors.
Featured Resource: Find a Pre-Screened Local Wood Flooring Contractor



 Don Vandervort writes or edits every article at HomeTips. Don has:
