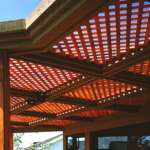
This article covers how to use erect posts to brace your patio roof. Includes construction examples with diagrams that apply to most patio roof projects.
Accurately measuring post heights is critical when building an overhead; you cannot achieve a stable, properly aligned substructure without precise post measurements.
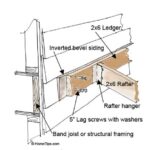
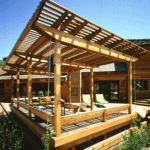
The construction examples discussed here are for attached overheads with beams and rafters; if your design is different, adjust the directions accordingly.


For a house-attached overhead, measure, cut, and erect the posts that are farthest from the house first. For a freestanding roof, begin with the corners, and then erect all of the intermediate posts.

Measuring posts for a freestanding roof differs in only one respect from measuring for a house-attached roof—with the attached roof, you’ve already defined the roof height at the ledger line.
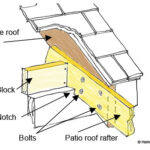
For a freestanding overhead, you will need to erect a post slightly taller than the desired height, mark the height on the post, and work from it as you would from a ledger. The minimum clearance for beams is normally 7 feet to prevent people from bumping their heads.

Some codes require that certain post-and-beam designs have cross-bracing for lateral stability during high winds or seismic events.
Unless they have a steel or engineered structure, post-and-beam assemblies, particularly those for freestanding patio roofs, may require bracing for lateral stability.

Roofs less than 12 feet high usually require bracing on the outside posts of the side not connected to the house.
The most common type of bracing, shown below right, is called Y bracing. Mark individual braces in position, and cut them on the ground. Nail them in place temporarily. Drill pilot holes for lag screws or bolts, and then permanently affix the braces.
Next, please see: