Grapes can be grown throughout most of the continental United States as well as southern Canada; there are even varieties that are grown in parts of Alaska and Hawaii. Table grapes are more popular for home gardens because they offer more versatility than wine grapes, and some can be used to produce a sweet wine.

An expert guide to growing, training, and pruning grapes. Includes help with care, fertilization, and various pruning techniques.
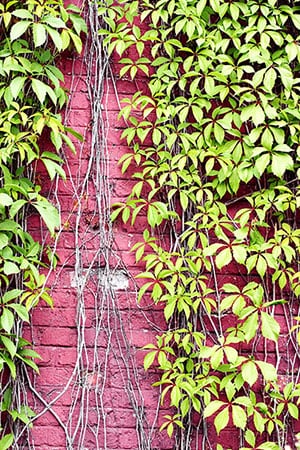
As landscape plants, grapes are winners. They are fast growing, with large, heart-shaped leaves; clusters of fruit in colors ranging from yellow to dark purple; and beautiful fall color. They can be trained along fences and paths, and over pergolas and arbors. Their fruit can be eaten fresh from the vine or turned into jams, jellies, raisins, juices, and wine.
Matching the variety to your growing conditions is key. American grapes are very disease-resistant and the best choice for cold-winter areas; the most well-known variety is Concord. European grapes, such as Thompson Seedless, grow in mild-winter areas of California and Arizona, though with winter protection they can be grown in more marginal areas. European grapes tend to be the table grapes you find in grocery stores as well as the grapes used for most commercial wine production. American hybrid grapes, such as Golden Muscat and Reliance, can be almost as hardy as their American grape parents, but their fruit is more like that of European grapes. Most all of these grapes are self-fertilizing.
In areas of the Deep South where temperatures stay above 10 degrees F., muscadine grapes such as Scuppernong are the best choice. Check if your variety is self-fertilizing, as many require a pollinator.
While the plant itself grows quickly, it takes several years before it produces a full crop, and many growers recommend not letting any grapes develop until the third summer after planting. In the meantime, you’ll be shaping the plant in both summer and winter to encourage a pleasing–and productive–final form. The good news is that grapes can last for decades, with many producing for well over a century.
How to Grow Grapes
The first rule for growing grapes is choosing the right location. All grapes like a sunny spot with rich, well-draining soil and good air circulation. Don’t crowd the plants. You don’t need flat terrain, but if you’re growing on a hillside, plant above the lowest-lying spots to help prevent both frost damage and mildew.
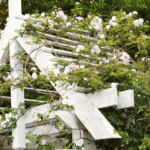
Grapes need a strong support system that can handle the heavy fruit. In vineyards, grapes are often grown on horizontal wires between posts, and this system also works well against a fence or along a path. Another good option is a rail fence. Grapes also grow well over an arbor or pergola. Whichever support you choose, put it in place before planting.
Buy and plant bare-root vines when they are dormant, during the winter in mild-winter areas and about three weeks before the last frost in colder areas. The planting holes should be deep enough so the plant will be set at the same depth it was grown at in the nursery (look for the soil mark on the trunk) and wide enough to allow you to spread out the roots.
For American and European grapes, space the holes about 8 to 10 feet apart. For muscadine grapes, the holes should be 12 to 15 feet apart. If you’re using an arbor or fence as a support, dig each hole about 1 1/2 feet away from the support. If you’re planting in rows, space the rows 10 to 12 feet apart for American and European varieties and 20 feet apart for muscadine varieties.
If the roots are dry, soak them for up to four hours before planting. Remove any damaged roots, and trim the remaining ones to approximately 6 inches long. Carefully set the plant in place and spread the roots out. If you’re planting against an arbor or fence, lean the plant at a 45-degree angle toward the support. Cover the plant with the soil you removed from the planting hole, and then cut the top growth back to just two or three buds. Water thoroughly.
How to Care for Grapes
Keep grapes watered regularly throughout the growing season; they usually need about 1 inch per week. If you don’t have rainy summers, drip irrigation or watering basins are ideal; grapes are prone to fungal diseases, which can be exacerbated by overhead watering.
Fertilize in spring, just as the buds swell, using a balanced fertilizer. For just-planted grapes, use only one-quarter the recommended amount. Increase the amount of fertilizer to one-half the recommended amount the second year and three-quarters the recommended amount the third year. From the fourth year on, use the recommended amount.
Grapes can be troubled by a number of pests, including aphids, grape leafhoppers, grape mealy bugs, and grape berry moths. Birds are also attracted to the crop. Fungal diseases, especially mildew, can be a problem, especially for European grapes.
The first line of defense is good gardening practices. Start by keeping the plants well watered and ensuring they have good air circulation. Keep the area weeded, as weeds can harbor damaging insects. Pick up and discard any fallen or diseased leaves. Clean up dropped leaves in the fall. Nets will keep birds from getting the fruit.
Aphids and leafhoppers may be controlled with beneficial insects, strong bursts of water, insecticidal soap, or biological controls. Use horticultural oil spray in late winter on mealy bugs. Control mildew by allowing good air circulation and keeping the leaves dry. Use neem for downy mildew; powdery mildew can be controlled with sulfur dust. For more serious problems, check with your local nursery or agricultural extension agent.
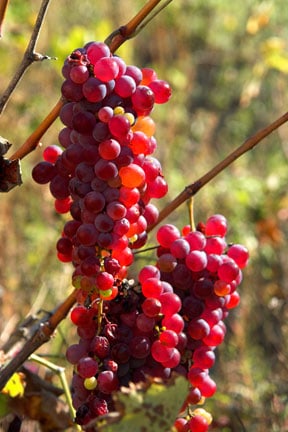
Harvest grapes when the fruit is fully colored and sweet. Cut the bunches of American, American hybrid, and European grapes from the vine. Shake muscadine grapes loose onto a cloth.
Training Grapes & Vines
To keep grapes under control and ensure the best harvest, you’ll need to spend time training the vines throughout their first three years and then follow up with yearly pruning over the rest of the plant’s life. While time-consuming, the results are worth it.
Along a wire or rail fence. Wire guides and fence rails provide a framework for shaping a grapevine’s growth as well as providing support. Start by letting the vine grow by itself throughout the first spring and summer. The first winter, choose the sturdiest vertical shoot as the trunk. Tie this to the support (you may need to add a temporary support if it can’t reach the permanent support). Cut this shoot back to three or four buds, and remove all other shoots.
In the second spring, let the buds grow out to between 6 and 8 inches long. Choose the strongest upright one as the trunk. If you’ll be growing the vine along a single wire or rail, cut off all the other shoots. If you’re growing the vine on a double wire or rail, choose two more shoots and tie them to the lower wire or rail.
In the second summer, once the trunk reaches the first or top horizontal support, cut the tip to encourage the vine to grow sideways. Choose the two strongest arms that develop, and remove the others. If shoots develop from these arms, remove them as well. If you have a lower wire or rail, tie the lower arms along the support. Pinch back any lateral shoots on those arms so they are about 10 inches long.
In the second winter, prune off all of the growth on both the trunk and the arms. In the third summer, let the vine grow, pruning any growth from the trunk. Tie the arms to the supports as needed.
In the third winter, begin pruning, using either spur pruning or cane pruning as described below.
If you’re growing on a support that has more than two horizontal supports, follow the general outline above, but choose shoots close to each arm to develop.
On an arbor or pergola. Left unchecked, a strong vine will grow up and over an arbor or pergola, but it won’t necessarily grow exactly where you want it to or produce great fruit. To be sure the vine grows where you want and the fruit production is optimal, you’ll need to train it after it’s planted. If you have room, consider growing several varieties of grapes, setting a different one at each post.
In the first spring and summer, let the plant grow without any training. In the first winter, choose the sturdiest vertical shoot as a trunk and tie it to the post. Cut it back to three or four buds, and remove the other shoots.
In the second spring, let the buds grow out to 6- to 8-inch-long shoots. Choose the strongest upright one as the trunk, and then remove all the other shoots. During the second summer, let the vine reach the top of the arbor or pergola and then bend it and tie it to the top in the direction you want it to grow. Remove any side shoots to encourage growth at the tip.
In the second winter, cut back the main stem to a point just past where you want the last set of branches to be. Remove all the side shoots.
In the third spring, thin the shoots as they grow so they are 1 foot apart. In the third winter, begin either spur pruning or cane pruning. See more about Vines.
Pruning Grapes
Pruning begins in the third winter and should be done every year during the dormant season, in winter or early spring. Pruning helps keep the amount of fruit in check and ensures that the fruit is of good quality.
Check with your nursery or a garden guide to determine if your variety should be spur-pruned or cane-pruned. Spur pruning is generally used for muscadine and European grapes, while cane pruning is more commonly used for American grapes and some European grapes. Some varieties can be pruned either way.
Spur pruning. In the third winter, begin by removing the weak side shoots, or spurs. Leave the strongest ones in place, keeping them between 6 and 10 inches apart. Cut them back to two buds per spur. Each following winter, cut the upper shoot of each spur back to two buds and remove the lower shoot.
If you’re training the vine onto an arbor, cut back the shoots selected in the third spring to two buds during the third winter. Then follow the guidelines above.
Cane pruning. In the third winter, choose one strong lateral shoot near the trunk on each arm. Cut that shoot back to two buds; this will be the renewal spur. Then choose another strong lateral shoot near the trunk, cut it back to 12 buds, and tie it to the wire or support. This will produce the fruiting canes. Remove all other shoots. The next winter, remove all of the previous year’s fruiting canes. From the renewal canes, choose the two strongest shoots. Cut each back to 12 buds and tie them to the wires. Choose the two next-strongest shoots and cut them back to two buds; these will be the renewal spurs. Remove all other shoots. Repeat this process each year.
If you’re growing the vine on an arbor, cut back the branches on either side of the trunk to long canes with 12 buds and spurs with two buds. Then follow the guidelines above.