Expert advice about how to apply wallpaper around corners and obstacles. Covers wallpapering outside and inside corners, archways, outlets and windows.

Wallpapering into and around corners requires special techniques and particular attention to detail because most walls are not plumb.
You can’t just push paper into an inside corner and then continue pasting it onto the intersecting wall as this will more than likely result in a misaligned and wrinkled mess. Instead, cut the strip where the two walls meet and hang the resulting two strips individually.
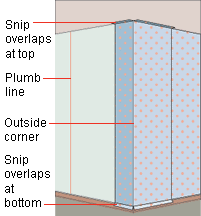
For outside corners, you can paper around them and then use either of two methods as detailed below to hang the second strip, depending on how plumb the intersecting walls are. (For a strip that ends at an outside corner, trim off 1/8 to 1/4 inch of the corner edge to prevent it from fraying).
Covering Outside Corners
1 Measure for the second strip
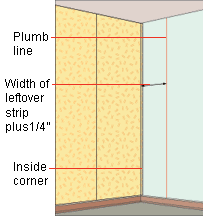
After papering around the corner, draw a plumb line on the second wall a strip’s width plus 1/2 inch from the end of the corner strip. Measure the space between the end of the corner strip and the plumb line in three different places.
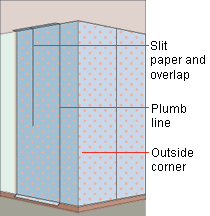
2 Set the second strip
If the distance to the plumb line is larger at the top of the wall, slit the second strip from the middle to the bottom. If the distance is longer at the bottom, slit the strip from the middle to the top. Overlap the paper so that the uncut edge will be plumb and then double-cut the overlap.
Cover Inside Corners
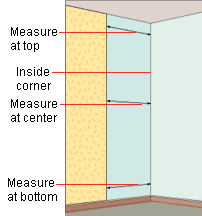
1 Measure for the first corner strip
Measure from the last strip to the corner in three different places. The first corner strip should be cut to the largest length plus 1/4 inch. Put aside the resulting strip.
2 Set the first strip
Butt the first corner strip to the preceding one and push it firmly into the corner.
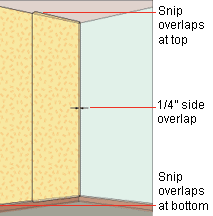
3 Measure for the second strip
Measure the width of the saved strip and then draw a plumb line on the intersecting wall that width plus 1/4 inch away from the corner. Place the leftover strip next to the plumb line and allow the corner edge to overlap the first strip. Apply a non-porous vinyl-to-vinyl paste to the overlap. Don’t worry about slight imperfections in the alignment of the pattern since such minor flaws generally go unnoticed in corners.
Wallpapering Archways
Wallpapering around an archway uses some of the same techniques as covering a solid wall.
Hanging Archway Strips
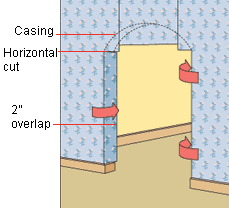
Hang two strips of paper that are as tall as the archway and as wide as the jamb; make a horizontal cut from the inside edge to within an inch of the wall. Wrap the paper along the edge of the arch and down the jamb, smoothing out any wrinkles and bubbles as you go.
Trimming & Matching
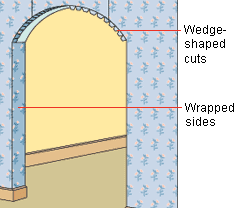
Trim the paper on the archway with utility shears to within an inch of the edge. Cut small wedge shapes that extend 1/4 inch from the edge. Calculate half the length of the arch, and then cut two strips to that length (plus a quarter inch) and to a width that is 1/4 inch narrower than the jamb. Apply the paper from the top down, and double-cut the seam.
Hanging paper around openings such as windows, outlets, and fixtures is similar to hanging paper on solid walls and uses many of the same techniques.
Papering Around Windows & Obstacles
1 Fit the paper
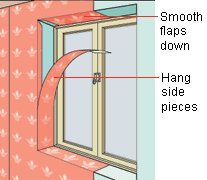
After you hang the paper around the window opening, trim it to about 2 inches longer than the width of the recessed area. Cut diagonal slits into the corners.


2 Apply matched side pieces
Smooth all the flaps down and then paste matching strips into each side, cutting each piece to about 1/4 inch narrower than the space.
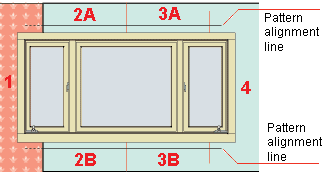
Papering Around Large Windows
Mark a horizontal line above and below the window, using a carpenter’s level aligned with a design element in the strip you’re starting with (marked “1” on the diagram). Hang strips according to the diagram, following the sequence 2A, 2B, 3A, 3B, and finally 4. You may need to make adjustments to strip 4 to match the surrounding pattern.
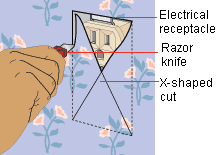
Papering Around Outlets
Shut off the power to any outlet you’ll be papering over, and remove the faceplate. Paper over the space as if it were a solid wall. Then, use a utility knife to slice the paper from corner to corner. Trim the extra off and then fold the edges in. Replace the faceplate.
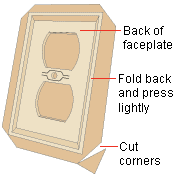
Papering a Faceplate
Paper over each faceplate before placing the faceplates back on walls. Sand and prime the front and measure a piece of wallpaper that is 1 inch longer on all four sides. Apply vinyl-to-vinyl paste to both the faceplace and the paper. Hold the faceplate up to the outlet and attach the wallpaper so that it matches the pattern. With the faceplace paper side down on a table, trim the border down to 1/2 inch and cut off the corners. Fold the paper around the plate and smooth the edges into the back. Use a utility knife to cut out the openings for the electrical plug and then replace the faceplate.
Papering Around a Fixture
1 Slice the wallpaper
After turning off the electricity, removing the fixture, and covering it loosely with paper, slice the wallpaper from the ceiling line, baseboard, or corner, whichever is closer, to the opening.
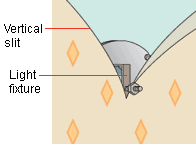
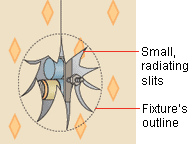
2 Cut slits
Cut a series of slits from the fixture’s center to its outer edges until you can smooth down the paper around it.
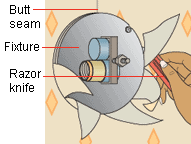
3 Finish up
Crease the edges of the slits against the wall tightly, and then trim them with a razor or utility knife.
Wallpapering Around a Thermostat
To paper around a thermostat, hang the strip from the ceiling line as you would for any wall.
When you reach the thermostat, smooth the paper down as close to it as you can without tacking it onto the thermostat as shown at left.
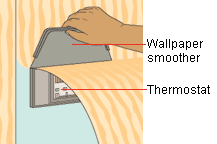
Make an X-shaped cut over the thermostat large enough for the paper around it to lie flat, but not so large that the paper will show cut marks. Trim the excess, and then smooth the paper.
![]()
![]()