How to install door weather stripping to stop drafts and energy loss, sealing the gaps around your home’s exterior doors. Expert step-by-step advice for installing door weather stripping, door sweeps, and door shoes.

The products used to seal between a door and its jambs and top are the same as those used for sealing windows. For in-depth information about the various types of materials used for weatherstripping, see Weather Stripping Doors & Windows.
The most effective and least visible types for these areas are spring-metal and cushion-vinyl strips and adhesive-backed foam. Foam is not as durable as strips, but it is a breeze to install and the least visible when the door is open.
Sealing the bottom of a door is another story. Sealing that gap requires a special type of weatherstripping or a combination of materials. The most common materials are a threshold, a door shoe, and a door sweep.
This video, produced to educate weatherstripping installers, shows the basics of how to install door weatherstripping. It includes information on cutting and installing a door sweep.
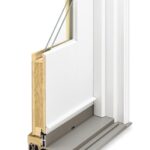
A threshold is a wood or metal strip that is fastened to the floor beneath the door. It typically finishes off the flooring material at the door and provides a slightly raised, flat surface directly under the door.
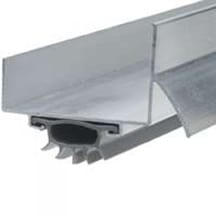
One type, a metal threshold that has a raised rubber gasket, is designed to seal against the bottom edge of the door.
Another type mates with a door shoe, which is a flexible gasket that is fastened to the door’s bottom edge to create the seal.
For information on repairing or replacing a threshold, see Repair an Entry Door Threshold.
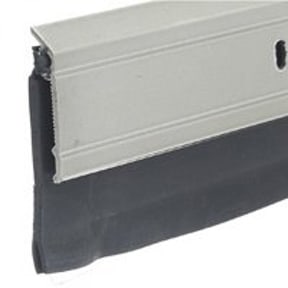
A door sweep is like a gasket that is fastened along the door’s bottom face. It is made of a soft material such as felt or rubber and presses tightly against the threshold or floor when the door is closed. See more about these below.
Door weatherstripping works best when the door is mounted uniformly in its jambs. If your door is out of alignment, consider adjusting it before installing weatherstripping. For more about adjusting a misaligned door, see How to Fix an Interior Door.
Weatherstripping Door Jambs
If air is leaking around the perimeter of a door, simply replace the weather stripping (if there is any) and add a door show or sweep, as discussed below.
Compression weather stripping is the most common type. Steel doors may utilize magnetic weather stripping.


Most types of weatherstripping—and a door sweep—can be installed without removing the door. For some types—and with a door shoe—it’s easiest to remove the door, so plan to do this on a warm day.
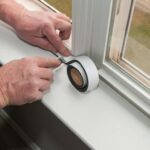
1 Pull off the old door weather stripping. If it’s the type that fits into a groove in the jamb, don’t attempt to pull out the brads that hold it in place. Instead, shear them off or drive them into the groove with an old chisel.
2 Cut a short cushion-vinyl or spring-metal weather stripping, sized to fit against the door stop, behind the latch area. The illustration shows cushion-vinyl weather stripping, but spring-metal (also called spring-bronze) works the same way.
3 If necessary, bend or trim this so that it doesn’t intrude on the latch mechanism. Attach it with 1-inch brads.
4 Measure and cut lengths of door weather stripping to fit along the latch side of the doorway, and then measure and cut weather stripping for the top of the jamb and the hinge-side jamb. Fasten with 1-inch brads.
Installing a Door Shoe
Installing a door shoe is an effective means of cutting down on drafts and saving energy. Both door shoes and door sweeps are designed to seal the gap at the bottom of a door.
Although sweeps are very easy to attach, door shoes take a little more effort because you must remove the door to install them. They seal very effectively because they’re designed to work in combination with the threshold.
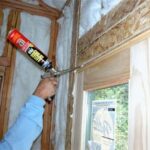
In most cases, you must trim the bottom of the door to allow for the extra thickness of the door shoe. This can be tricky. If you?re not careful, you can scratch your door or—worse—ruin it with a poor cut. If in doubt about your ability to do this well, hire a finish carpenter.
1 Start by opening the door and setting the shoe in place on the threshold. Almost close the door so that it presses against the shoe, and mark the shoe’s position on the door at each end. Mark the shoe’s position on the door so you will know where to trim.
If you’re a little worried about the precision of your measurements, err to the waste side—you can always cut a little more wood off, but you can’t add it once it’s gone.
2 With a helper, tap out the hinge pins and remove the door from the hinge leaves. Lay the door across a pair of sawhorses or a large bench or table, marked side up. Using a pencil and a straightedge, draw a line to connect the corner marks that indicate where the door must be cut.
3 Use a circular saw equipped with a sharp crosscut blade to do the cutting. It’s a good idea to scribe along your cutting line with a utility knife to minimize any chipping or splintering of the surface. To ensure a straight cut, clamp a straightedge to the door to guide the base plate of your circular saw.
4 Slip the door shoe onto the door’s bottom edge and attach it with screws, per the package directions. Hang the door back onto its hinge leaves, and replace the hinge pins.
5 Check the seal and operation of the door and make any needed adjustments.
Installing a Door Sweep
Installing a new door sweep is a quick and easy way to cut down on drafts and energy loss that occur when air flows under the bottom of a door.
1 Leaving the door mounted on its hinges, simply measure the door’s width and cut a sweep to this length. To do the cutting, you typically use a pair of tin snips or shears—but follow the directions on the package.
2 Screw the sweep along the base of the door where it presses down against the threshold in the door-closed position but clears the floor when you swing the door open.
3 Test the sweep to make sure it seals the gap but moves freely, and adjust if necessary.