This in-depth DIY guide covers how to repair a lamp or light fixture. Includes how lamps work, switch repairs, lamp dimmers, and much more.

Most problems with lamps and light fixtures occur when power is interrupted to the light fixture or when the lightbulb or its socket is defective.
Before working on the electrical components of a lamp, unplug the lamp!
How a Lamp Works
Regardless of how sophisticated or elaborate the design, most lamps have the same basic wiring and construction.
A typical lamp includes a shade that sits on a frame called a harp. A socket holds the light bulb, or several sockets may hold several bulbs, and a cord runs through a hollow channel, called a stem, inside the body of the lamp.

If a table or floor lamp doesn’t work, do the obvious: Put in a new working bulb. If it still doesn’t light, check the circuit breaker or fuse that serves the lamp’s outlet.
If the circuit is working, you may need to replace the cord, lamp socket, or plug. For complete coverage on replacing lamp cord, please see How to Replace Electrical Cords and Plugs.
Be sure to replace cords and sockets with parts that are identical to the originals.
If you’re not comfortable working with electrical wiring, voltage testers, and the like, try a few simple procedures detailed in the articles listed below, but, if those don’t solve the problem, take the fixture to a lighting repair shop.
Lamp Switch Repairs
The most common problems with lamp switches are that they cease to work or, worse, give off sparks when you flip them off and on. If the switch gives off sparks, it should be replaced.
If a switch doesn’t work at all, first make sure the problem is with the switch and not the light or device it’s intended to turn on and off. This is easy to do. Just replace the bulb with a working lightbulb or plug a working appliance or lamp into the switch-controlled receptacle and try the switch again.
How to Install a Lamp Dimmer
Would you like to be able to adjust the illumination of a table or floor lamp? This article will help you understand how to install a dimmer switch either in the socket or on the cord of a portable lamp. If you want to install a dimmer on built-in lighting, please see How to Install a Dimmer Switch.
Lamp dimmers, sold online and in hardware stores, come in a few different varieties. They are intended for controlling different types of lamps, from incandescent to compact fluorescent (CFL) to LED, so it’s important to pay attention to the specifications. These are the main types of lamp dimmers:

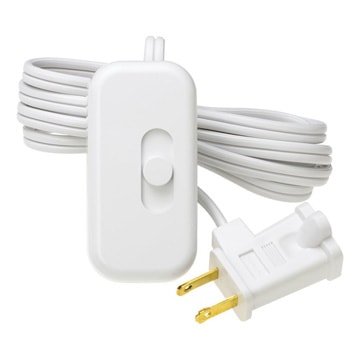
• Plug-in table or floor lamp dimmers allow you to simply plug your lamp into the device, plug the device into the wall, and dim the lamp from the device.
• In-line lamp cord dimmers, which can be attached to a lamp cord, are the least expensive type—they mount directly on the cord.
• Lamp-base dimmers screw directly into a lamp’s socket. Some are controlled just by touching them.
Installing a Lamp Cord Dimmer
You can buy a lamp cord dimmer online or at a hardware store or lighting shop. Here are directions for wiring a cord dimmer:
1 After making sure your lamp is unplugged, use a utility knife to separate the two wires in your lamp’s cord.
2 Determine which wire is neutral and which one is hot. This isn’t always easy to discern but, in many cases, the hot wire has smooth insulation, and the neutral wire is ribbed. Slice through the hot wire where you wish to install the dimmer.

3 Use wire strippers to strip about 1 inch of insulation from both ends of the cut hot wire.
4 Unscrew and remove the cover of the dimmer switch. Place the neutral wire along the inside of the switch box, as specified by the manufacturer. Put the cut ends of the hot wire under the two terminal clamps, and fasten them in place by turning the screws.
5 Screw the dimmer switch’s cover back into place. Plug the lamp in, and check to make sure the new switch works.
How to Test a Light Socket
If you’ve established that the light bulb hasn’t burned out and that the outlet is receiving power, how do you figure out whether the problem is with the socket or the plug?
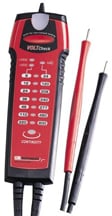
A continuity tester makes checking a light socket easy.
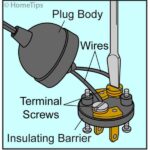
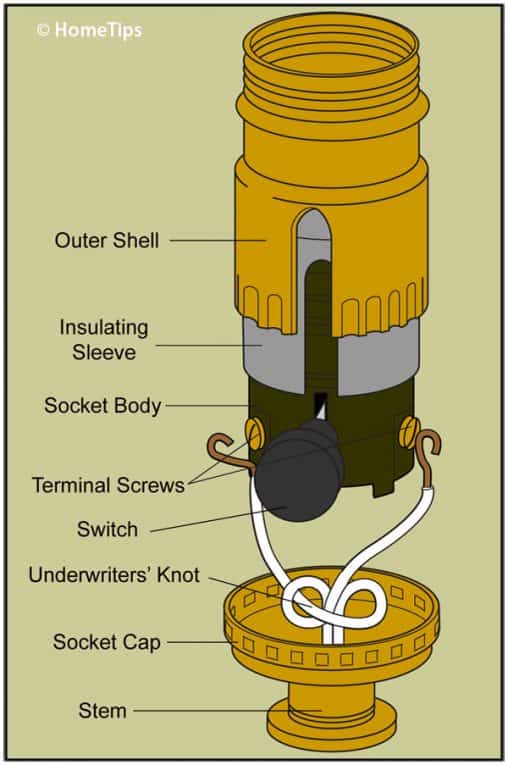
You’ll need a continuity tester, and you’ll need to remove the socket from the lamp frame. Unplug the lamp and remove the shade, the light bulb, and the harp (or frame) that supports the shade. Squeeze the socket’s outer shell at the base and gently work it off. Then slip off the insulating sleeve.
Clip the continuity tester wire to one plug blade and touch the probe to the silver screw on the socket. Then touch it to the brass screw. Clip the wire to the other plug blade and touch the probe to the silver screw on the socket. Then touch it to the brass screw. The tester should light with at least one combination in either case. If not, the cord is your problem and you’ll need to replace it.
To test the socket, clip the tester wire to the threaded collar and touch the probe to the brass screw. Turn or click the lamp’s on/off switch. The tester should also go on and off. If not, the socket is your problem, and you’ll need to replace it.
A continuity tester is very helpful for checking to see whether an electrical circuit is complete or broken. You can buy one for under $10 at hardware stores and home centers. Battery-powered, it’s made like a small flashlight with two probes. Complete instructions are included on the package.
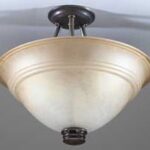
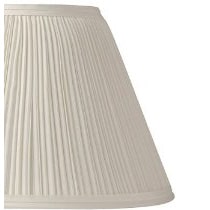
How to Clean a Lamp Shade
Lampshades collect dirt and dust over time, but cleaning them can be tricky because some types of shade fabrics or materials are easily smudged or stained.
The following instructions can help you with common types of lampshades. Please note: If you have particularly delicate or valuable lampshades or if you are at all concerned about whether the following methods are appropriate for your shade, consult a drycleaner.
First use a vacuum brush or soft, dry cloth to wipe or brush off the inside and outside of the lampshade.
You will need:
• A sink, tub, or basin deep enough to fully submerge the lamp shade
• Laundry detergent or dishwashing liquid
• A soft brush or cloth
• Rubber or latex gloves
Remove all non-washable trim from the lampshade. Fill a sink, bathtub, or basin with warm water. Add laundry detergent or dish soap.
Cleaning a Fabric Shade
Soak the lamp shade in the soapy water and use some suds on a cloth or soft brush to lightly rub out any particularly soiled spots. Swish the shade around in the water, dipping it up and down.
When the water gets too dirty, empty it out and refill the basin with clean, soapy water. Continue the process until the water stays relatively clear.
The fabric shade may seem to stretch and sag when wet. Most types of fabric will stretch back to their original shape when dry.
Air-dry the shade, hanging it from a string over the bathtub or outdoors. If you have removed the fabric from the frame, put the fabric back on the frame before the fabric is fully dry. Then reattach the shade to the lamp and turn on the lamp to heat up the shade, which will speed up the drying/reforming process. If the shade is ruffled or ridged, press out the ruffles with your fingers to accentuate their shape.
Cleaning Other Types of Shades
For these types of shades, the trick is not to get them too wet. Use only 1/4 cup of clean, warm water in a bowl, mixed with mild detergent. Using a whisk or egg beater, whip the detergent to create “dry” soapsuds with the consistency of whipped cream.
Take a dry cloth or sponge and apply a bit of these dry suds to wash the inside and outside of the shade, small sections at a time. If parts of the shade, such as the binding, are glued together, make sure not to get these areas too wet or rub them too hard as this could cause the glue to loosen. Rinse the suds off of the surface with a clean damp sponge or cloth, and wipe dry.
Using either of these methods, remember to clean the metallic reflector bowl before you replace the lampshade. When doing this, use only non-abrasive cleaners on a soft cloth to prevent scratching the shiny surface.
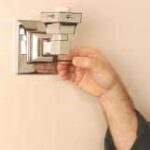
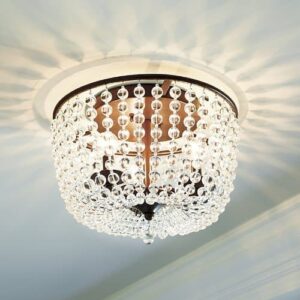
How to Clean a Chandelier
Chandelier lights can be beautiful, but because they have so many facets and surfaces, they can quickly accumulate dust and dirt, making their otherwise sparkling appearance dirty and dull.
Though cleaning a chandelier may appear to be an overwhelming task, it’s actually relatively easy. Here’s how we recommend you do it.
You will need:
* Two basins, deep trays, dishpans, or a double-bowl sink
* Detergent or dishwashing soap
* Rubber or latex gloves
* Two towels and two washcloths or dishrags
* Ammonia or glass-cleaning solution
To clean the chandelier:
1 Unplug the fixture at the wall or ceiling or turn off the light’s circuit at the main circuit breaker (be sure to try the light switch to make sure the power is off). Remove all light bulbs and set them aside on a soft surface.
2 Fold a towel and lay it in a sink, deep tray, or dishpan to keep fine glass from breaking. Fill it a few inches deep with warm water and detergent or dish soap mixed to a sudsy consistency.
3 Pad a second large pan, deep tray, or basin with a towel and fill it with clean hot water mixed with 1/4 cup ammonia (for extra sparkle).
4 Remove a few crystal drops and saucers from the chandelier. Don’t remove too many at a time or else you may forget their order when reassembling them. Soak a cloth in the sudsy water, wring it out, and wipe down the fixture’s frame and arms.
5 Put the removed crystal pieces in the sudsy water basin, swish them around carefully, and wipe down their edges if particularly soiled. Rinse the pieces in the hot ammonia-and-water mixture and wipe dry with a clean cloth.
6 Put each cleaned and dried piece back in its original place on the fixture. If you see any pieces or wire fittings that are bent, worn, or rusty, replace them with new ones. Continue removing and cleaning the crystal parts—and wiping down the metal body and arms—moving in small sections around the body of the chandelier until all parts are clean.
7 Wipe down the bulbs with a wrung-out, soapy cloth. Make sure to wipe them dry (especially their metal bases) and then put them back into their sockets. When you’ve finished cleaning all the parts, plug-in the fixture or turn the circuit back on and watch it sparkle!

")