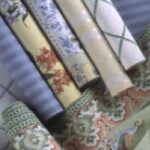
As wallpaper ages, it can tear, its edges can work loose, and bubbles may appear beneath it. In many cases repair is possible, but in other cases the only solution is to patch or replace the damaged wallpaper. For this reason, after a new installation, always save some for repairs.

How to Patch Wallpaper
Fixing Wallpaper Bubbles
Reseating Wallpaper Seams
Tears and loose edges are part of normal household wear and tear. A simple tear can be re-glued to be almost unnoticeable. Seams that have lifted also can be re-glued. Wallcovering stores sell mending kits that include contact cement and wood rollers to press the repair back down.
To reglue loose edges, moisten the area and lift the wallpaper away from the wall. Apply a thin layer of adhesive to the back of the loose paper, press it back into place, roll it, and then sponge off any extra adhesive.
Where repair is not possible—as in the case of a damaged section or a section that has become dirtier than you can tolerate (most contemporary wallpaper is washable, but older papers may not be; to test if your wallpaper is, sponge down a small section in an inconspicuous area with a mild detergent in water)—the only solution is to patch or replace the damaged or offending section of wallpaper.
In addition to contact cement and wood rollers, mending kits include small pieces of various color papers to match (more or less) most walls. If you had the presence of mind to have saved some pieces from the installation, use one of those.
How to Patch Wallpaper
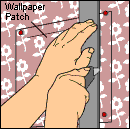
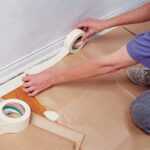
To make a patch, cut a square larger than the existing area to be patched and align the pattern. Use masking tape or tacks to attach the patch to the wall. Cut through the patch and the wallpaper with a utility knife and straightedge as shown at left. Put the patch aside and dampen the wallpaper with a wet sponge. It should peel right off.
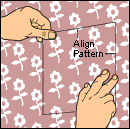
Clean the wall and let it dry. Spread a thin layer of adhesive to the back of the patch and carefully put it in place on the wall as shown at right. Use a seam roller to smooth it gently and affix it firmly in place. Quickly wipe away any adhesive that spreads onto the surrounding wallpaper.
Fixing Wallpaper Bubbles
Bubbles in wallpaper may be an indication that whoever applied it did not use enough glue in certain places or failed to use a roller to press the paper firmly to the wall. Bubbles may also be an indication of moisture problems in the wall—make a close inspection to determine if this is the case and then take the necessary remedial steps.
To repair bubbles, moisten the area with a clean, damp cloth. Using a utility knife or sharp razor blade, slit the bubble. Avoid making a straight cut—a V-shaped slit or one that follows the wallpaper’s pattern will conceal the cut and make gluing easier. With a narrow putty knife, force glue through the slit. Use a damp sponge to spread the glue so it completely fills the area beneath the bubble; press the wallpaper smoothly to the wall and roll.
Or, you can use a syringe-like glue injector, available at home centers, to inject wallpaper adhesive into the bubble’s center. Use a roller to work the adhesive throughout the bubble, and squeeze the excess back out through the hole. Wipe away the excess with a damp sponge.
Reseating Wallpaper Seams
Reseating a peeling wallpaper seam is a very simple DIY task, and the results can dramatically increase the appearance of your walls. Here’s how to do it in just a couple minutes:
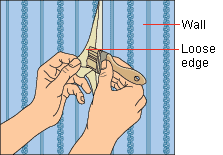
1Apply new adhesive
Moisten the peeling or damaged portion of the seam. Then carefully lift up the loose section of wallpaper and, using a small brush, apply a thin, even coating of wallpaper glue or adhesive to the underside of the piece you wish to reattach.
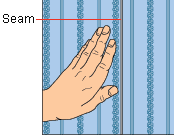
2Reseat the wallpaper seam
Press the piece of wallpaper back into place. Clean off any areas of excess adhesive with a sponge or damp cloth. Make sure not to soak the wallpaper too much or you run the risk of loosening the adhesive you’ve just applied. Let the wallpaper dry and you’re done!