Would you like to do your own garage door opener installation?

A professional will install a garage door opener on your door for a fee. But this job, like installing the door itself, is one that you may be able to handle if you’re an experienced do-it-yourselfer.
Several types of garage door openers are sold today. Each has an electric motor driving a lifting device—a chain or belt, for example—that is fastened to the door.
The most common type of opener has its motor mounted over the area where the car is parked.
For information on how to install this type, please see the following clear, helpful video. This shows how to install a particular model of Chamberlain garage door opener.
Torsion spring openers are also available—though far less common. This type is meant for a door that weighs no more than 225 pounds.
Pluses are that a torsion spring opener is somewhat easy to install than other types and is located out of the way.
In addition, because it doesn’t employ a chain, a torsion spring garage door opener is relatively quiet and vibration-free.
Other models of this type of garage door opener are made for use with other garage door spring systems.
All manufacturers offer a variety of optional accessories, including remote controls, keyless entry pads, and keyed switches.
And, of course, all openers come with manufacturer’s directions.
For information on Wi-Fi enabled garage door openers that work from an app on your smartphone, see How to Make Your Garage Smarter.
Regardless of the type you choose, follow the accompanying instructions exactly.
Step-by-Step Garage Door Opener Installation
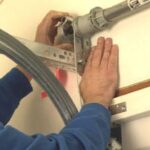
1 This opener is designed to fit onto a torque tube spring system; refer to the manufacturer’s directions for other types of springs. If the torque tube has already been installed, remove it and slip the drive motor onto it.


2 With the drive motor in place, reinstall the torque tube, end bracket, and cable drum.
3 Using 1/4-by-2-inch-long lag screws, fasten the mounting bracket for the drive motor to the wall above the garage door. Make sure the lag screws amply penetrate the beam or any other framing members located above the door.
Attach the disconnect cable to the motor with an S hook, and thread it through the wall bracket and the handle. Pull it just enough to remove the slack, and secure the bracket to the wall at least 6 feet above the floor. Put a label on the wall to identify this emergency disconnect device.

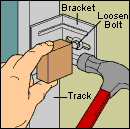
4 To keep the door from lifting, clamp locking pliers on both side tracks just above the third roller. Use a socket wrench to rotate the winding bolt head the number of turns specified in the owner’s manual for your door.

5 Set the emergency disconnect in the manual position and raise the door until it is fully open. Then lower the door until it is fully closed to be sure it moves freely. Attach the stop bracket to the drive motor.

6 Securely plug the female end of the power cord into the opener. Then run the cord to the nearest grounded receptacle and plug it in. If the cord is not long enough to reach a receptacle, use an approved cord extender.

7 Mount the remote control. Install the battery provided and replace the touch pad. Finally, test the door. Place a 2 by 4 flat on the ground under the door to make sure it stops and reverses automatically when it encounters an obstacle.

![]()
![]()