Learn how to install a whole house fan for natural cooling and energy savings. This step-by-step DIY guide covers location, tools, attic preparation, cutting the hole, and safe electrical connections.

Installing a whole house fan is a great, energy-efficient way to significantly cool your home by pulling cooler, fresh outdoor air in through open windows and exhausting it outdoors through the attic. This creates a refreshing whole-house breeze, offering a fantastic alternative to air conditioning, especially during milder parts of the year when the outdoor temperature is lower than indoors.

Installing a whole house fan requires careful planning, some attic work, and electrical connections. While many homeowners with intermediate DIY experience can tackle this project, you must prioritize safety and follow the manufacturer’s instructions meticulously when doing this work yourself.
Following are the steps involved in installing a whole house fan. Always refer to the specific installation instructions provided by the manufacturer of your whole house fan, as designs, wiring requirements, and installation methods can vary significantly between different models. The manufacturer’s instructions should be the primary guide for your specific unit.
1. Choose the Location
Select a central location in your house, preferably in a hallway or near the attic access, for optimal airflow throughout your home. Consider areas with the highest ceilings to maximize the “stack effect,” where warm air that rises is effectively exhausted. Also, consider the noise level in the rooms below and avoid placing the fan directly above bedrooms if possible.
In the attic where you plan to install it, be sure there are no obstructions such as ductwork, structural beams, or wiring that would interfere with the fan unit and its associated vent box or shutter assembly.
Measure the joist spacing in your ceiling to make sure the fan unit you choose will fit between the joists without requiring significant structural modifications.
2. Buy a Whole House Fan
You will need a whole house fan unit sized appropriately for your home’s square footage, climate, and desired air exchange rate (refer to sizing guides from the manufacturer).
The following table outlines whole house fan sizes suitable for various common home square footage sizes. Please note that these are general recommendations, and factors like ceiling height, climate, and the desired number of air changes per hour (ACH) can influence the ideal fan size. It’s always best to consult the manufacturer’s sizing guide for the specific fan you are considering.
| Home Square Footage (sq ft) | Recommended Airflow (CFM) – Moderate Cooling (2 CFM/sq ft) | Recommended Airflow (CFM) – Better Cooling (2.5 CFM/sq ft) | Recommended Airflow (CFM) – Best Cooling (3 CFM/sq ft) | Example Fan Sizes (Approximate CFM Ranges) |
|---|---|---|---|---|
| 1000 – 1500 | 2000 – 3000 | 2500 – 3750 | 3000 – 4500 | 2000 – 3500 |
| 1500 – 2000 | 3000 – 4000 | 3750 – 5000 | 4500 – 6000 | 3500 – 5000 |
| 2000 – 2500 | 4000 – 5000 | 5000 – 6250 | 6000 – 7500 | 5000 – 7000 |
| 2500 – 3000 | 5000 – 6000 | 6250 – 7500 | 7500 – 9000 | 6000 – 8000 |
| 3000 – 3500 | 6000 – 7000 | 7500 – 8750 | 9000 – 10500 | 7000 – 9000+ |
Important Considerations:
- CFM (Cubic feet per minute): This measures the volume of air the fan can move per minute. Higher CFM generally means faster air exchange and more noticeable cooling.
- Air changes per hour (ACH): Some guides recommend sizing based on achieving a certain number of air changes per hour (for example, 4-8 ACH). To calculate this, you’d need your home’s cubic footage (square footage x ceiling height).
- Climate: In hotter climates or areas with less nighttime cooling, you might want to lean towards the “Better” or “Best” cooling recommendations.
- Ceiling height: Homes with higher ceilings will have a larger cubic footage and may benefit from a fan with a slightly higher CFM rating.
- Attic venting: Ensure your attic has adequate venting to allow the hot air to escape effectively. Insufficient venting can reduce the fan’s performance and potentially damage your roof. A general guideline is 1 square foot of net free vent area (NFVA) for every 750 CFM of fan capacity.
This table provides general guidance. Always consult the specific sizing recommendations from the whole house fan manufacturer you choose and consider consulting with an HVAC professional for personalized advice, especially for larger homes or complex installations.
3. Gather Tools and Materials
Necessary tools include:
- Work light or headlamp
- Power drill with various drill bits (including a pilot bit and one sized for the mounting screws)
- Screws (usually provided with the fan unit, but have extras on hand)
- Measuring tape
- Drywall saw or reciprocating saw with a drywall-cutting blade (if cutting into the ceiling is required)
- Level
- Safety glasses, dust mask, and work gloves
- Stud finder (to locate ceiling joists)
- Sturdy ladder for safely accessing the attic
- Appropriate gauge electrical wire (matching your home’s wiring)
- Wire strippers
- Wire connectors (wire nuts)
- Electrical tape
- Non-contact voltage tester to be sure power is safely off
- Depending on your installation, you might also need caulk or foam sealant to seal air gaps
4. Prepare the Attic
Never step between the floor joists—your foot will go right through the ceiling below and you can be seriously injured! Consider laying down plywood boards or other stable materials to create a safe and even working surface if the attic floor only consists of joists.
The attic must be easily and safely accessible. Clear the fan’s future location of any debris, loose insulation, stored items, or other obstructions—when you cut the hole through the ceiling below, anything in that area will drop to the room below. You’ll need enough clear, level space to safely work, move the often bulky fan unit, and accommodate its dimensions and the required clearance for the vent box or motorized louvers to open and close fully without interference.
Good lighting in the attic, such as a portable work light or a headlamp, is absolutely essential for safety.
5. Cut the Hole
Using the fan manufacturer’s template, carefully mark the precise outline of the opening on your ceiling where the fan will be installed. Double-check your measurements several times to be absolutely sure the hole is the correct size, in the right place, and will avoid any joists. Do not cut joists—this will compromise your home’s structure. Cutting joists and reinforcing the structure must be done by a licensed contractor.
If possible, plan to cut the hole from the attic, not from below, to avoid having debris rain down on you as you cut. Drive a nail up through the ceiling at the corners of your cutout area and transfer your cutout markings to the attic.
Before cutting, make sure there are no hidden electrical wires, plumbing pipes, or HVAC ducts that you could accidentally damage.
Wearing safety glasses and a dust mask, start by cutting a small pilot hole in the center of your marked area to confirm placement before making the full cut along the template lines. Use a drywall saw or reciprocating saw with a short, controllable blade. Have a helper below to manage dust and debris as you cut.
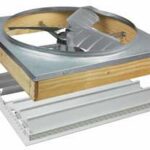
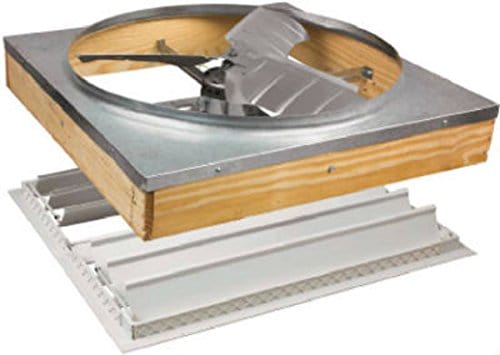
6. Install the Fan
Carefully follow the specific installation instructions provided by the whole house fan manufacturer, as these can vary significantly between models. Typically, this involves lifting the often heavy fan unit into the attic and carefully positioning it directly over the hole you just cut in the ceiling, ensuring the vent box assembly aligns correctly with the opening.
Secure the fan assembly to the adjacent ceiling joists using the screws provided. Pre-drill pilot holes if necessary. Make sure the fan unit is level and firmly attached to the joists to prevent vibration and noise during operation.
The vent box or motorized louvers, which will open into the attic when the fan is operating to allow airflow, will also need to be properly positioned and securely attached to the fan unit according to the instructions.
7. Electrical Connection
Connect the fan’s electrical wiring to your home’s electrical supply. This usually involves tapping into an existing suitable circuit in the attic or, ideally, running a new dedicated circuit directly from your electrical panel to handle the fan’s specific power requirements.
If you are not comfortable or experienced with electrical work, or if you are unsure about your local electrical codes, it is strongly recommended to hire a licensed electrician to handle this crucial step. Incorrect wiring can be extremely dangerous and could damage the fan, your home’s electrical system, or even cause a fire.
Absolutely make sure the power to the circuit you plan to use is turned off at the breaker and test it with a non-contact voltage tester before making any wire connections. Use appropriate wiring connectors (wire nuts) and electrical tape to secure the connections according to local electrical codes.
If running a new circuit, this should always be done by a qualified electrician who can ensure proper wire gauge, breaker size, and grounding.
8. Seal and Insulate
Once the fan is mechanically and electrically installed, properly seal around the fan housing in the ceiling to prevent air leaks between your conditioned living space and the unconditioned attic when the fan is not in use. Use caulk or expanding foam sealant to fill any gaps or cracks around the fan unit where it meets the ceiling drywall. If necessary, add or adjust insulation in the attic around the fan unit to maintain the thermal barrier of your home and prevent energy loss. Be sure the insulation does not obstruct the fan’s motor or interfere with the proper opening and closing of the vent box louvers.
9. Clear Attic Vents
Before operating your whole house fan, make absolutely sure your attic vents (gable vents, soffit vents, ridge vents) are completely clear and unobstructed. The fan works by pushing large volumes of air into the attic, and if these vents are blocked by insulation, debris, or anything else, it can create back pressure, reduce the fan’s efficiency, and potentially damage the motor or even the roof structure. Proper attic venting is essential for the safe and effective operation of your whole house fan.
10. Test the Fan
After all mechanical and electrical connections are made and the area is sealed, turn the power back on at the circuit breaker. Test the whole house fan to ensure it operates correctly and creates the desired airflow, drawing air audibly out of the living space and visibly into the attic. Check for any unusual or excessive noises or vibrations that might indicate an installation issue. Open windows in the rooms where you want to draw air from to facilitate proper airflow and ensure the fan is effectively moving a large volume of air through your home and out through the attic vents.
Safety Considerations
Always prioritize safety when installing a whole house fan:
- Professional help. If you are unsure about any step, especially the electrical connections or cutting into your ceiling structure, consult a qualified professional electrician or HVAC technician.
- Turn off the power. Absolutely ensure the power to the circuit you are working on is turned off at the circuit breaker and verified with a non-contact voltage tester before touching any electrical components or wiring.
- Ladder safety. Use a sturdy ladder that is properly positioned on a level surface when working in the attic. Follow all ladder safety guidelines and have a helper spot you if possible. Be aware of your footing and avoid stepping only on joists.
- Attic temperatures. Be aware of the extreme temperatures that can occur in attics, especially during summer months. Work during cooler parts of the day and stay hydrated.
- Insulation safety. When working in the attic, wear a dust mask or respirator, long sleeves, long pants, and gloves to avoid touching or breathing insulation fibers which can be an irritant.