How to build a garden arbor or pergola, with illustrated step-by-step instructions, building plans, and buying advice for roofing materials.

Arbors and pergolas, which are designed to provide relief from the sun’s heat, can be just large enough to shelter a table for two, spacious enough to cover a large deck, or any size in between. Regardless of size or style, an arbor or pergola not only gives you a shady place to relax or party but can also solve the nagging problem of how to screen your site from above—for instance, to block the view from the windows of your neighbors’ houses or a nearby apartment building.
Roofing Materials Overview
Generally, any roofing material that is appropriate for a house can be used on an outdoor structure. Even though the area to be covered is much less than the average home, unless you have roofing experience, it is best to call in a professional to do the installation. Following are popular materials for patio roofs and gazebo roofing:
Asphalt Shingles
The most common roofing material in the country, asphalt shingles have achieved their popularity by being affordable, long-lasting, and virtually maintenance-free. Because of their popularity, they are manufactured in a vast array of colors, patterns, and dimensions, though the most common is 12 by 36 inches.
Plastic & Glass
If natural light and views of starry, starry nights are on your wish list, plastic or glass panels fill the bill.
Plastic has a number of features to recommend it: It will not shatter. It is relatively lightweight, making installation a fairly easy process. It comes in a range of styles, from translucent to opaque, and in a rainbow of colors (though the light shed will be the color of the plastic). It comes in a range of thicknesses, from 1/8 to 1/2 inch—the thicker the more expensive—but the thicker the material the less likely it will be to crack.
Last but not least, acrylic sheets can be easily cut and fastened with standard tools used for woodworking. The only real downside to plastic is that it can scratch, which does not make it a practical material if your outdoor structure is sited underneath tree limbs.
While plastic cannot compete with glass for sheer aesthetics and long-lastingness, glass is costlier, heavier, making installation trickier, and it can shatter. Because of this, most building codes dictate what kinds of glass are acceptable, and what type of support it requires. Installation is best left to a professional who is current on local building codes.
Polyester Resin & Vinyl
More commonly known as “fiberglass,” these materials are actually a blend of acrylic and fiberglass, which has been added to give the plastic increased strength. Polyester resin and vinyl panels come transparent or opaque in corrugated, flat, crimped, shiplap, and board-and-batten patterns. Panels come 24 to 50 1/2 inches wide and 8 to 20 feet long in varying thicknesses. Corrugated styles come in rolls that are 40 inches wide, flat styles in rolls 36 inches wide.
How to Build an Arbor or Pergola
The terms arbor and pergola are often used interchangeably, but there is a minor distinction between the two. Although both consist of posts supporting an open roof of beams or lattice, an arbor is broader and may be connected to a building on one side. A pergola, on the other hand, is always freestanding and narrow.
Regardless which of these shade-giving structures you choose to build, the technique is the same. This project is best done with two people. As with any permanent structure, consult your local building department first to determine if you will need any variances or permits.
Materials List
- 6-by-6 posts
- One post base and anchor bolt for each post (if you are affixing to concrete) or one precast concrete pier with post base, plus concrete mix (if building on soil)
- Galvanized nails
- One 1/2-by-10″ lag bolt with washer per post
- Two 1/2-by-7″ lag bolt with washers per beam
- Braces and wooden stakes
- Two 6-by-6 beams
- 4-by-4 rafters
Step-by-Step Instructions
1Fasten each post base to the concrete with an anchor bolt (if building on the ground, dig a post hole, fill the hole with concrete, and position the top of the precast pier 3 to 4 inches above grade level). Cut the posts to length if necessary. Nail the posts to the post bases.

2Use a level on two adjacent sides to check that each post is vertical. Secure each post in position with temporary braces nailed to wooden stakes driven into the ground.

3With a helper, position a beam on top of each post. Check that the posts are still vertical and the beam is level. Use a 7/16-inch bit to drill a 9-inch-deep hole down through the beam into each post. With a wrench, install a 10-inch lag bolt into the hole. Repeat for the other beams.

4Set and space the rafters on top of the beams. With a 7/16-inch bit, drill 6-inch-deep holes through the rafters and into the beams. Install a 7-inch lag bolt into each hole. For more strength, you can install diagonal bracing between the posts and the beams.

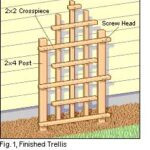
5For shade, cover the rafters with vines or lath, either 1 by 2s or 2 by 2s.