Improve your indoor air quality and HVAC efficiency! This homeowner’s guide provides steps for safely cleaning your ductwork, from removing debris to sealing leaks.


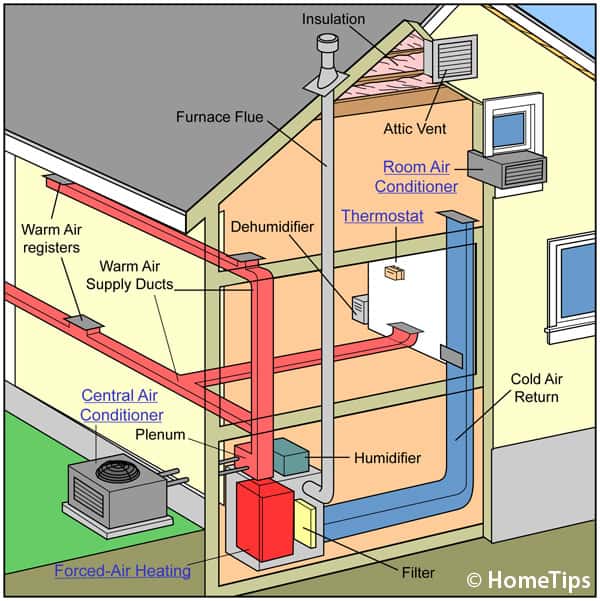
Though your home’s ductwork is generally out of sight, out of mind, the HVAC duct system is very important for circulating heating, cooling, and fresh air throughout your living spaces. Over time, dust, allergens, pet dander, and other debris can accumulate inside your HVAC ducts, potentially impacting your indoor air quality and reducing energy efficiency.
You can hire a professional duct cleaning service to clean your ducts, but here are several steps DIY homeowners can take to effectively clean accessible portions of their ductwork and maintain a healthier home environment:
1. Power Down First
Before you begin any ductwork cleaning, turn off your entire HVAC system—both the heating and cooling units—at the thermostat and, for added safety, at the breaker box. This prevents dust and debris from being drawn into the system and circulated during the cleaning process, and it eliminates any risk of accidental activation of the blower fan.
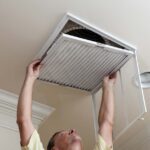
2. Remove Vent Covers
The easiest points of entry for cleaning your ductwork are at the supply and return vents located on your walls, ceilings, or floors. Removing the vent covers provides direct access for vacuuming and cleaning.
Carefully detach each vent cover. Most are held in place by screws or clips. If you encounter screws, use a screwdriver to remove them and set the screws aside in a safe place so you can easily reattach the covers later. For clip-on covers, gently pry up the clips, being careful not to damage the surrounding wall or floor or scratch the covers.
3. Vacuum Dust and Debris
A vacuum cleaner with a long hose attachment is a good primary tool for removing accumulated dust and loose debris from within the ducts. (A long whole-house central vacuum system hose is ideal.) Attach the long hose and any extension wands to your vacuum cleaner. Carefully insert the hose into each accessible duct opening. Be thorough and systematic, trying to reach as far into the ducts as possible. Move the hose around to dislodge and suction up dust, pet hair, and other particles. If your vacuum has a brush attachment, use it to gently scrub the inside surfaces of the ducts to loosen any stubborn dirt.
4. Clean Your Vent Covers
Don’t forget the vent covers themselves, as they accumulate dust and grime as well. Wash the removed vent covers in warm water with a mild dish soap. Use a brush or sponge to scrub away any dirt and residue. Rinse them thoroughly with clean water and be sure they are completely dry before reattaching them to the walls or floors.
5. Use a Duct Cleaning Brush for Targeted Cleaning
For dust and debris that is more firmly attached to the duct walls and out of reach of your vacuum hose, a specialized duct cleaning brush can be helpful. These brushes typically have long, flexible handles. Carefully insert the brush into the ducts and use a scrubbing motion to loosen any stubborn buildup. Then, use your vacuum cleaner again to suction up the dislodged particles. Be cautious not to force the brush too far or damage the ductwork.
6. Seal Duct Leaks
While not actually cleaning, sealing leaks in ductwork is an important step in improving overall airflow and HVAC efficiency. Leaky ducts allow conditioned air to escape, wasting energy and reducing the amount of air reaching the intended rooms.
If you notice any visible holes or gaps in your ductwork, especially at joints, consider sealing them. The best materials for this are mastic sealant (a paint-like substance) or UL 181B-FX listed metal foil tape (often called “duct mastic tape,” which is different from standard cloth-backed “duct tape”). Apply these sealants carefully to all seams and openings.
7. Knowing When to Call the Pros
While homeowners can handle surface-level DIY duct cleaning, the presence of mold, pests, or hard-to-reach areas often require specialized equipment and expertise.
If you suspect significant contamination, notice visible mold growth inside your ducts, have evidence of pests living in your ductwork, or if you’ve followed these steps and are still concerned about your air quality or HVAC efficiency, it’s best to hire a professional duct cleaning service. They have powerful vacuums, specialized brushes, and video inspection tools to thoroughly inspect and clean your entire duct system.
Safety Considerations
Always prioritize safety when undertaking this type of home maintenance task:
- Wear a dust mask. Protect your respiratory system from inhaling dust, allergens, and other particles dislodged during cleaning. An N95 or higher-rated mask is recommended.
- Wear gloves. Protect your hands from dirt and potential irritants.
- Ensure good ventilation. If you are working in a confined space, make sure the area is well-ventilated by opening windows or using fans.
- Be mindful of asbestos. If your home was built before the 1980s, there’s a potential for asbestos-containing materials in duct insulation. If you suspect this, do not disturb the materials and consult a qualified asbestos abatement professional.
Conclusion
Cleaning your ductwork is a proactive step towards improving your home’s air quality and the efficiency of your HVAC system. By following these practical steps, you can remove a significant amount of accumulated dust and debris. Remember to prioritize safety and recognize when professional help is necessary.