An expert step-by-step guide on building a garden path, with tips about tools and materials along with detailed step-by-step instructions.

Create an attractive, natural garden path with easy-to-install bricks on sand. Even a beginning do-it-yourselfer can accomplish this project in a day.


Materials: Common bricks, masonry sand, two 4-foot long 2x2s or 2x4s, one 3-foot long 2×4, mason’s line, and two stakes.
Tools: Shovel, tape measure, level, safety glasses, gloves, brickset, small sledgehammer
Step-by-Step Brick Path Installation
Sketch your path on a piece of graph paper and figure out the number of bricks you’ll need (a standard brick is about 8 inches by 4 inches by 2 3/8 inches thick), then increase that number by 5 percent. Also figure out how much masonry sand you will need based on one-quarter of a cubic yard for a path that is 3 feet wide by 15 feet long.
The bricks should sit on top of a bed of damp sand that is about 1 1/2 inches deep; you’ll need to excavate and flatten the area to be paved so the bricks will sit flat, their top surfaces flush with the ground’s surface. The flat, excavated area should be about 4 inches below grade to allow for sand plus the bricks’ thickness. Also excavate enough area for an edging made of bricks placed on edge or concrete blocks like the ones shown in the photograph.
Note: The soil beneath the bricks should be stable and drain well. If drainage is poor, excavate for a 4-inch layer of gravel beneath the sand.
1. Install screed rails. To maintain a flat brick surface, the key is to establish a flat sand base using a technique called “screeding.” Along each side of the path, install temporary “screeding rails” made from 2x2s or 2x4s laid flat. For a contoured path, substitute 3/4-inch PVC pipe (it will conform to the contours). Keep the path level from side to side by placing a carpenter’s level across the rails at intervals.
2. Provide a flat sand base. Working in 3-foot-long sections, first fill one section between the rails with moist masonry sand. Level and smooth (screed) the sand by pulling a short 2×4 along the surface of the rails (see Figure 1). When voids appear, add sand and screed again. Avoid standing or kneeling on the sand. When you’ve completed the area between the screed rails, lift out the rails and replant them in the next section of the trench, overlapping their prior position by about a foot. Fill the holes they’ve vacated with sand.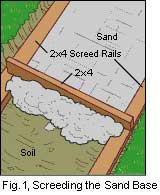
3. Lay the bricks. Stretch a mason’s line between two stakes—one at each end of the section—as a guide for aligning the bricks. Start installing bricks from one corner. Use a mallet or a block of wood to tap them into place. Keep joints tight and surfaces flush across the top. You can also check the top surface of the bricks for level with a long, 4-foot level or by placing a carpenter’s level across a short 2×4 (on edge).
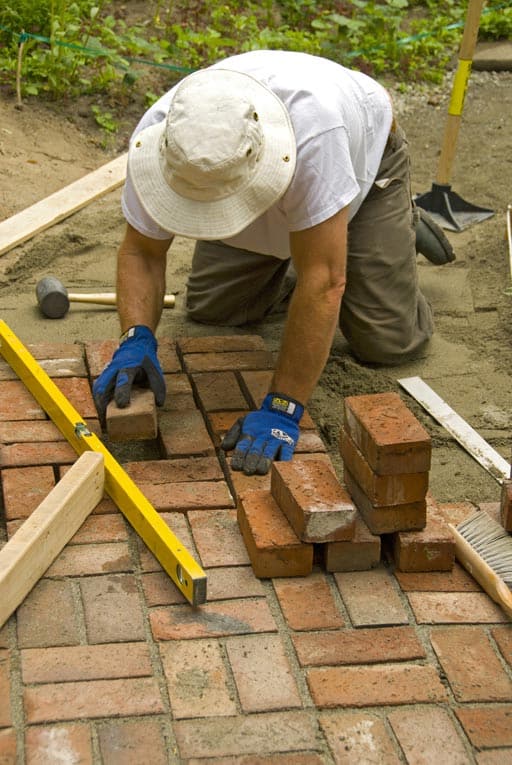
4. Cut bricks when necessary. Bricks are relatively easy to cut with a tool called a brickset (be sure to wear safety glasses). Score your cutting line on all four sides of the brick by tapping the brickset on your marks with a small sledgehammer. Then place the brick flat on soil or sand, align the brickset’s blade with your scored mark (bevel toward the piece you’re cutting off), and strike the brickset with firm blows until the brick breaks. If necessary, chip away irregular edges.
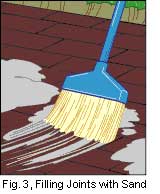
5. Fill the joints with sand. When all the bricks are installed, spread sand evenly over the surface. Allow it to dry and then use a broom to sweep it into the joints between the bricks (see Figure 3). When all joints are filled, sweep off the excess sand and spray the surface lightly with water to help pack the sand into the joints. Add more sand if needed.