This step-by-step DIY guide will teach you how to build a mirror shelf, a fun and functional project for your kids’ room.

Build a mirror-shelf wall organizer for a child’s room in a weekend! All you need is some elbow grease and some basic materials.


Skill level: Intermediate. Estimated time: 2 days
This hardworking mirror is an ideal organizer for a child’s room wall, with a generous 2-by-3-foot mirror, a series of display shelves, and wooden pegs for hanging caps, backpacks, or just about anything.
The unit is built primarily from standard-dimension clear pine and given a clear polyurethane finish.
Materials
1 10-foot clear pine 1 by 6
1 8-foot clear pine 1 by 6
1 4-foot clear pine 2 by 6
1 3-foot clear pine 1 by 1
2 6-foot clear pine 1/4-inch quarter-round moldings
1 2-foot-long, 3/4-inch diameter hardwood dowel
1 4-foot by 4-foot sheet of 1/4-inch birch plywood
2-foot by 3-foot mirror, 1/4″ (cut to fit)
For fastening and finishing, you’ll also need 1 1/4-inch drywall screws, 1/2-inch brads, 2 1/2-inch screws with wall anchors, wood glue, wood plugs, wood putty, and clear satin polyurethane finish
Tools
Tape measure
Combination square
Table saw (or portable power saw with guides)
Hammer
Nail set
Drill with 3/4-inch bit, screw countersinking bit, and screwdriver tip
Sanding block with sandpaper
Paint brush
Electronic stud finder
Overview
The mirror frame ‘s sides, top, and shelves are built from 1 by 6s and the base along the bottom of the unit is a 2 by 6–a wider piece so it can receive the dowel pegs. The back is made from a 1/4-inch birch plywood, faced best side forward.
To achieve quality results, it’s very important to make straight, accurate cuts. Mark square cuts with the aid of a combination square. Cut the wood with a table saw, radial-arm saw, or power circular saw with a straightedge guide. You can have a glass shop cut the mirror to size, then install it yourself as shown here, or have the glazier cut and mount the mirror in the finished unit.
1. Lay out the 1-by-6 pieces.
Measure and mark the 1-by-6 sides (A), center divider (B), top (C), and shelves (D) from the 1 by 6s.
2. Cut the 1-by-6 and 2-by-6 pieces.
Cut the sides (A), center divider (B), top (C), and shelves (D) to size. Use the top (C) to mark the length for the 2-by-6 base (E), then cut (E). When using a circular saw or radial-arm saw, cut with the wood’s best side up; face the best side down when cutting with a table saw.

3. Mark and drill the base for dowels.
Following the illustration [Fig. 1], mark the 2-by-6 base (E) for dowel pegs. Center each mark along the board’s width. Then use a 3/4-inch-diameter spade bit to drill 1-inch-deep holes for the pegs–be sure to drill straight.
4. Assemble the 1-by-6 and 2-by-6 pieces. Glue and screw together the sides (A) and base (E), then screw the sides (A) to the top (C). For all connections, drill counterbored pilot holes for the screws so you can sink the screw heads about 1/4 inch below the surface and hide them with wood plugs.
Use two shelves (D) to space the vertical divider (B), then screw it in place. Position the shelves and attach them with two screws at each end of each shelf.
5. Cut and attach the back.
Lay the assembly face down and double-check the measurements for the plywood back (H)–plan to inset it 1/4 inch around the perimeter so it won’t be visible from the sides. Cut the back to size with perfectly “square” (90-degree) corners.
6. Cut and attach the mounting rails.
Check the inside measurements at the top of the unit and cut the mounting rails (F) and (G) to fit. Glue and screw them into place, driving the screws through the top (C) and into them.
7. Sand and apply a finish.
Using fine sandpaper, lightly sand the entire unit, working in line with the wood’s grain. Glue wood plugs into the screw-head holes, allow the glue to dry, and sand them flush (or use wood putty). Dust off the assembly, wiping it with a lightly damp cloth. Then apply a clear polyurethane finish (or you can paint or stain the unit).
8. Install the mirror.
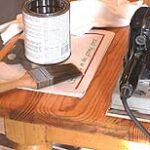
Have the mirror cut to fit, then install it in the unit with pieces of quarter-round molding, mitered at the corners, as shown. Be very careful when nailing the molding in place with brads–if you strike the surface of the mirror, it will break! For protection, you can lay a small plywood scrap next to the nail to protect the glass.

9. Mount the organizer.
Use an electronic stud finder to locate the positions of wall studs. Transfer these locations onto the mounting. First countersink, then drill pilot holes for 2 1/2-inch screws. Have a helper assist you position and level the unit on the wall, then screw it in place.