This expert step-by-step guide explains how to tile a wall with either ready-mixed organic mastic or thinset mortar, using a trowel, adhesive, and a mallet.

How to Tile Wall: Step-by-Step
Grouting & Finishing Wall Tiles
If the wall substrate has been well prepared, installing the tiles will be a straightforward job.
Double-check to see that the surface is flat and firm and that adjoining walls are plumb.
Organic mastic, which comes ready-mixed, is easy to apply and allows tiles to be adjusted up to 30 minutes after installation.
Thinset mortar is more difficult to work with, but it is more resistant to water.
Use mastic for walls that will stay relatively dry, and consider thinset for a wall that will often get wet, such as a tub enclosure.
How to Tile Wall: Step-by-Step
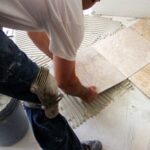
1 Using a trowel with notches recommended by the mastic manufacturer, scoop mastic out of the container, and spread it on the wall.


Leave the working lines visible. As much as possible, apply the mastic with long, sweeping strokes.
Continue to hold the trowel at the same angle to ensure a setting bed of consistent depth. The trowel teeth should lightly scrape the wall surface.
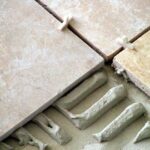
2 Press each tile into the adhesive. Avoid sliding a tile more than 1/2 inch. Add spacers as you go.
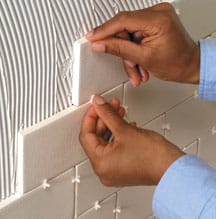
Every 15 minutes or so, check the entire installation to make sure no tiles have strayed out of alignment. Using a cloth dampened with water or mineral spirits (depending on the type of mastic used), wipe away any mastic that squeezes onto the surface of a tile.
3 Tap the tile surface with a mallet to make sure the tiles are embedded in the mastic and form a smooth wall surface.
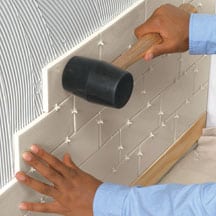
If a tile’s surface is raised noticeably above the surface of its neighbor, tap the raised tile against the wall using a rubber mallet. If this does not do the trick, you may have to remove some tiles, reapply mastic, and start over again.
Grouting & Finishing Wall Tiles
Wait for the adhesive to completely harden before grouting (this can take a day or two). If you can move a tile to the side using your hand, you need to wait longer. Use unsanded grout for joints less than 1?8 inch wide and sanded grout for wider joints. Unless the grout is fortified with powdered latex, mix it with liquid latex even if the directions say you can mix it with water only.
Prepare as much grout as you can use in 20 minutes or so. In a clean bucket, mix the liquid latex or water with the powder (a margin trowel works well as a mixing tool) until the grout is free of lumps and about as thick as toothpaste. Wait 10 minutes, and then stir again.
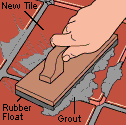
1 Tilt the float up, and use it like a squeegee to wipe away most of the grout from the face of the tiles. Be careful to scrape diagonally so that the edge of the float cannot dig into the grout lines between the tiles.

2 Dampen a sponge, and wipe the tiles gently. Rinse the sponge every few minutes with clean water.

If you see a gap in a grout line, push more grout into the gap using your finger, and wipe away the excess. Then wipe the surface two or three more times. Run the sponge gently along the vertical and horizontal grout lines to make them consistent.
3 Finish the grout joints. If necessary, try running the rounded handle of a tool along each line. Allow the grout to dry, and then buff the surface of the tiles with a dry, lint-free cloth.

![]()
![]()