This step-by-step guide will teach you how to build a raised flower garden, a type of garden that is elevated above the ground.

A garden bed that is raised 16 inches or more above the ground makes planting and weeding easier and can make for an attractive design element in itself. Even beginners can accomplish this project in a weekend.
Raised Garden Bed Materials:
Interlocking concrete blocks, fiberglass reinforcing stakes (enough for several layers) and string, gravel or sand, soil
Tools You’ll Need:
Shovel, flat-bladed spade, 4×4, rake, hammer, wheelbarrow, garden hose
Step-by-Step Building
Digging and lifting can strain your back if you are not used to this type of work so take plenty of breaks. There’s no reason you have to finish the job in a weekend, but if you are intent on it, get someone to help.
Plan the project so that you can easily reach all the parts of the bed without stepping into it. If you can access it from two sides, you can make it up to 7 feet wide. If you will have access to it from only one side, it should be no more than 4 feet wide.
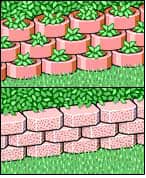
A raised bed can be made with many materials; this one is put together with interlocking pavers.
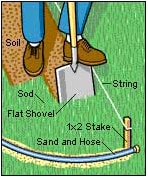
1. Lay out the bed
To make straight layout lines, pound stakes into the ground at the corners and stretch string between them.
For a curved line, lay a garden hose on the ground in the shape of the future bed. Pour sand over the hose along its length to mark the line.
2. Excavate
Dig away all the sod in the area where the bed will be. Use a flat-bladed spade to cut clean lines at the perimeter of the bed. Then dig away all the roots.
If your lawn has bare areas, consider renting a sod stripper, cutting the sod into lengths, and using the pieces to patch the lawn. It’s easier to strip off the sod with this tool than by using a shovel.
Wherever the blocks will sit, tamp the soil firm using a length of 4×4 or a rented hand tamper.
Spread an inch or two of sand or gravel over the tamped area, taking care not to spread too much; the top of the layer should be an inch or so below the level of the grass. This will ensure drainage under the blocks and reduce the chance that they will buckle during a cold winter. Then rake the surface smooth.
3. Stack the blocks
Lay the first course of blocks around the perimeter of the bed. See that the tops of the blocks are properly aligned to form a level surface for the next course.
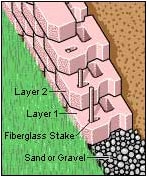
If your blocks come with pins or stakes, pound them through the blocks and into the ground with a hammer.
Lay the next course of blocks on top so that it overlaps the first course.
Continue laying courses to your planned height. You may want the last course to have a finished, rather than open-celled, top surface.
4. Fill the bed with soil
Consult your plant supplier regarding the correct soil mix for your plants.
You may want to lay a few inches of sand or gravel, followed by at least 8 inches of soil mixed with peat; this will give you the well-draining soil most plants appreciate.