Ever wonder how a wired doorbell works? In this article, we offer a doorbell diagram that shows the various parts and how they’re wired together.

Wired doorbells are simple electrical systems. Repairing one is normally easy and a good lesson in basic electricity—as long as you can find the key components.

Because buttons, buzzers, and transformers are relatively inexpensive, replacing these faulty components usually makes more sense than trying to make involved repairs on them.
Don’t be intimidated by the steps involving a multi-meter (or voltmeter or ohmmeter); these electrical tools are important and inexpensive.
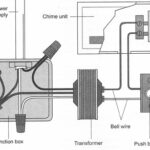
A Doorbell Diagram
A doorbell, chime, bell, or buzzer normally operates on low voltage.
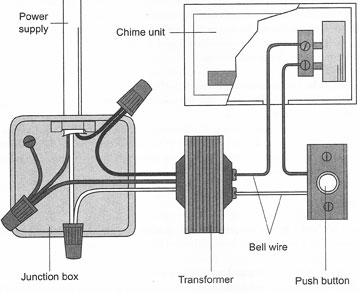
Older systems may be 6 or 8 volts, and newer ones are 12 to 14 volts for bells and buzzers and 16 volts for chimes. To produce this power, a transformer converts standard household 120-volt current into the lower voltage.
Two small-gauge wires run from the transformer to the bell or buzzer. A push-button switch interrupts one of these. When you push on the button, it completes the circuit, delivering low-voltage electricity to the bell unit.
At the bell unit, one or two spring-loaded pistons slide through the windings of an electromagnet. The electrical surge sent from the transformer charges the magnet, pulling the pistons against their springs. When the charge stops, the springs thrust the pistons against the bell or chimes: “ding-dong!”
Many doorbell units make two sounds: one for the front door, the other for the back door. Terminals on the bell unit are marked “front,” “back,” and “trans” (for transformer). One wire from the transformer goes to the “trans” terminal, and one wire from each button goes to either the “front” or “back” terminals.
In most cases, the button connected to the “front” terminal produces a “ding-dong,” and the one secured to the “back” terminal just produces “ding.”
Electrical Safety of Doorbells
The button and small-gauge wires that run from the button to the doorbell and transformer are normally safe to work on without shutting off the power. Nevertheless, be careful. Even the low-voltage side of an electrical system may carry dangerous current in certain conditions where the transformer has failed, though this is fairly rare.
Avoid shock by testing the transformer first. You can also use an electrical tester to check the two low-voltage terminal screws on the transformer; it should NOT light up if the transformer is working properly.
If you can’t find the transformer, you can still check its voltage and see if it works. At the bell unit, remove one wire from the terminal marked “front.” Have a helper push the button, if the button is known to be good; otherwise carefully remove the button and connect its two wires with a small wire nut (just to be safe, don’t touch the bare wires at this point).
Using a volt-ohm meter (set for voltage) at the bell unit, touch one test lead to the free wire from the “front” terminal and the other test lead to the terminal marked “trans.” If there is no reading, start hunting for the transformer so you can replace it.
Get a Pre-Screened Local Electrical Wiring Pro