Expert DIY advice on how to paint your house, including selecting the right house paint and paintbrushes, step-by-step painting methods and more

1) Choose the Right House Paint and Primer
2) Gather Tools and Equipment
3) Repair Damaged Siding and Trim
4) Wash the Siding
5) Protect, Mask, and Drape
6) Scrape and Sand the Siding
7) Caulk Siding and Trim
8) Prime Bare Wood and Stains
9) Paint the Siding
10) Paint the Trim
11) Clean Up Properly
When it comes to improving your home, one of the quickest, easiest, and least expensive ways to make a significant impact is to paint the siding and trim. Nothing protects the structure, revives weatherworn siding, or adds visual style faster or more effectively than a new paint job.
Is Painting Your House a DIY Job?
Should you paint your house yourself? How much money can you save if you do? What painting tools would you need and what are the best paints to buy? What techniques would help you paint like a pro? You will find answers to these questions and more in this article.
Painting a house can be a fairly big job but if you have the necessary tools, materials, and stamina to do the work yourself, you can save over half of what it would cost to have your house painted by a pro.

Factors that affect whether you can or should paint your house yourself include: 1) the condition of your home’s siding and trim, 2) your house’s height and size, 3) your abilities and stamina, and 4) your available time.
Labor typically represents more than half of the expense of having a house painted professionally. By doing the work yourself, you will save this half. But painting a house can be a big job, especially if the house is in shoddy shape that would require considerable preparation. In addition, a house more than one story tall or built on a hillside guarantees a high level of difficulty.

If you can’t paint your house without exposing yourself to the possibility of falls or injury, hire a pro. It isn’t worth the risk. Either way, it pays to get three bids from painting contractors. That way, you can roughly calculate your savings if you do the job yourself.
Additionally, through conversations with painters, you’re bound to gain knowledge that can be helpful if you choose to do the work yourself.
How to Paint Your House Yourself
If you do choose to paint your house yourself, the following information will guide you through the process, which typically follows this order:
- Choose the right paint and primer
- Gather tools and equipment
- Repair damaged siding and trim
- Wash the siding
- Protect, mask and drape
- Scrape and sand the siding
- Caulk siding and trim
- Prime bare wood and stains
- Paint the siding
- Paint the trim
- Clean up properly
1) Choose the Right House Paint and Primer
The best paint to choose for painting your house will depend upon the surface you’re painting. Bottom line: Select 100% acrylic paint for wood, vinyl, metal, or stucco. Semi-gloss or satin enamels are preferred for trim because they are durable and easy to wash. Flat finishes are favored for siding because they hide defects and irregularities better.
The key is to buy quality primer and paint. The last thing you want is to end up having to paint again in the not-too-distant future because your fresh coat of cheap paint failed.
Quality paint costs more, but when it comes to paint, you generally get what you pay for. Not only will good paint last longer, it will flow and cover better than low-quality material. For more, see How to Choose & Buy Top Quality House Paints.
Unpainted redwood, cedar, and cypress siding have the charm of natural color and texture. Instead of painting these, most homeowners prefer to finish the woods with a clear or semi-transparent stain. Beneath paint, these woods have natural resins that may bleed through the surface finish, so they should be sealed before painting.
2) Gather Tools and Equipment
To work safely and efficiently, you need the right equipment, which will depend upon the nature of the work you’ll be doing. Preparation, for example, can call for a selection of tools that includes sanding and scraping tools or, if your siding is in good shape, just a hose with a nozzle.
Following is a list of tools that are typically helpful. Most of these are sold at home improvement centers or online. If you don’t already own or want to buy some of the pricier tools, you can often rent them.
- Garden hose with high-pressure nozzle
- Stiff-bristle brush with extension pole
- Bucket and detergent or TSP substitute
- Drop cloths, plastic sheeting, and painter’s tape
- Hook-blade paint scraper and molding scraper
- Wire brush
- Respirator, dust masks, and safety goggles
- Putty knife and 5-in-1 tool
- Work gloves and latex gloves
- Stepladder and/or extension ladder
- Disk sander or random-orbit sander and sandpaper
- Caulking gun and caulking compound
- Paintbrushes (see below for information about selecting)
- Paint rollers and extension poles
- 5-gallon bucket with roller grid
- Paint sprayer* (see below)
Select the Right Paintbrushes
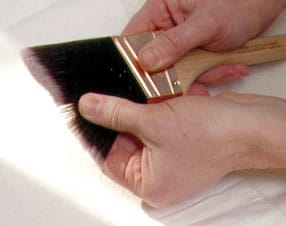
When buying paintbrushes, don’t skimp on quality. A well-made brush will make your work much easier and more successful. A quality paintbrush has many different lengths of bristles with split ends (yes, just like hair) that allow the brush to hold more paint. A wooden handle secures tightly packed bristles.
Before purchasing, hold the brush as you would when painting. Make sure it feels comfortable to grip. Fan the bristles, checking for gaps—bristles should fan evenly. “Bounce” the tip of the brush to test for springiness.
For acrylic latex paint or other water-based finishes, choose brushes with synthetic bristles—either polyester or nylon. Natural bristles lose their integrity when they soak-up water from water-based paints. Brushes made from polyester keep their shape when wet and remain firm when you paint on a hot day. Brushes made with nylon last longer, but tend to become limp on hot days.
For alkyd paints or a solvent-based finishes that require paint thinner for cleanup, choose brushes with natural bristles.
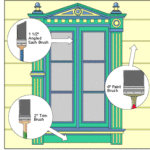
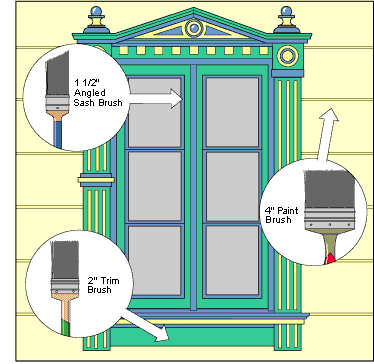
Brush sizes. For miscellaneous siding work, choose a 4-inch brush that has a straight edge. Get a tapered 1 1/2-inch brush for window sashes and a 2-inch brush for trim.
What about a paint sprayer? A spray-painted finish may not be quite as durable as hand-painted one, but using a power sprayer can be a real time saver, especially on hard-to-paint irregular surfaces such as shingle siding and latticework.
One downside of using a sprayer is that you must meticulously protect surrounding surfaces from overspray with plastic sheeting and drop cloths. And, because of overspray, you can’t use a paint sprayer outdoors during breezy conditions. See more about how to use a paint sprayer below.
Ladders. The height and surrounding grade of your house will determine the needed type and height of ladders you need. For a tall house, figure you’ll want a 16-foot extension ladder and a 6- or 8-foot stepladder. For a short house, just the stepladder should fill the bill.
3) Repair Damaged Siding and Trim
Fix any damaged siding and try to solve any structural problems that lead to water damage or you’ll be painting again before you know it.
For more about repairing siding, see the following articles:
How to Repair Wood Board & Shingle Siding
Aluminum Siding Repairs
Repairing Hardboard & Plywood Siding
Aluminum Siding Repairs
Vinyl Siding Care & Maintenance
How to Repair Stucco Siding
How to Repair Brick Siding
4) Wash the Siding
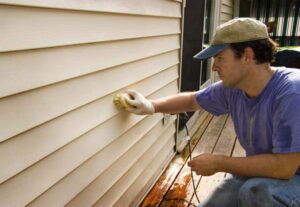
Siding must be clean, dry, and free of flaking paint before you paint. If your home’s siding is in good condition, just wash it thoroughly. Sometimes, hosing it down is all that’s necessary; when doing this be careful not to drive water up under the joints where siding boards or panels overlap.
To clean wood, vinyl, or aluminum siding, you will need a hose, sponge, stiff-bristle brush with extension pole, bucket, and mild detergent such as laundry soap or a TSP substitute. Scrub the surface with the soapy mixture, and then rinse it with clear water.
You may want to use a long-handled car-wash brush to easily extend your reach, or use a high-pressure hose if you have grime built up from air pollution and exhaust. Be sure to cover nearby plants with plastic tarps.
If you use a power washer on wood siding, be very careful not to erode the wood’s surface or to blast water into the separations between boards. For more, see How to Clean House Siding.
Beware of pressure-washing stucco—it can damage the siding. To clean older stucco that is sound, simply scrub it with a stiff nylon brush and detergent.
5) Protect, Mask, and Drape
Before you begin scraping, sanding, and painting, drape and mask-off surfaces and areas where you don’t want paint chips, sawdust, paint, and mess.
The main materials needed for masking and draping include:
- Painter’s tape
- Paper drop cloths
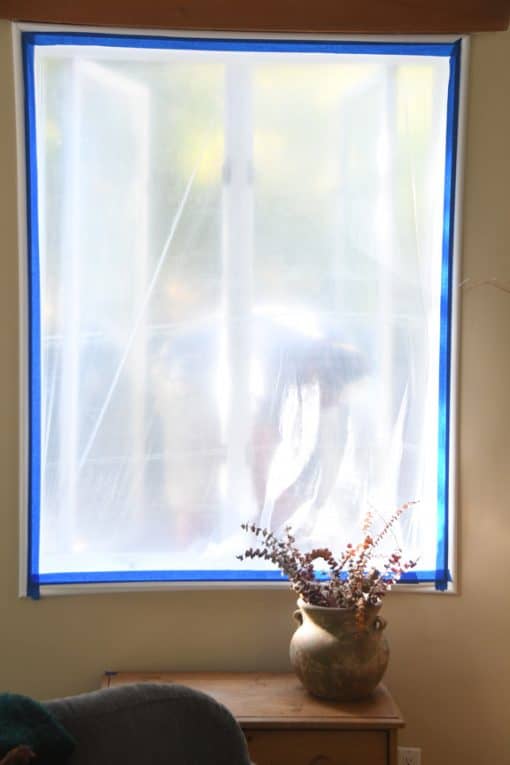
- Plastic sheeting
- Fabric drop cloths
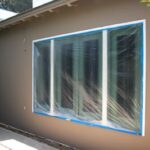
Depending upon what you’re painting, you may not need all of these. For example, if you’re just painting trim, painter’s tape and a single drop cloth should suffice. When painting window trim, it can be easier and more accurate to mask-off the glass from the frame (if you have a steady hand, masking may be an unnecessary hassle).
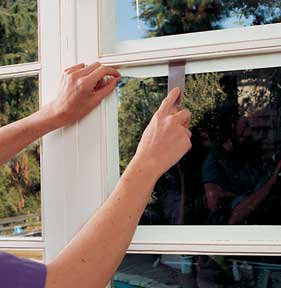
Unlike conventional masking tape, painter’s tape—the blue type—has an adhesive backing that is only mildly sticky. This makes it much easier to remove without damaging the paint or finish. Stickier 3-inch painter’s tape is better for holding down paper and plastic drop cloths.
Plan to use painter’s tape when you want to maintain a straight edge between colors of paint to avoid peeling-away the painted finish when you remove the tape. Be sure to remove both painter’s tape and masking tape as soon as the final finish is dry.
Use thick cotton drop cloths to protect bushes, decks, patios, porches, walkways and anything else that you don’t want splattered with paint.
 A Word About Lead Paint: Before scraping or sanding paint on a home built before 1978, test the paint for lead. (For more information, see Testing for Lead). Sanding or scraping paint that contains lead can be very hazardous to the health of your family. You can buy an inexpensive lead-test kit online or at a home improvement center.
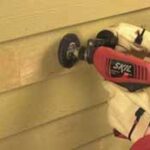
6) Scrape and Sand the Siding
Existing wood siding that is in rough condition must be scraped and sanded. You will need to remove paint that is cracked or peeling. This is essential for a successful, lasting paint job. Be sure to wear gloves, a dust mask, and protective goggles.
Scraping siding. Begin by removing dirt and any blistered or cracked paint from wood siding with a hook-blade paint scraper, scraping in line with the wood grain. You don’t necessarily need to remove the paint down to the bare wood, but you should remove all flaking paint.
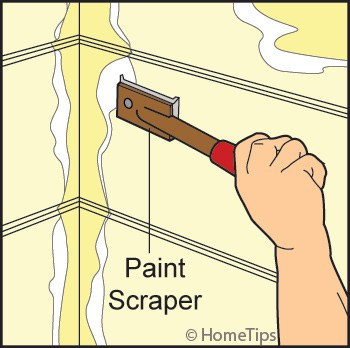
Scrape from all directions to ensure getting all of the loose paint. Hold the scraper flat—with two hands, if necessary—so you don’t gouge the wood.
To remove any loose paint from a smooth stucco surface, use a scraper as discussed above. If the surface is textured, remove loose paint with a wire brush. Then, regardless of whether the surface is smooth or textured, give the stucco surface some “tooth” for new paint to grip by “scratching” it with a wire brush.
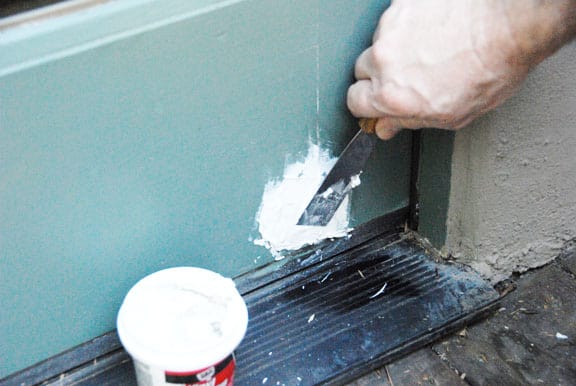
Filing siding and trim. Use a putty knife to fill deep gouges or holes in wood siding with vinyl exterior spackling compound or, for a semi-transparent stained finish, wood-toned filler. Allow the compound to dry completely. Then, repeat if necessary.
Sanding siding and trim. If you need to remove large areas of loose paint from wood siding or trim, use a power sander.
A disk sander takes off the most material the fastest, but can also leave swirl marks. Use a disk sander if you want to get down to the original wood in a hurry. A random-orbit sander is a more subtle, controlled choice.
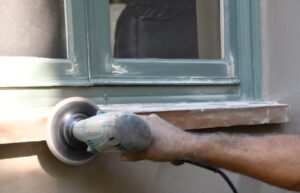
Work in 3-foot by 3-foot sections, guiding the sander horizontally across each board, in line with the wood grain. Start with coarse 60-grit paper and then follow-up with finer 100-grit paper to remove abrasion marks. The final light sanding is often easiest to do by hand.
For metal siding, use medium-grade sandpaper on a sanding block. Sand any chipped or peeling paint until the surface is smooth. Remove any chalking or dust with a clean rag.
Sealing siding. If water damage could be a problem in the future for wood siding, plan to apply water repellent before priming with an oil-based prime coat and covering with two coats of high-quality paint.
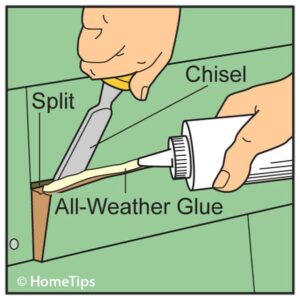
7) Caulk Siding and Trim
Before painting, seal-up any gaps between siding and trim. Painters recommend using paintable100% acrylic caulk for multi-purpose caulking. For caulking seams where heavy water flow can occur, choose a paintable polyurethane (PL) caulking compound.

For larger gaps or cracks, choose a latex-based insulating foam sealant that expands into the area to be sealed, providing an effective barrier against both pests and drafts. You can buy insulating caulk online at Amazon.
Caulk the holes where plumbing and electrical lines enter through siding, and seal around exterior vents from bathrooms or kitchen exhaust fans.
Also caulk the space where siding meets the foundation to prevent cold from entering the house. In fact, caulk wherever two different materials meet, such as where flashing abuts concrete. A good choice for this application is a paintable 100% acrylic caulk that can adhere well to concrete and masonry or a polyurethane sealant designed for concrete and masonry.
8) Prime Bare Wood and Stains
Once caulking compounds and wood fillers have completely dried, prime any bare wood with a high-quality alkyd or 100% acrylic primer. Also prime any stains to prevent them from bleeding through the final paint coats.
Wait for clear, dry weather before you prime and paint. Outdoor temperatures should be between 50 and 90 degrees F. Don’t prime or paint in the morning before the dew has evaporated, and stop painting before evening dampness sets in. Don’t paint on windy or dusty days.
To improve coverage of your finish paint coats, you can tint the primer toward the finish color.
For best adhesion, brush-on the primer. Using a 4-inch brush for siding or a 2-inch brush for trim, work from the top down, brushing in line with the siding’s grain. Brush out any drips or splatters. t
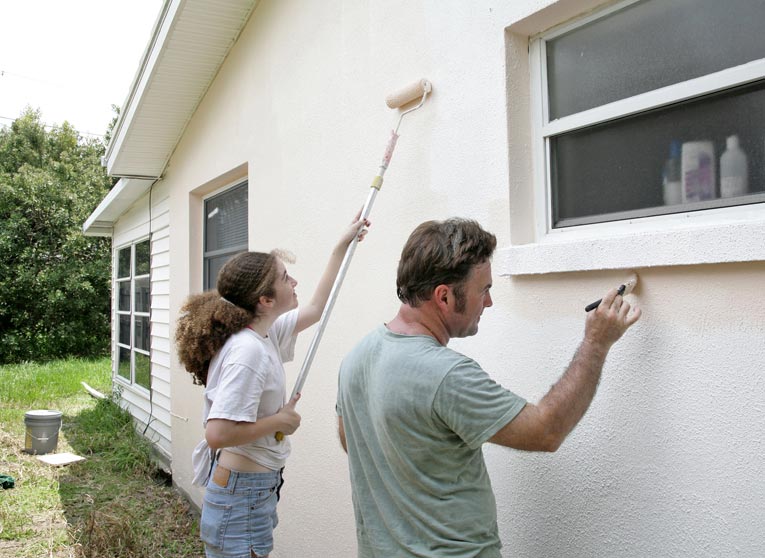
9) Paint the Siding
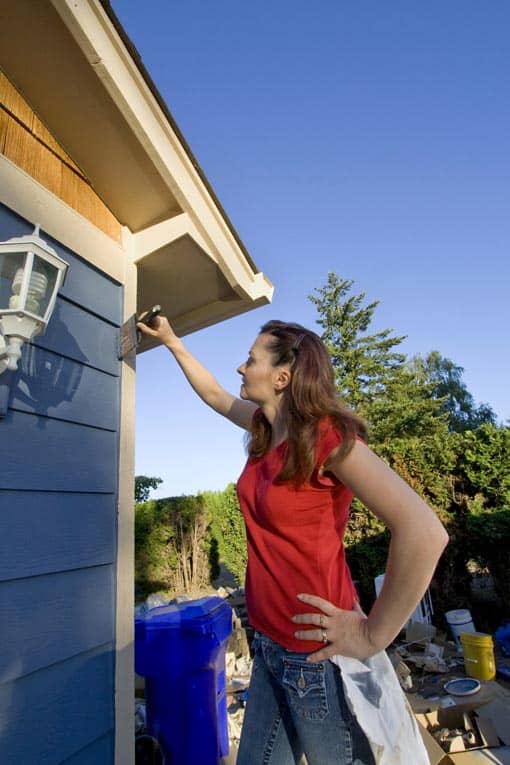
Paint the siding before the trim, beginning at the top—fascia and eaves—and working down the wall.
Helpful video. This quick-moving video offers a wealth of tips for painting both wood board and shingle siding. It includes subjects such as how to properly raise and safely use a tall extension ladder, paint scraping techniques, and more.
Painting Wood Siding
The technique for painting wood siding surfaces with a brush goes like this:
Dip a high-quality 4-inch paintbrush about 2 inches into the paint (so it doesn’t collect too much paint).
Tap it against the side of the paint can or bucket to remove excess paint.
Lift it horizontally, and then press the brush’s paint-heavy side against the siding board.
Brush back and forth to spread the paint evenly on horizontal siding or, for vertical siding, up and down.
Avoid lap marks by painting all of the way across three or four boards at a time. Brush-out any drips.
With lap siding, paint each board’s underside edge before painting its surface, brushing horizontally.
Painting Stucco Siding
Stucco preparation typically involves cleaning the surface, patching pits, cracks, and chips with stucco patching compound, and removing any loose paint.
Stucco siding can be spray painted, but you will get better paint adhesion by applying paint with a roller that has a nap suitable for the wall’s texture. The heavier the texture, the thicker the roller’s nap should be.
For best adhesion, apply the paint with a roller, and then brush it in with a 4-inch nylon-bristle brush. Work from the top of the wall down.
For more, see How to Paint Stucco Siding.
Painting Brick and Masonry
Masonry walls, including brick and concrete, can be painted. First clean them with a solution of TSP (tri-sodium phosphate) or a phosphate-free alternative. Wear rubber gloves and safety glasses or goggles while mixing and applying the solution. Rinse the area thoroughly.
Before painting, prime the surface with a latex primer made specifically for masonry. Paint brick with a 1-inch-nap roller or paint concrete with a 3/8-inch-nap roller. Choose 100% acrylic latex paint. When the paint is dry, touch up as needed with a brush.
Painting Vinyl Siding
Vinyl siding usually doesn’t need to be painted because the color permeates the material. Then again, if you don’t like the color of your vinyl siding, you can paint it. For a sound finish, apply two coats of 100% acrylic latex paint. Be aware that, if you do paint your vinyl siding, it will require repainting in a few years.
Painting Aluminum Siding
Before painting aluminum, apply primer. If aluminum siding is in good shape, you can use a latex metal primer. However, if the surface is oxidized, do not use a latex primer: A typical ingredient of latex is ammonia, which can have a negative reaction with the oxidation. Instead, use an alkyd-based primer that has been thinned one part paint thinner to four parts primer. Your finish coat will cover best if you tint the primer toward the finish color with about half the tint in the final finish.
For the finish, apply one or two coats of premium 100% acrylic latex paint made for metal siding. In most cases, satin or eggshell finishes look good on metal siding and offer longevity. Apply the paint with a paintbrush, as discussed above, under “Wood siding.”
For more see How to Paint Aluminum Siding.
10) Paint the Trim
Use a 2-inch angled trim brush and a 1 ½-inch sash brush to paint trim. Always brush in line with the wood’s grain.
Dip the brush into the paint about 1 to 2 inches, tap it against the side of the paint can or bucket to remove excess paint, and then draw the brush smoothly across the trim.
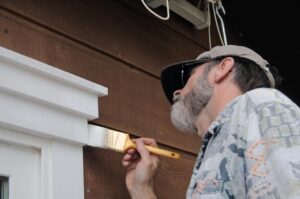
Work in the paint by brushing perpendicular to the grain, and then draw the brush in line with the grain to even and properly align the finish.
Painting a Window
When painting a window, begin with the muntins and then paint the stiles, rails, head casing, side casings, and sill. If the window sash is operable, open it so it won’t be sealed shut.

When painting along glass, don’t bother to mask it if you have a steady hand. Allow the paint to lap onto the glass by about 1/16 inch. Remove the wet paint from the glass with a rag wrapped around the end of a putty knife. Then, after the paint sets-up, use a razor blade to remove any remaining paint.
Painting a Door
When painting a door, it is usually easiest to paint it in place, opened over a drop cloth. In some cases, it may be easier to remove the door and paint it on sawhorses.
On a raised- or recessed-panel door, start with the inset panels, and then paint the panel moldings and recesses, horizontal rails, vertical stiles, and mullion.
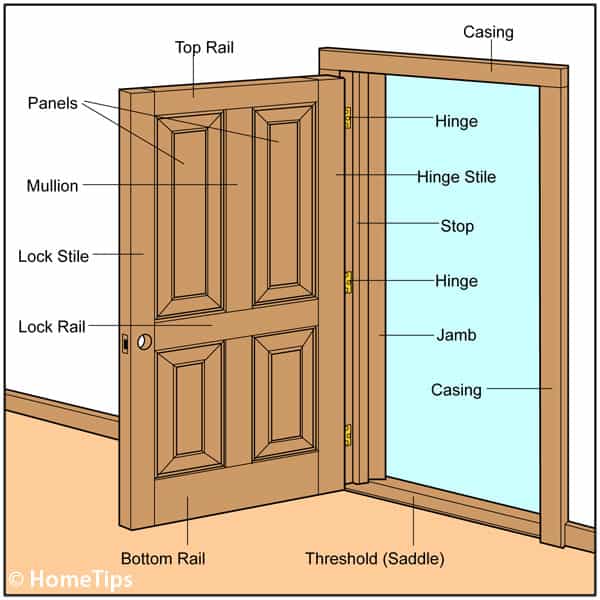
When painting trim adjoining siding, use painter’s tape to mask the siding. Remove the tape as soon as the paint sets-up.
Here is a good video that shows painting techniques and includes some other door improvements:
11) Clean Up Properly
Use soap and water to clean up latex paints, and paint thinner to clean up alkyd paints. Clean your brushes and gear right after painting. Do not ever pour paint thinner or excess paint down the drain or onto the ground—this is a very serious source of ground-water pollution. Keep old paint and solvents in an old sealed paint can, and dispose of it at a toxic-waste collection site.