Step-by-step DIY instructions on how to size, plan, buy, and install a clothes-closet organizer

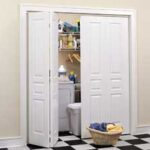
Closets come in all shapes and sizes, but one thing they all have in common is that they’re not big enough. Whether a closet is small or large, we inevitably manage to fill every available inch. As a result, we can become overwhelmed with clutter.
The best answers to this problem are 1) minimizing the stuff we accumulate (good luck!), and 2) installing a closet organization system that will take better advantage of every available cubic foot. The latter is what we explore here—employing a closet organization system to improve closet storage.


The best storage maximizes the use of space and keeps things appropriately accessible. A raft of closet organization systems can do this.
Modular cabinet-style closet organizers can be installed by closet organization pros, or you can go the do-it-yourself route and install your own ready-to-assemble (RTA) kits made of melamine or wood-veneered panels.
Professionally installed systems can be extremely efficient, effective, and expensive. RTA systems are more affordable, and most are relatively easy to assemble and install if you have a few basic DIY skills.
Wire closet organizer systems are also relatively easy to install and can be a great answer for some types of organization. A combination of various products is often the best solution of all.
Planning a Closet System
When choosing the best products for organizing your closet, focus on what you want to store. Using a tape measure, check the hanging length of dresses, coats, shirts, blouses, and pants. Then figure out how many lineal feet of hanging rods and shelves you will need to hang your clothes so that they’re not crowded.
Plan to put items that you use frequently on open shelves. Top shelves are fine for bulky articles, sweaters, hats, and the like.
Make a rough drawing on graph paper, including basic dimensions. This can serve as a map for working out your needs once you know the dimensions of the storage systems you might employ.
Wire Closet Organizers
The easiest and least expensive path to an organized closet is to buy coated wire shelves and organizers. These come in kits to accommodate various sizes of closet; you can also purchase individual components. The standard shelves are not suitable for holding small clothing items such as socks or underwear, but small mesh wire baskets work well.
Such systems are easy to install, inexpensive, and sturdy. Heavy-gauge steel shelves coated with vinyl or chrome stand up to weighty objects and the test of time, resisting the expansion and contraction common with wood shelving units and the sagging or warping that can occur with plastic storage.

In a simple wire shelf organization system, shelves attach to the wall via hooks, and diagonal metal supports affix to each shelf end to provide increased support.
Begin by cleaning out the closet. Use a hammer and flat pry bar to remove the existing shelving and rods. Patch the holes with spackling compound and paint before any installation, as painting will be difficult after the shelves are in place.
Often, a kit will save you time and money. If you buy a kit, make sure that it has everything you need, and comes with all the necessary parts. If you are sure of your dimensions, consider having the home center cut the shelves and hanging track for you so that all you have to do is hang them on the walls. Otherwise, plan to cut them yourself with a hacksaw.

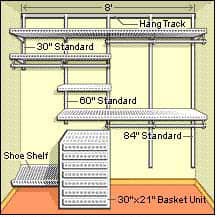
There are two basic types of wire shelving: One uses a top-mounted horizontal “hanging” track that holds equally spaced vertical shelf standards, which can be adjusted. The other is a non-adjustable wire-shelf system that utilizes clips and brackets or standards for support.
Installing Wire Closet Shelves
With a simple wire shelf organization system, shelves attach to the wall via hooks, and diagonal metal supports affix to each shelf end to provide increased support.
When installing wire closet shelves, begin by plotting where you want your shelves to go. It is okay to affix shelves to drywall, but keep in mind that it is important to attach shelves to studs if they will carry heavy loads. Re-size shelves, as needed, using bolt cutters or a hacksaw. Attach rubber end caps to the cut ends.
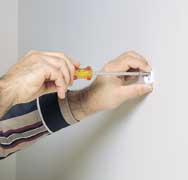
1 Place a level on the wall where you want to attach your first shelf. Draw a line along the level to mark this position.
2 With a drill, make a hole for the expanding anchor hook that will fasten the shelf to the wall. The shelving manufacturer should specify the size of this hole.

3 Place the anchor hook into the hole. Fasten its screw tight. Duplicate this step to insert another anchor hook at the shelf’s opposite end. (Note that you do not need to use anchor hooks if you are drilling directly into wall studs.)
4 Align the shelf so that it sits and hangs on the two anchor hooks.
5 At the front edge of one shelf end, affix the diagonal support piece using a bracket. Check to make sure the shelf is level, and then drill a hole for an expanding anchor hook where indicated at the base of the diagonal support.
6 Place the anchor hook into this hole, and fasten the screw through it to secure the support to the wall. Repeat this process for the opposite shelf end. (Again, you will not need anchor hooks if you are drilling into studs.)
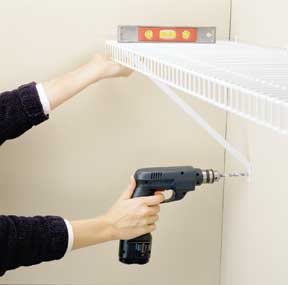
7 Repeat these directions to install the remaining shelves.
Installing Track-Mounted Shelves
For track-mounted closet shelves, begin by plotting where you want the top hang track to go, keeping in mind your shelving system. Plan to affix the highest shelf at an accessible height and attach the track to the wall horizontally approximately 6 inches above it.
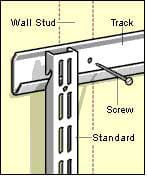
1 Use a level and pencil to draw a line around your closet 6 inches above where you want the top shelf. Using a stud finder, draw a faint line indicating the location of each wall stud.
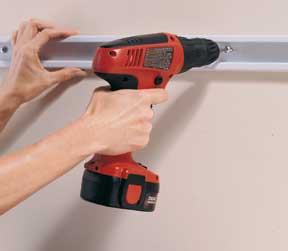
2 On each wall, cut a hanging (horizontal) track to fit the width of the storage area in the closet. Have a helper hold the track on the level line while you drive screws through it into every available stud. Make sure the track is secure.
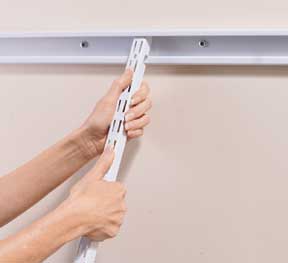
3 Place the first shelf standard (the long vertical track to which you will attach the shelves) into position on the hang track. It is best to allow a distance no greater than 4 inches between the end of the shelf and this first standard (the same rule goes for the last standard) and place the standard over a stud, if possible. Check to make sure the standard is plumb, and then insert a screw through its center and into the stud (use expanding anchor hooks if you can’t fasten to studs, but be aware that these won’t bear as much weight).
4 Position the additional standards 16 to 32 inches apart, just slipping them onto the track (the weight of the shelves will solidify the structure). If necessary, cut them to length with bolt cutters or a hacksaw and cover cut ends with rubber end caps.

5 For shelf supports, slip the shelf brackets into the slots on the standards according to your layout. Cut and install the longest shelves first. Then measure and cut the shorter shelves as needed. Secure the shelves onto the shelf brackets.
6 Install a wire basket unit or shoe shelf. Sliding basket units come in various heights and widths. Set yours in place and attach two or more clips in the back. Be sure to position the clips where you can screw them into a stud.
A shoe shelf may be simply a standard shelf turned upside down, with brackets that angle downward for easy access to the shoes.