Whether your attic is finished or unfinished, this expert DIY guide will show you how to insulate it. Includes where insulation goes, the need for vapor barriers, and basic installation techniques.

How to Insulate a Finished Attic
How to Insulate an Unfinished Attic
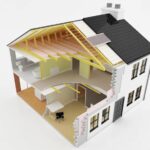
In an unfinished attic, the goal of insulation is to keep the rooms below cool in summer and warm in winter. That means insulating the attic floor only—not the walls—and having vents in the roof. With a finished attic, insulation must help keep the attic areas comfortable.
How to Insulate a Finished Attic
A finished attic should be insulated much like the rest of the house, with insulation in the walls and ceiling.
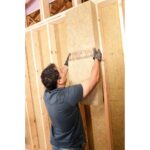
If your attic is already finished, it probably is at least partially insulated. However, most older attics are under-insulated so it’s a good idea to raise the R-value where possible. Unfortunately, you will not be able to get into all the openings. The ceiling will probably be closed off to you unless you remove the drywall or other finish material. You may have better luck getting behind sidewalls (also called knee walls).
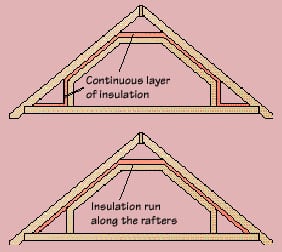
There are two basic ways to insulate a finished attic. If only the living space will be insulated, wrap the insulation around the room’s walls and ceiling and then continue along the floor of the non-living space. In this case, the area behind the knee wall will be uncomfortably hot or cold. If you want to keep the area behind the sidewalls from freezing in winter, apply insulation from the roofline all the way down to the floor.
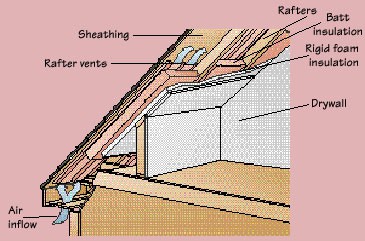
A roof should be able to “breathe,” meaning that air should blow from the eaves below to the roof above. Such ventilation keeps the roof cold in winter, which prevents ice dams that can damage your roof and even your house.
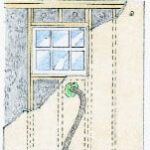
To provide ventilation in a roof that is insulated, install special rafter vents. These are stapled to the underside of the roof sheathing, between rafters. They allow air to move behind the insulation so the roof stays nice and cold while the room inside is insulated against the cold.
Make sure the eave vents at the bottom of the rafter and the ridge vent or other vents at the top are free of obstructions so air can move freely.

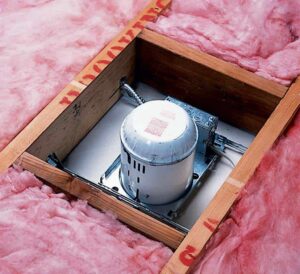
Caution: Avoid covering recessed lighting or any other heat-generating fixtures when installing insulation in an attic. See the adjoining photograph for the proper method of holding insulation back from these fixtures.
How to Insulate an Unfinished Attic
When you think of insulation, you may immediately think of your attic—and for good reason. The attic is one of the primary areas of potential heat loss in your home. Here is how to insulate an unfinished attic.
Preparing An Attic for Insulation
Place planks (1 by 6 or 1 by 8) or plywood sheaths across floor joists to improve your mobility in the attic. (NEVER step between joists, as you may break through the ceiling below.)
Make sure there are no uncovered electrical boxes or exposed wirings. Caulk up any spaces where air can pass between the attic and the rooms below, paying particular attention to areas surrounding light fixtures, electrical wires, pipes, and ducts. (For more on sealing up these areas, see our section on Insulation and Saving Energy.) Apply weatherstripping around the attic entryway. Check to ensure you have proper venting to eliminate moisture retention.
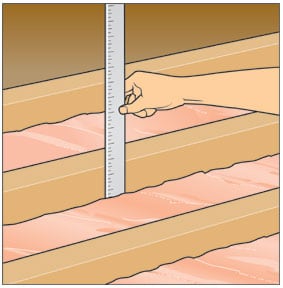
Figure out how much insulation to buy by following the directions outlined in How to Calculate Your Insulation Needs. If you have preexisting insulation, you may purchase a different type and layer it over your older material.
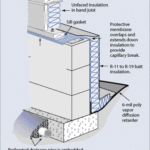
Installing a Vapor Barrier
Batts-and-blankets insulation often comes with a vapor-retardant facing, and some varieties of rigid foam insulation need no extra barrier protection. For other types, it is a good idea to install a thin barrier of polyethylene on the underside of the insulation to prevent moisture from compromising your material.
(Note that in some hot and/or humid regions, such sheeting may need to face the exterior side of your insulation.) Always use unfaced insulation near flues and chimneys, as well as in instances where you are merely adding new insulation on top of old.
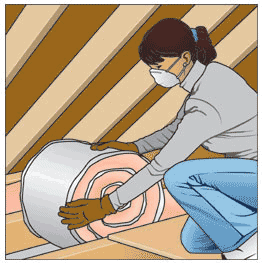
To Install Insulation Batts and Blankets
If using insulation with a vapor-retardant facing, install the material with the vapor-retardant side down.
Begin at a wall and work toward the center of the attic floor or the entryway, carefully placing insulation between joists and ensuring a snug fit. Be careful not to compress the material when pressing it in place. Allow insulation to overlap the top plate of the exterior wall, and for additional protection, install insulation across the tops of joists, as well. Cut each run to the proper length.
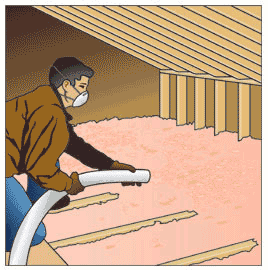
To Install Loose-Fill Insulation
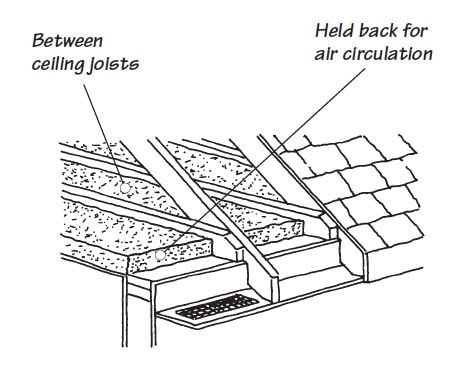
With a loose-fill blower (these can often be rented from your local home improvement retailer), begin filling the space between joists with insulation, starting from the walls and backing up slowly toward the center of the room or the attic entryway. Pay particular attention to areas where insulation must fill in around obstructions. Leave vents uncovered. It is best to have a friend help you with this task, as one of you can hold the hose and the other can control the flow of insulation from the hopper.
With a helper to load the blower with insulation as needed, start at the perimeter of the attic and work toward the attic access door. Fill every joist space completely and evenly with the insulation, leaving attic vents uncovered. Level uneven spots with a rake.