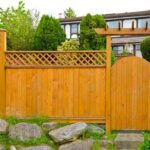
This step-by-step guide will teach you how to build a simple garden trellis, a structure that can be used to support climbing plants.

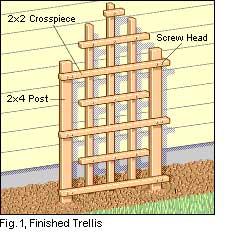
A trellis is any structure made of pieces arranged in a crossing pattern, and is essentially a ladder for climbing plants. Here’s what it will take to build one like the one shown here.
Skill level: Beginner.
Estimated time: 1/2 day.
Materials: Two 8-foot 2x4s; six 8-foot 1x2s; 1 pound of 1 1/4-inch deck screws; small amount of gravel.
Tools: Circular saw or hand saw; drill; post-hole digger or narrow shovel; tape measure; framing square; level.
Overview
Design a trellis to accommodate the climbing plant you have in mind. Some vines will grab onto any surface with grasping tendrils; bushier plants often need to be tied to a trellis. In general, the more delicate the climbing plant, the smaller the open spaces in a trellis should be.
The design below may be followed to the letter, or you can use it as a springboard for your own ideas. We use 2×4 posts and 1×2 crosspieces, but you may want smaller pieces for a more delicate look. Use lumber that is rot-resistant, such as dark heartwood of cedar, redwood, or pressure-treated wood.
1. Attach the long horizontals to the 2x4s.
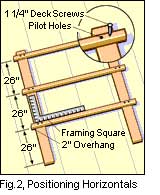
Cut three pieces of 1×2 to 4 feet. Lay the two 2x4s on a flat surface, positioned so they are parallel and 42 inches apart. Lay the three 1x2s on top of the 2x4s, positioned as shown (see Figure 2). Use the framing square to see that the structure is square, and double-check with a tape measure to make sure that the 1x2s are parallel to each other. Drill pilot holes and drive two deck screws into each joint.
2. Attach the vertical 1x2s.
Flip the structure over, so the 1x2s are lying on the working surface. Cut the three vertical 1x2s: two at 72 inches and one at 84 inches. Position the long vertical in the exact middle of the structure, its bottom end 2 inches below the bottom horizontal 1×2. Position the other 1x2s centered between the middle vertical and the 2x4s. Drill pilot holes and drive one screw into each joint.
Flip the structure over again. Cut three 1x2s to 30 inches and one to 8 inches. Position them as shown in Figure 1 above, and attach them by drilling pilot holes and driving screws.
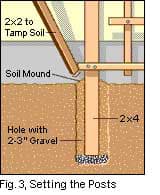
4. Set the posts.
With a helper, position the structure where you want it to be, and mark the post holes. Dig them about 2 feet deep, and set the posts in the holes to test for the correct depth. Shovel 2 to 3 inches of gravel into the bottom of each hole, so rainwater can drain away from the post bottoms (see Figure 3).