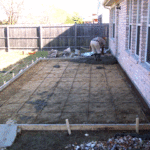
A concrete slab may be cast at the same time as footings or after the footings have set up. The slab’s overall dimensions are determined by the size of your new structure.

Before casting a concrete slab, first place any plumbing or electrical conduit that will run under or through it. After casting the slab, do not allow the surface to dry too quickly or it may crack.
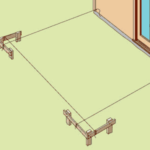
Spray it with a light mist of water, cover it with plastic sheeting, and allow it to cure for three days (longer in cold weather). Begin by marking the slab’s placement on the ground with powdered chalk, or stretch mason’s lines between batterboards to determine the perimeter of the foundation.
A rectangular slab should have corners at precise 90-degree angles. To ensure the corners are square, lay out a triangle with sides 3 feet, 4 feet, and 5 feet long.
Excavate a flat-bottomed hole for a 4-inch-thick slab; in areas where frost or drainage may be a problem, the slab should be poured over a 4- to 6-inch gravel bed, so dig deep enough to accommodate this.
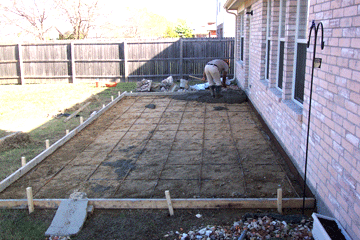
Build temporary forms from scrap lumber nailed securely to stakes. Make sure the top edges of the forms are level to expedite finishing the concrete later. Pour the gravel bed.
Reinforce the area as required by code (typically with 1/2-inch reinforcing bar around the perimeter and 6-inch-square N. 10-10 welded-wire mesh within the slab area). Support the mesh about 2 inches above the base with small pieces of brick or block.
Thoroughly dampen the soil or gravel. Then, beginning at one corner, place and spread the concrete. Work the mix up against the form, and compact it into all corners with a shovel or mortar hoe by pushing (not dragging) it. Don’t overwork the material or the heavy aggregate may sink to the bottom.
With a helper, move a straight 2 by 4 across the top of the forms to level the concrete, using a zigzag, sawing motion. Fill any voids with more concrete and re-level.
To smooth the surface, move a darby (which you may want to rent) in overlapping arcs and then in overlapping straight, side-to-side strokes. Keep the tool flat—don’t let it dig in. After the water sheen disappears from the concrete, but before the surface becomes really stiff, smooth it once more with a wood or magnesium hand float.
While the concrete is still plastic, install anchor bolts where required by your plan, typically every 3 to 4 feet.