If you are building a new house or having a major remodel done on your existing home, it will pay off in energy savings and increased comfort to have underfloor insulation installed. During the early phases of construction, the builder should inform all subcontractors (plumbing, electrical, HVAC, etc.) that they need to keep the space between the floor joists as clear as possible.

1) Have drain lines, electrical wiring, and ductwork run below the bottom of the insulation so that a continuous layer of insulation can be installed. If you live in an area with freezing winters, supply plumbing may be located within the insulation for added protection. The best approach is to run supply plumbing together in a few joist spaces. The insulation can be split and run around the plumbing.
2) All air leaks between the conditioned area of the home and the crawlspace should be sealed. High-priority leaks include holes around bathtub drains and other drain lines, plenums for ductwork, and penetrations for electrical wiring, plumbing, and ductwork (including duct boot connections at the floor).
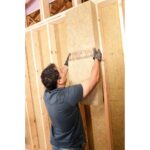
3) Insulation batts with an attached vapor barrier are typically used to insulate framed floors. Make sure the insulation is the proper width for the joist spacing of the floor being insulated. Complete coverage is essential; there should be no insulation voids. The batts should be installed flush against the subfloor to eliminate any gaps, which could serve as passageways for cold airflow between the insulation and the subfloor. The batts also should be cut to the full length of the joist being insulated and slit to fit around wiring and plumbing.
4) Have the band joist area between the air ducts and the floor insulated as space permits. Use insulation hangers (wire staves) spaced every 12 to 18 inches to hold the floor insulation in place without compressing it more than 1 inch.
5) The orientation of the vapor barrier depends on the home’s location and climate. In most parts of the country, the vapor barrier should face upward. However, in certain regions of the gulf states and other areas with mild winters and hot summers, it should face downward.
6) All ductwork in the crawlspace should be insulated.
7) All hot and cold water lines in the crawlspace should be insulated unless they are located within the insulation.
8) Crawlspace vents should be closed after ensuring that the crawlspace and all the construction materials within are dry.
For insulating truss floor systems, it’s better to have netting or foam board insulation installed to the underside of the floor trusses. Then, the space created between the netting or insulation and the subfloor should be filled with loose-fill insulation.
If you properly insulate your crawlspace, in addition to air sealing and controlling moisture, you will save on energy costs and increase your home’s comfort.
How to insulate a crawlspace depends on whether it’s ventilated or not. Traditionally, crawlspaces have been vented to prevent problems with moisture, as dictated by most building codes. However, many building professionals now recognize that building an unventilated crawlspace (or closing vents after the crawlspace dries out following construction) is the best option in homes using proper moisture control and exterior drainage techniques.
There are two main reasons for this line of thinking: 1) Ventilation in the winter makes it difficult to keep crawlspaces warm; and 2) warm, humid outdoor air in the summer brought into the crawlspace through foundation vents makes it difficult to dehumidify the space. In fact, this air can increase moisture levels in the crawlspace.
Insulating an Unventilated Crawlspace
If you have or will have an unventilated crawlspace, then your best approach is to seal and insulate the foundation walls rather than the subfloor.

The advantages of insulating the crawlspace are as follows:
- You can avoid the problems associated with a ventilated crawlspace.
- Less insulation is required (around 400 square feet for a 1,000-square-foot crawlspace with 3-foot walls.)
- Piping and ductwork are within the conditioned volume of the house so they don’t require insulation for energy efficiency or protection against freezing.
- Air sealing between the house and the crawlspace is less critical.
The disadvantages of insulating a crawlspace include the following:
- The insulation may be damaged by rodents, pests, or water.
- A radon mitigation system will require ventilation of the crawlspace to the exterior. Not planning for radon-resistant construction may necessitate air sealing the floor to mitigate the radon through ventilation.
- The crawlspace must be built airtight, and the air barrier must be maintained.
- The access door to the crawlspace must be located inside the home through the subfloor unless an airtight, insulated access door in the perimeter wall is built and maintained.
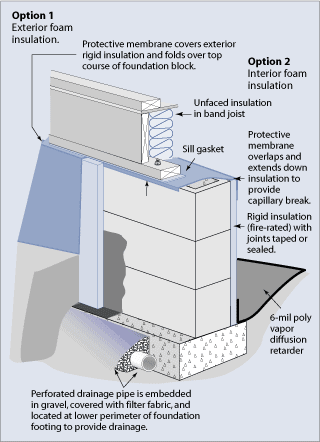
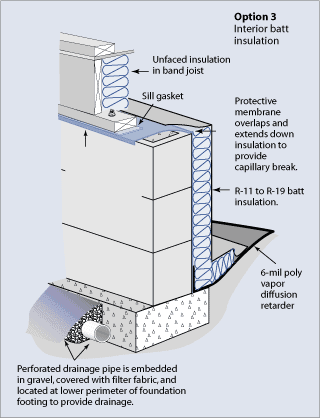
Insulating Crawlspace Walls
1) Review plans for this method of foundation insulation with pest control and local building officials to ensure code compliance.
2) Eliminate or seal the foundation vents.
3) Ensure that combustion furnaces and water heaters located in the crawlspace are sealed-combustion units equipped with a powered combustion system.
4) Seal all air leaks through the exterior wall during and after construction, including the band joist.
5) Locate the crawlspace access inside the home or install an access through the perimeter that will remain airtight after repeated use.
6) Install rigid foam board or batt insulation—exterior foam, interior foam, or interior batt—to achieve complete insulation coverage. Insulate the band joist with batt insulation as well as the crawlspace access if it’s located in the wall.
7) Install a continuous termite shield between the band joist and masonry foundation wall that covers the wall insulation and extends completely outside (or leave a 2- to 4-inch insulation gap at the top for termite inspection).
8) Install a supply outlet in the crawlspace, relying on the leakiness of the floor to provide the return air path.
Insulating a Ventilated Crawlspace
Here are some guidelines to follow for insulating a ventilated crawlspace:
1) Carefully seal any and all holes in the floor above (the “ceiling” of the crawlspace) to prevent air from blowing up into the house.
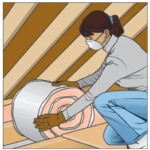
2) Insulate between the floor joists with rolled fiberglass. Install it tight against the subfloor. Seal all of the seams carefully to keep wind from blowing into the insulation. Also, adequately support the insulation with mechanical fasteners so that it will not fall out of the joist spaces in the years to come. Do not rely on the friction between the fiberglass and wood joists to secure it in place.
3) Cover the insulation with a house wrap or face it with a vapor barrier.
4) Install a polyethylene vapor retarder, or equivalent material, over the dirt floor. Tape and seal all seams carefully. You may also cover the polyethylene with a thin layer of sand or concrete to protect it from damage. Do not cover the plastic with anything that could make holes in it, such as crushed gravel. Be sure the headroom of the crawlspace meets local code regulations if you are considering pouring a concrete slab.
5) The orientation of the vapor barriers depends on the home’s location and climate.
When properly insulating a crawlspace, you also have to consider moisture control measures and air sealing. Finally, you need to consider radon resistance or control when installing any type of foundation.
Courtesy EERE