Get your dryer working in no time by handling your own repairs. For the secret of how to open up your dryer for easy repairs, just follow these steps.

Although a clothes dryer looks like an almost impenetrable appliance, it is fairly easy to open up to gain access to the working parts for repairs. In fact, because it’s pretty simple once you know how, this is a great way to gain a clearer understanding of how this appliance works.
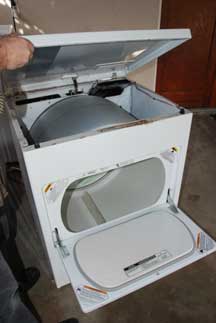
You can remove the top, the front, and the back, depending upon what you’re trying to do.
Be sure to disconnect the electrical power and, if it is a gas dryer, turn off the gas before doing any repair work.
As you work, pay attention to the sequence and gather each of the screws and parts in one place so reassembly will be easy.
The steps here show how to open a front-loading Kenmore dryer. If your dryer is a different make, the steps are probably reasonably similar, but refer to your owner’s manual. If you can’t find your owner’s manual, search for it online, including the brand and model number.
Removing a Dryer’s Top
To remove the dryer’s top, lift out the lint trap and, underneath it, unscrew the screws that secure the dryer’s top. For some dryers, you’ll need to remove screws at the top of the back panel.


Push a stiff, thin putty knife between the top and one side, about 2 1/2 inches from the front corner.

On some models, you will be able to just pry the top up. With others, you will need to release a locking clip at this location by pushing it with the putty knife. Then do the same at the other corner.
Lift the top up and tilt it safely against the wall behind the dryer. Wires will prevent you from removing it completely.
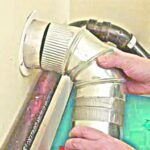
Removing a Dryer’s Back
Removing the back is trickiest, but not because of the way it is attached (it is just held in place with screws) but because you usually must wrestle the dryer away from the wall and detach the dryer vent before you can do this.
Fortunately, however, opening the top and front will suffice for most repairs.
Removing a Dryer’s Front
To open the front of the dryer, start with the lower kick plate panel. Unscrew this and take it off.

Then support the bottom of the tumbler drum with a couple of blocks or bricks so that, when you pull the full front of the dryer off, the drum won’t drop.

Find the screws and/or locking clips that secure the front panel to the sides and remove them. Also disconnect the wire module between the main body of the dryer and the door. Then you should be able to just lift off the front.
With access to the dryer belt, idler pulley, gas valve, and other parts, you can accomplish many repairs.
Helpful Videos for Opening Specific Dryers
The methods for disassembling clothes dryers vary slightly, depending upon the make and model of the appliance. The following helpful videos will walk you step-by-step through the process of opening some popular models.
How to Open a Whirlpool or Kenmore Dryer
This clear video by Appliance Parts Pros guides you through disassembling a dryer like the one discussed above.
How to Disassemble a GE Dryer
This shows how to take apart a General Electric (GE) dryer, which is very similar to certain models of Whirlpool and Samsung.
How to Take Apart a Maytag Dryer
This is a a really well produced video by Repair Clinic—easy to follow, clear, and accurate. They’re working on a new machine but, hey, what the heck? It makes it easier to see everything.