A helpful step-by-step guide that explains how to replace a cracked or broken floor tile. Includes materials you’ll need and in-depth instructions.

Replacing a cracked, defective, or broken floor tile isn’t as difficult as you might think. Of course, you can only replace the tile if you have or can find a match—this is one of the reasons it’s smart to store a few extras when you first install a floor.
Finding a matching tile at a tile dealer’s outlet can be almost impossible. Tiles vary widely. Even if you find a match that’s made by the same manufacturer, the color may be slightly different than your floor. If you don’t have any extras and you can’t find a match on your tile dealer’s shelf, ask if there is a “bone pile” of rejects or extras you can check. This is a last resort…and a long-shot.
The following video shows the process of removing and replacing a single defective floor tile.
Note that there is a slight difference between this technique and the steps that we show below. In the video, he leaves the hardened thinset mortar in place beneath the tile to hold the new tile level and flush with the other existing tiles. He then glues-down the replacement with construction adhesive.
In our examples illustrated below, we remove the thinset and replace the tile with new thinset. Keeping the new tile level with the existing floor may be easier with the video method, but choose the method that will work best for your situation—you won’t be able to tell the condition of the thinset until the old tile is removed.
Before installing the new tile, make sure there are no sub-surface problems that will cause more trouble. Once your have verified this, here’s how to do it:
1 Start by tapping the tile to find hollow spots in the adhesive that’s adhering the tile to the subfloor. These will be the best spots to break through.
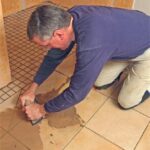
2 Wearing eye protection, use a hammer and nailset or cold chisel to punch a hole toward the center of the damaged tile where there is a hollow spot. Be careful not to chip or crack any of the surrounding tiles, and avoid driving the nailset or cold chisel into the adhesive or subfloor underneath.
3 Rap a cold chisel lightly with a hammer to break away the tile, starting at the center. The video above shows a good technique.
4 Pry up the pieces. Also remove the grout between the adjoining tiles and the one you’re removing.Brush the debris from the area, and vacuum it clean.
5 Paint the surface with latex primer and allow it to dry.
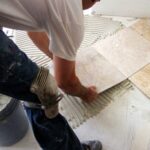
6 Using a small notched trowel, apply tile adhesive. Also “butter” the back of the replacement tile with adhesive.

8 Set the new tile into place and press it in with a slight twisting motion, taking care to maintain even grout joints all the way around. Using a rubber mallet or a hammer and block of wood, tap it gently to level it with the surrounding tiles. Remove any excess adhesive from the grout joints with an old screwdriver.
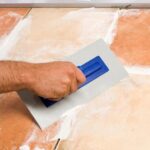
9 Allow the adhesive to set up and then, wearing rubber gloves, mix the grout to match the existing grout. Apply it to the joints with your finger. Clean any excess grout from the tile surface with a damp sponge.
NEXT SEE:
• Tile Floor Underlayment Options
• How to Install a Ceramic or Stone Tile Floor
• How to Lay Vinyl Tile Flooring