Plaster applied to wood lath is held in place by the “keys” that form when it squishes through the lath. (For more about how plaster walls are built, see Plaster Wall Construction.) Over time, these keys can disintegrate, causing the plaster to crack, crumble, and fall away from the lath. Settling of a house or the occasional earthquake can speed this process.

Expert advice and detailed instructions on repairing the most common plaster wall and ceiling problems, including cracks, holes, and sagging


Some plaster is of poor quality, and this may cause the plaster to crack and crumble. In addition, water damage from roof or plumbing leaks can discolor plaster and cause peeling or efflorescence, the leaching of salts and minerals to the surface.
Plaster can also be damaged from the normal stresses and strains of people living in a house: holes from wall hangings, scratches from furniture, spilled liquids. Fortunately, most of these simple problems can be easily fixed.
Cracks leading from windows and doors or along seams in the ceiling can signal more significant damage, so you may want to call in a contractor to take a look at your home’s structural integrity.
Repairing Small Cracks in Plaster
Small cracks in plaster are relatively easy to repair, with one condition: The plaster must be firmly anchored to the lath behind it. If, when you push on the wall, it flexes as though it has broken away from its support base, call a plaster specialist—the repair will involve removing the loose plaster and replacing it.
It just takes a little spackling compound to repair fine cracks, nail holes, and gouges in a firmly anchored plaster wall. Here’s how:
1. Widen the crack. Wearing safety glasses, take a lever-type can opener and use the point to widen the crack to about 1/8 inch, as shown at right. Or, you can use a screwdriver or a utility knife.

2. Blow out the plaster dust. Using a medium-bristle brush, scrub the area with a solution of water and tri-sodium phosphate (TSP) or a non-phosphate detergent.
3. Cut short pieces of self-adhesive fiberglass mesh joint tape and cover the groove with them.
4. Dip a sponge in clean water and dampen the area of the repair.
5. Mix setting-type joint compound and apply it over the tape and groove using a 3-inch-wide putty knife. Smooth it out evenly and allow it to dry.
6. Apply another coat of joint compound with a drywall knife or wide-blade putty knife. Apply it smoothly and “feather” the edges so that they taper into the undamaged area. Allow the compound to dry and then sand lightly to blend the patch into the wall at the edges.
7. Prime with a high-quality latex primer and then paint.
Repairing Large Cracks in Plaster
Larger cracks can be fixed in a similar way:
1 Widen the crack with the can opener and dampen the edges of the crack with a sponge.
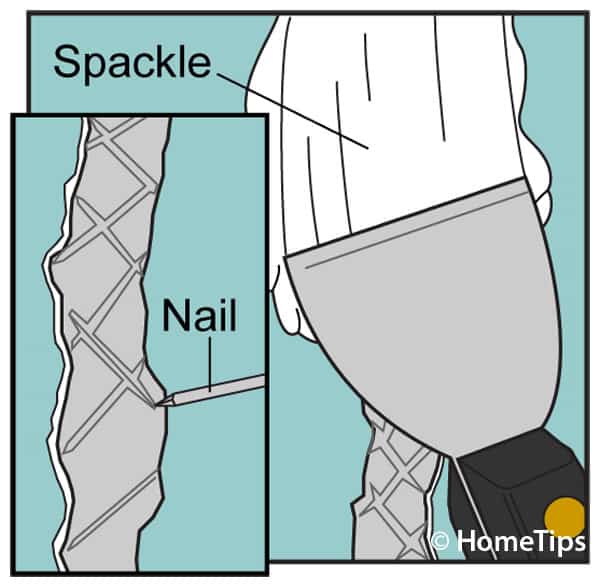
2. Fill the crack half full with patching plaster. When it has dried a little, score the plaster with a nail, as shown at right. This will give the next layer of plaster something to hold onto.
3. Dampen the patch again and apply another layer of patching plaster to about 1/4 inch of the surface. Let the patch dry and apply a coat of finishing plaster.
Repairing Holes in Plaster
It’s relatively easy to repair small holes in plaster if the lath backing that grips the plaster is intact. If the lath backing is fine, you can mix joint compound with plaster of Paris for the patch.
First brush away loose plaster and dust. Working from the edges inward, push the plaster mixture into and through the lath for a good bond. Apply an initial “scratch” coat. Let this dry, then apply a finish coat.
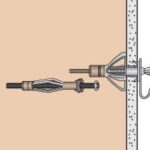
If there isn’t proper backing behind the hole, install backing first. Begin by enlarging the hole just enough to expose firm lath around the perimeter. Using tin snips, cut a piece of wire mesh that’s large enough to bunch-up and fill the opening when you push it into the hole. If necessary, wind wire ties wound around one or two dowels or sticks to hold it in place until the plaster mixture hardens.
Apply the plaster mixture in layers, allowing each to set before applying the next. When the patch is complete, and dry, just snip off the exposed wire.
Getting the surface coat smooth can be tricky, especially if the hole is large and you have limited plastering skills. In this case, use only joint compound for the final coat. When the patch is dry, use fine sandpaper to sand the surface smooth. Then prime and paint it to match the wall.
How to Fix Sagging Plaster
Flaking and cracking plaster are relatively minor repair items, but when the plaster starts to sag, or “belly out,” from a wall or ceiling, it indicates deeper problems.
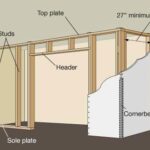
Plaster is heavy, and it needs a solid, well-anchored base to support its weight. This base is usually strips of wood or metal wire mesh (both referred to as lath) that are nailed to the wall and ceiling framing. When the plaster is applied, it squeezes through the lath, creating “keys” that harden to form a strong integral bond with the wall.
Over the years, plaster can dry out and lose its holding strength, or weaken from vibration, and the keys begin to break away. The lath can also pull away from the framing. Gravity and the weight of the plaster exert themselves, and the first sign is often sagging, followed eventually by the collapse of the plaster surface.
At this point, you may want to call in a professional. Repairing a large wall area is difficult enough, but if the ceiling is beginning to sag, working over your head with heavy, hard-to-handle materials is not an easy job. If you still want to attempt your own repairs, here’s how:
1. First, protect the flooring under your work area, because once you begin the entire affected area could give way. To prevent plaster dust from spreading into the rest of the house, hang damp sheets or tape plastic sheeting over the doorways and put an exhaust fan in a window. If you’re worried that much of the ceiling could come down at once, build T-shaped supports from 2 by 4s and use them to hold a piece of plywood flat against the ceiling while you work.
2. Use a hammer and cold chisel or wrecking bar to chip out a small area at the edge of the bulge (wear safety glasses). Once you can see behind the surface, you should be able to tell if the plaster has pulled away from the lath or the lath itself has come loose from the framing. If the lath has pulled away and the plaster is still well-adhered to it, you may be able to refasten the lath to the framing without removing the plaster.
3. Use long drywall screws that will penetrate at least half their length into the wood framing. Start near the edge of the bulge and press the ceiling upward as you drive the screws (you may have to shift your plywood support, and the tees holding it, as you work). Because the plaster and lath form an integral sheet, like a piece of drywall, it may go back up without a problem. However, if the lath has warped, or if the old nails in the framing prevent the lath from returning to its original position, this may prove impossible. You might have to first remove much or all of the plaster just to get the lath back up.
Note: Please see the reader comment at the bottom of this page for a method of reattaching sagging ceilings using drilled holes along the crack line on both sides.
4. If the lath is still anchored to the ceiling joists and the plaster has pulled away, your only option is to remove the old plaster. It’s a dirty job, but if there’s nothing holding the plaster to the framing, it will come down quickly.
There is another trick that professionals use to repair plaster walls and ceilings that have failed—leave the old plaster in place and reface the entire area with new drywall. Long screws with washer heads are used to pull the drywall and old ceiling back up to the framing, or as close to level as possible. You end up with a drywall surface, but it eliminates the problems of sagging, cracking, and flaking plaster once and for all.