This expert guide will help you choose the right camellias for your home. Learn about different types of camellias, and their planting, pruning, and care.

Types of Camellias
Planting Camellias
Caring for Camellias
Pruning Camellias
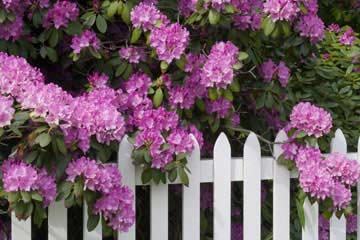
If you live in the mild coastal areas of the United States and British Columbia, you’re in camellia country. From September through May, camellias in shades ranging from white to pink to red add color to a winter garden. The rest of the year, they show off glossy, dark-green foliage—the kind home pastry chefs prize as the ideal form for creating chocolate leaves to decorate cakes.


Though camellias are considered mild-climate growers, newer varieties are now available that can take more cold. If you live on the fringes of areas where camellias thrive, look for extra-hardy varieties such as April Blush and April Dawn; Polar Ice, Snow Flurry, and Winter; and Bette Sette, Ice Follies, Pink Icicle, and Spring Icicle.
Types of Camellias
Three different camellia species are most often grown: Camellia japonica, C. reticulata, and C. sasanqua. You may also find a fourth species, C. hiemalis, which is similar to and was once sold as a variety of C. sasanqua.
Hybrids that combine desired characteristics of different species, such as abundant foliage and large flowers, are also gaining in popularity. And although it’s not grown in gardens, another camellia, C. sinensis, is cultivated for its leaves, which are harvested for tea.
Camellia japonica is what most people think of when they think of a camellia. It’s prized for its abundant, glossy foliage, its flowers ranging from 2 to 7 inches across in shades of white to pink to red, and its long bloom period. While it’s considered a spring-blooming camellia, the earliest japonicas begin blooming in October, and the late-blooming ones finish blooming in May. Alba Plena was the first camellia introduced to the West from Asia in the 1700s, and it’s still one of the most widely sold varieties.
The Camellia reticulata varieties are known for their large flowers, which may reach up to 9 inches across. The plants themselves tend to be open and rangy with dull green leaves. They look best underneath garden trees that provide light shade, and they don’t like to be crowded. Though flowers are usually red or pink, you can also find blooms that are white or variegated. Popular reticulatas include Buddha and Shot Silk.
Camellia sasanqua and its close relative C. hiemalis are early bloomers. Some varieties begin flowering as early as September; the late bloomers are finished in January. Sasanquas make up for their relatively short blooming season by producing masses of flowers. They also can take more sun than other camellias. Among the most well-known sasanquas are Apple Blossom, Mine-No-Yuki, and Yuletide.
Flower color is the first priority when choosing a camellia, so buy when plants are in bloom in fall and winter. Also check the blooming period; with smart planning, you can have flowers from September through May. As always, look for a healthy plant with a good overall form.
Planting Camellias
Though you can plant from containers any time of the year, it’s best to plant in fall or early spring, once the danger of frost has passed.
Though camellias can take full sun, the ideal spot is in dappled shade, preferably out of morning’s sun, which can cause light brown spots to form on the buds. If you plant under trees, be sure that the trees’ canopies are open enough to let in light and air; shade that is too dense will keep buds from setting. The plant should also be sheltered from strong winds.
As with azaleas and rhododendrons, camellias prefer an acidic soil that is fast draining but retains moisture. The ideal soil is rich in organic matter, so you may need to amend your soil before planting. If your soil is too heavy or claylike, or too alkaline, consider planting in a raised bed.
To plant from a container, dig a hole almost as deep as the soil in the container and twice as wide, tapering the sides outward as you dig. Build a small mound in the center of the hole. Remove the plant from the container and place it on the mound; the crown of the plant should be about 1 inch above the adjacent soil. Spread out the roots, and then begin to fill in the hole with the soil you dug out, firming it as you go. When finished, form a watering basin around the plant and water gently, adjusting the plant’s height as needed.
If planting a bare-root plant, first soak the roots for four hours. Dig a hole as you would for planting from a container. Form a mound in the center; the crown of the plant should sit about 1 inch above the adjacent soil. Put the plant in place, checking to make sure the height is right (fill in with soil if the plant is too low), and then spread the roots out around the mound. Holding the plant in place, add the soil that you dug up, firming as you go. When almost finished, gently water. If the plant settles, add additional soil beneath it to bring it back to the proper height. Finish filling in the hole, and then build a watering berm around it and water gently.
Caring for Camellias
Sufficient water is key to growing camellias. Camellias can dry out easily, even if they look fine, so if summer rains aren’t consistent, you’ll need to supply supplemental water from spring to fall. Watering basins or drip irrigation are ideal solutions. In dry climates, and when the plants aren’t in flower, overhead watering done early in the day will wash dust and pests off the leaves. To help retain moisture, add 2 to 4 inches of mulch around the plants.
Camellias don’t need a lot of fertilizer, so feed with a weak solution of fish emulsion when new leaves appear in spring and then at six-week intervals during the growing season. Use a low-nitrogen fertilizer once a month in November, December, and January. Look for a fertilizer formulated for camellias for the best results.
Many problems with camellias are the result of poor drainage, excess salts, or poor location. Drainage problems can be solved by amending the soil before planting or planting in raised beds. Excessive salts in the soil can be leached out by deep, slow soakings done twice during the summer growing season. If camellias in poor locations cannot be moved, shelter them from winds and sun.
Camellia petal blight starts with a brown spot on a petal and spreads, covering the entire flower. To prevent this, remove the fallen flowers from beneath the plant. If the problem is serious, remove all mulch from around the plant and replace it with fresh mulch. If only the edges of the petals are brown, sun- or windburn is usually the cause and the condition will quickly correct itself once the conditions are corrected.
Other problems may include bud drop, which may be normal for the plant, but it can also result from over- or under-watering. Check your watering schedule if the bud drop is severe. Dieback can cause new growth to die, followed by cankers forming on the branches. This is most common in wet weather, especially in the South. Cankers can also be a problem in California. Cut out the diseased branches and dispose of them. Then spray with a fungicide during the period of spring leaf drop.
Viruses may also attack camellias, resulting in yellowish leaves or variegated leaves and flowers. It is unsightly but doesn’t harm the plant. Because it can be difficult to diagnose the exact cause of the problem, the best approach is good gardening practices, including sufficient water, good drainage, mulching, feeding, and pest control.
Pruning Camellias
Camellias need little pruning. You’ll only need to prune to get rid of dead or weak wood, to thin out areas, or to shape the plant to a more pleasing form. Cut just above a leaf, a bud, or a side branch. Choose a leaf that points in the direction you want the new growth to go. Otherwise, cut just above the slightly thickened area that indicates the previous year’s growth.
If your plant overproduces blooms, remove buds during the middle of summer. Keep just one or two round flower buds in clusters at the end of branches. Keep a single flower bud every 2 to 4 inches along each stem.