Build a closet yourself, following these illustrated step-by-step techniques, including wall framing and finishing the wall with drywall.

Need more closet space? If you have adequate floor space and some basic carpentry skills, you can build a closet in a bedroom, guest room, den, or hallway that will look like it has been there all along.


The first step is to build a closet frame and fasten it to the surrounding walls. Next, you will trim the door opening and install the door(s) of your choice. Finally, you will hang the closet rods or customize the interior with rods, shelving, drawers, and any other accessories you desire. For information on outfitting a closet with an organizer, please see How to Install a Closet Organization System.
TOOLS AND MATERIALS NEEDED
| TOOLS | Carpentry tools such as hammer, power circular saw, handsaw, chalk line, plumb bob, combination square, framing square, and pencil |
| MATERIALS | 2×4 lumber for framing, shims or thin blocks, 8d, 10d, and 16d nails, drywall, drywall compound, tape, and screws, bi-fold doors with hardware and screws, door casing and molding, closet rod with pole sockets |
Planning to Build Closet Walls
Plan to build a closet frame from 2 by 4s, allowing an inside depth of at least 27 inches. You can construct the frame in one of two ways: Build the walls flat on the floor and then raise them up into position, or build them in place.
It is much easier to nail the framing members together on the floor if the room has a large, clear area to accommodate this. But, using this method, you will have to make a slight modification in the height of the closet walls because it is impossible to tilt an 8-foot-tall wall up into an 8-foot-high space. So, build the wall about 1/4 inch shorter than the height of the ceiling, and then place shims or thin blocks between the top plate and the ceiling.
Getting Started
Mark the positions of the top plate and the sole plate. On the ceiling, mark both ends of the center line of the new closet wall. Measure 1 3/4 inches (half the width of a 2-by-4 top plate) on both sides of each mark. Snap parallel lines between corresponding marks with a chalk line to show the position of the top plate.

Next, hang a plumb bob from each end of the lines, and mark these points on the floor. Snap two more chalk lines to connect the floor points, marking the sole plate’s position. If the closet has a side wall return, lay out the top plate and sole plate in the same way; use a framing square to make sure this will be perfectly perpendicular to the front wall. Cut each sole plate and top plate to the desired length.
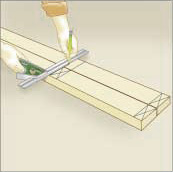
Lay each top plate edge to edge against its sole plate and flush at both ends. Beginning at an end that will be attached to an existing wall, measure in 1 1/2 inches (the thickness of a 2-by-4 stud), and then draw a line across both plates using a combination square. Starting from that end, measure and draw lines at 15 1/4 and 16 3/4 inches. From these marks, advance 16 inches at a time, drawing new lines for stud locations until you reach the far end of both plates.
How to Frame Closet Walls
Assemble the top and bottom plates, wall studs, and other framing members for each wall on the floor and then tilt the walls up into place, framing each wall according to the drawing above.
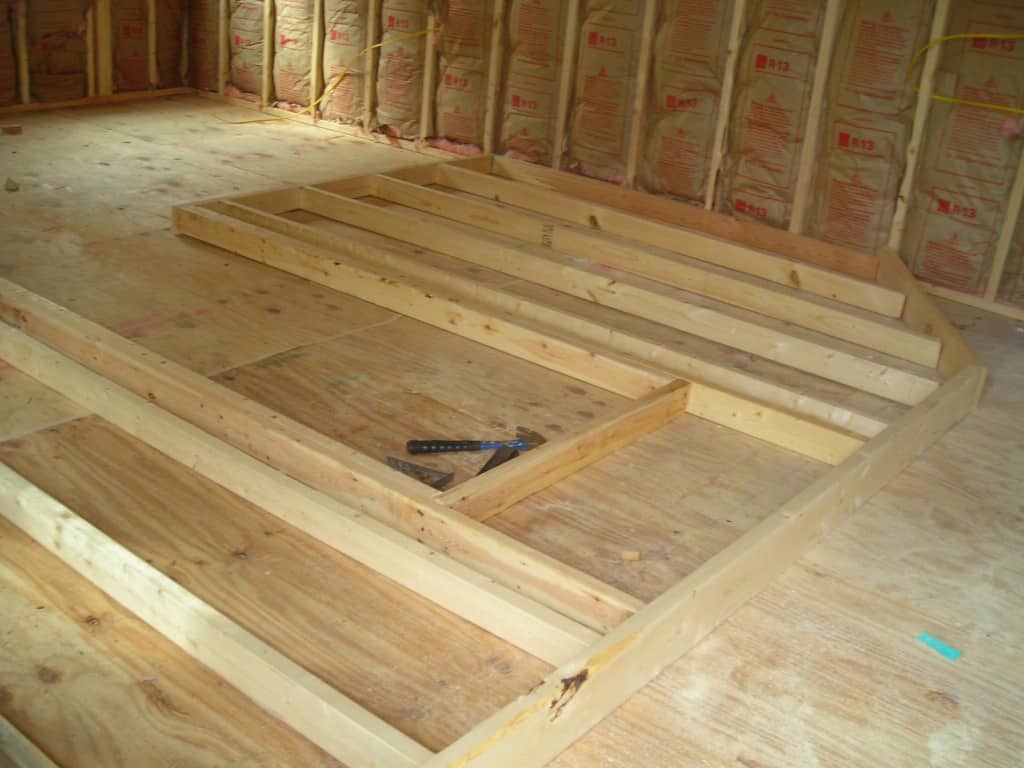
So that you can tilt it up, the wall must actually be shorter than the distance between wall and ceiling. Note that the sole plate has been cut out where it spans the door’s opening—you will cut this after erecting the wall.
The rough opening for the door requires a king stud and a trimmer stud on each side, a header across the top, and cripple studs between the header and top plate.
Cut the full-length studs to a length equal to the ceiling height minus 3 3/4 inches (for the 1 1/2-inch-thick top and sole plates and the needed 1/4-inch clearance).
Nail short cripple studs into the top plate at appropriate intervals, or, if you have nailed in studs across the doorway, cut these to size. Measure and cut the header, and then nail the header to the bottoms of the cripple studs with 16d nails. Using 8d nails, toenail the header to the king studs.
Measure and cut two trimmer studs (also called jack studs), and nail one to each king stud with 10d nails in a staggered pattern. You will probably need to adjust the width of the opening by adding a pair of trimmer studs on one side.
Once the walls are built, get a helper to help you lift them into place, and shim between the top plate and the ceiling joists. Anchor the end studs to existing wall studs or to the blocking that is inserted between the wall studs. (See How to Build & Panel a Wall.)
Nail the sole plate in place with 10d nails spaced every 2 feet, except where it runs across the planned doorway. Use a handsaw to cut out that area of the sole plate, taking care not to damage any flooring beneath it, and pry the sole plate away from the subflooring or flooring.
Finishing Closet Construction
Install gypsum wallboard to cover the studs, and tape the seams between wallboard panels. Protect any outside corners with metal corner bead. (For more about how to do install wallboard, see How to Build & Panel a Wall.)
Next, install pre-hung 1 3/8-inch-thick bi-fold closet doors, which move in metal tracks mounted to the bottom of the head jamb. Pivots turn in top and bottom brackets, and the doors are guided along the track by hardware that slides in the track. (Sliding doors run on rollers inside metal tracks with floor guides below that keep the doors in line.) Most doors come with all the necessary hardware. For step-by-step installation advice, see How to Install Folding Doors and How to Install Interior Trim.
The final step is to install a rod inside a closet—it simply fits into pole sockets. First, screw one socket in place, then insert the rod and level it before fastening the other socket. If the closet rod is very long, it may need additional support by a closet pole support hook that’s secured to the top or back of the closet near the middle of the rod. To maximize the use of your closet space, see How to Install a Closet System.
How to Build a Closet FAQs
What’s the first thing to do when building a closet?
Build a closet frame using 2 by 4s, ensuring the inside depth is at least 27 inches. Secure the frame to the surrounding walls.
What are the two methods for constructing the closet frame?
You can either build the walls on the floor and then raise them into position or build them directly in place.
What’s the benefit of building the closet walls on the floor?
Instead of nailing the framing members together vertically, where they will stand, it’s easier to assemble them on the floor and tilt the wall up when finished. You just have to be sure there’s enough space in the room to do this and make the wall about 1/4 inch shorter than the ceiling height to allow for tilting it into place. Use shims or thin blocks to fill the gap between the top plate and the ceiling.
How do you mark the top and sole plate positions?
Mark the centerline of the new closet wall on the ceiling. Measure and mark 1 3/4 inches on both sides of the centerline. Use a chalk line to snap lines between the marks, indicating the top plate position. Use a plumb bob to transfer these marks to the floor and snap chalk lines to mark the sole plate position.
How do you mark the stud locations on the plates?
Place the top plate and sole plate edge to edge and flush at the ends. Start measuring from the end that will be attached to an existing wall. Mark lines at 1 1/2 inches, 15 1/4 inches, and 16 3/4 inches. From these marks, continue marking lines every 16 inches until you reach the end of the plates.
ALSO SEE:
How to Install a Closet Organization System