Extending an electrical circuit is not a complicated process, but the job does require precision.

Even if you’re just giving your house a face-lift, you may discover the need to add a new receptacle, switch, or light fixture to an existing circuit. The easiest way in most cases is by simply extending the electrical circuit where wall, ceiling, and floor coverings already exist.
Selecting a Source of Power
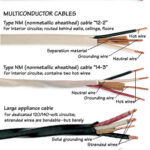
With the exception of switch boxes that do not have a neutral wire and switch-controlled fixtures at the end of a circuit, to extend a circuit you can simply tap into that circuit at any easily accessible receptacle, switch, fixture, or junction box. However, make sure that what you are tapping into is large enough to accommodate the new wires and that the box has a knockout hole through which you can thread the new cable. Also, you will want to find the easiest path through walls, ceilings, and floors to run the wires.
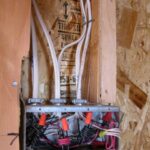
Before beginning any wiring project, make sure to turn off the power supply to the area. Confirm that the circuit is dead by using a circuit tester (also known as a neon tester). There are several steps you must take prior to actually installing the wiring when extending a circuit, and it is quite unlikely that you will come into contact with electrical wires early on in the process. Still, for safety’s sake, make sure the circuit is dead from the beginning of work.
Preparing for a New Housing Box
The first step in finding where the existing circuit is located is by assessing the underlying framework. This can be done in a few ways:
- Measure to find the wall studs on 16- or 24-inch centers.
- Look for nail holes or screw dents where the wall sheathing was attached to the studs.
- Use an electronic stud finder—by far the most effective and accurate way of finding the hidden wall studs.
After you have located an area you think will work, drill a small test hole where you want to place the box. Then, take a 9-inch length of stiff wire, bend it to a 90-degree angle, and insert it into the hole. Rotate the wire; if it cannot rotate a full circle without bumping into something, drill another small test hole a few inches away and try again. Keep trying until you find an unobstructed space.
If you are adding a new box to a room that already has boxes, try to place the new one at the same distance from the floor as the existing ones. Receptacle boxes generally sit 12 to 18 inches off the floor and switch boxes are usually placed 48 inches up from the floor.
Cutting a Hole in the Wall
Once you have located a suitable space for the receptacle, it is now time to cut a hole for it. Some housing boxes come with a hole-cutting template. If yours does not, simply hold the receptacle where you wish to install it and trace around it, omitting any protruding wings or brackets. Once the wall is marked, use a drywall saw or jab saw to cut the hole.
1 Insert the cable through a knockout hole in the box. Punch the knockout with the end of a screwdriver and twist it cleanly off.
2 Secure the cable to a metal box either with built-in cable clamps or with metal cable connectors. Always leave 6 to 8 inches of cable in the box with which to make the connection.
3 Several options are available for mounting a new box into the hole; most all use screws. Some ceiling boxes come with metal spring ears that pop open once in place to secure the fixture. (For more information, see How to Mount a New Electrical Box.)