This is a helpful DIY guide about whitewashing interior trim. Covers steps from stripping to cleaning, sanding, and staining interior trim.

Though wainscotting, trim, and wooden detailing often give a house character, some woodwork— specifically dark-stained softwoods—can look dated and overbearing, stealing the light and spunk from a room.
If your home has dark interior trim, what can you do to lighten the tone yet maintain the wood’s character? An excellent solution is similar to whitewashing. It involves stripping the wood, applying a special light-toned stain, and protecting with a clear finish.
The charm of this look is that it is at once both vintage and contemporary, offering the friendly driftwood warmth of Shaker furniture yet reflecting a metallic silver sheen. It is mixed from an oil-based “limed oak” stain, titanium dioxide—a white pigment—and powdered aluminum. The limed-oak stain is available at paint stores; the other two ingredients are sold at artist’s supply stores.
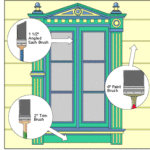
As with most staining or painting jobs, preparation is key. For the stain to take, all varnish or paint must be stripped and sanded from the wood. If your trim has years of built-up varnish, the stripping and sanding will be by far the most tedious part of the job.


For the stripping, you can use either paint remover or furniture refinisher, depending upon the existing finish. Paint remover will strip paint of multiple layers of varnish. Furniture refinisher is less caustic and can handle stripping one or two coats of varnish effectively (just apply it with steel wool and wipe the surfaces with a rag).
No matter which stripper you choose, work from a metal bucket and wear rubber gloves to protect your hands. Don’t forget to protect the floor with a dropcloth before you begin and plan to repaint wall areas around the trim.

You can sand by hand or, for a large area, use a power vibrating sander (a “palm sander” is the easiest to handle for this type of work). if sanding doesn’t lighten the wood satisfactorily, you can apply an easy-to-use, two-part wood bleach, available at paint stores.
To mix the stain, pour about 2 inches of limed oak oil-based stain into a plastic bucket. Add about 2 tablespoons of white titanium dioxide and mix well. Then stir in about 1 tablespoon of aluminum powder.
Test the stain in an inconspicuous place and modify ingredient amounts if necessary. Then tackle the actual application, working in areas that you can complete in about 15 minutes—the period the stain should set before you wipe it off. Use clean rags to wipe off all excess stain, rubbing in line with the wood’s grain.
Allow the stain to dry thoroughly—at least a day—and then complete the job with a non-yellowing clear finish such as an acrylic.