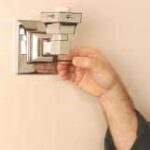
Smack dab in the center of many ceilings hangs a rather prosaic light fixture. Typically, this fixture wishy-washes a room with an overall glow. It makes the room usable but adds very little character, contrast, or lighting interest. If your home has one of these, maybe it’s time for a makeover.

We removed an outdated pendant light and mounted a 4-foot Halo “Miniature Trac” fitted with three solid-state, low-voltage transformers and lampholders. We chose low-voltage lighting for its energy efficiency, the control over “beam spread” that low-voltage lamps offer, and the “white” color of the light. Incandescent lampholders could be substituted for low-voltage. For either, you can get a broad range of lampholder styles and bulbs at lighting retailers.
- How to Dim LED Lights
- Understanding Color Temperature in Home Lighting
- Light Up Your Look—Stylish Vanity Mirrors with Lighting
- Smart Home Upgrade: The Best Motion Sensor Lights for Security and Convenience
- Dining Room Lighting Delights—Illuminate Your Space with Style
- Stylish Floor Lamps—Light Up Your Living Room
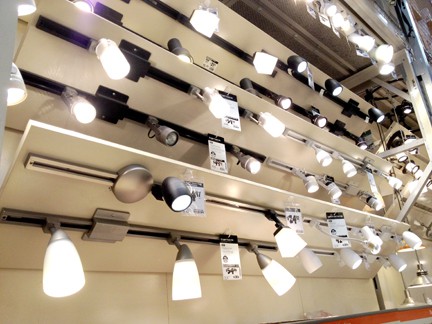
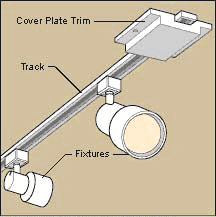
Available fixtures are only part of a track lighting system’s flexibility. You can mount lampholders anywhere along a ceiling- mounted (or wall-mounted) track’s length, route track in nearly any direction, and control fixtures so they cast light only where you want it.
Placing the Fixture
If an existing electrical box isn’t placed in an ideal location for lighting, you can either check with an electrician about running a new circuit, or you can take advantage of special track connectors to route the track from an existing box (you can buy straight, L, T, cross, and adjustable angle connectors).
This Halo track receives its power through a connector that locks into the track anywhere along its length, offering a measure of lateral adjustability. You can also power a track from one end, with a live-end connector. Or, you can power the track from an electrical outlet with a cord and a 3-pronged plug connector.

Proper choice and placement of fixtures can be tricky. For a complicated lighting scheme, you may want to find professional help. Some interior designers specialize in lighting design, and some quality lighting retailers offer skilled lighting consultants.
Tools & Materials
Supplies for this system include: one 4-foot track with toggle bolts and dead-end connectors; a floating canopy, a mounting bracket and connector; three solid-state low-voltage transformers with gimbal-ring lampholders, and 25W PAR 36 lamps.

You’ll need only a few tools: a measuring tape, a pencil, a drill with a 1/2-inch bit, Phillips and flat-blade screwdrivers, and a wire stripper/cutter.
Calculating Electrical Load
Be sure your new lights won’t exceed the house circuit’s electrical capacity (often 15 amps). This generally isn’t a problem with a small low-voltage system, but incandescent lights may overload your circuit.
Before installing, check your circuit for its amperage rating. Add up all appliances and lights drawing power from that circuit to figure the overall requirements. If this sounds confusing, be sure to get help from your lighting retailer or a qualified electrician.
To increase lighting control for more drama, also consider getting a quality dimmer switch (a standard incandescent dimmer can be used with these solid-state transformers).
Also don’t overload the track: The one we chose can handle a maximum electrical capacity of 20 amps per circuit if wired directly to an electrical box or 10 amps if a cord and plug-in connector are used.
Track Light Installation Steps
As with all electrical work, it’s important to check with your local building department for code requirements. Before doing any work, be sure to shut off the power to the light—not just at the light switch, but at the fuse box or circuit breaker.
1. After disconnecting the old lamp make sure the wires are suitable for connection. If necessary, clip the ends and strip off 1/2 inch of insulation. Strip the ends of new wires if they’re not already stripped.
Connect white wire to white and black to black. Ground the fixture’s green wire to the house system’s green wire, to an electrical ground wire, or to the metal electrical box (according to code).
After you’ve tightened wire nuts onto the joined wire ends, gently push excess wires back into the outlet box to get them out of the way.
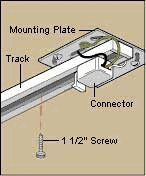
2. Before you screw the new mounting bracket to the electrical box, touch up the ceiling around the box with paint, if necessary. Be sure to orient the bracket so the track will run the proper direction. It may be necessary to buy an adapter to modify your electrical box’s hole spacing so that it matches the mounting bracket’s holes.
3. This type of track can be cut to length with a hacksaw before mounting. Cut the track 1/8 inch shorter than the required dimension (to allow for the dead-end fitting). Following the manufacturer’s directions, pull out two copper conductors about 5/16 inch and cut them off; do not cut the insulators.
4. Push the conductors back into the insulators, and then add the dead-end fitting. Whether or not you cut a track to length, put dead-end fittings into the open ends of the track before attaching the track to the ceiling.
5. The track can be mounted to drywall or plaster with toggle bolts or screwed directly to solid wood. Before drilling holes for toggle bolts (or screw pilot holes), double check the track’s location.
6. Before you plug lamp holders, transformers, or the power supply into the track, note that the track has a polarity line running along its length. Each lamp holder and transformer also has a polarity line for reference. Be sure to install each fixture and transformer so that its polarity line aligns with the track’s line.
Track Light Installation Video
Here is a helpful video that shows how to install a track light, from start to finish.