Installing a new asphalt roof is a major improvement that you don’t want to have to repeat in 5 years. The best way to ensure that your new roof will last is to utilize quality materials and proven installation methods.

Understanding Roof Warranties
When you put a new asphalt shingle roof on your house, you should be able to predict how long it’ll last based on the warranties stipulated by the shingle manufacturer and by the roofing professional. It’s important to note that those are two separate warranties, each spelling out specific liabilities for the two distinct parties.
A manufacturer’s warranty—which can run anywhere from 15 years to “lifetime,” based on the shingle thickness and other aspects of their composition—assumes liability for failure due to manufacturing defects. Symptoms of manufacturing defects that lead to premature failure include:
- Blistering
- Splice shingles
- Stress fractures and premature granule loss
- Coating defects
Manufacturing defects are immediately visible to the trained eye, and roofing failures attributable to them usually occur within the first year or two after installation. Along with their product and warranties, all manufacturers offer detailed installation instructions with the caveat that the warranty will be void if the installer doesn’t follow them to the letter.
An installer’s warranty should cover defects that lead to roof leaks and/or premature shingle failure. Installer’s warranties generally provide roofing repair or replacement for a much shorter period than a manufacturer’s warranty—usually only one or two years. Typical shingle installation issues include:
- Improper preparation of the roof deck
- Inadequate flashing at valleys, eaves, rake edges and penetrations of the roof plane
- Failure to properly install underlayment
- Starter course not installed properly
- Faulty assembly at valleys
- Improper shingle fastening, including too few or too many nails, improper placement of nails, over- and under-driven nails
- Roofing installed at a temperature below 40⁰ F or higher than 85⁰ F
Installation defects may or may not result in roofing failure within the installer’s warranty period but are most likely to be revealed in the process of diagnosing the source of a leak. For that reason, it’s a good idea to have a clear spec in the contract on how each detail will be addressed during installation. Adhering to the best installation practices should prevent premature failures of an asphalt shingle roof assembly. Note, however, that not all “failures” are caused by manufacturing or installation defects. Some, especially stains, are sometimes caused by environmental factors and can be remedied before things go too far.

Best Roof Installation Practices
What follows is a guide to the best practices for each phase of asphalt roof shingle installation and maintenance tips that will keep a new roof from failing prematurely. Before hiring a roofer, take some time to familiarize yourself with these methods to get the most from your investment.
Old Roof Tear-Off
While some local codes allow the application of new roofing shingles over an existing shingle roof, it’s not a good idea, especially if the existing shingles are curled, fish-mouthed or otherwise not flat. Tearing off existing roofing to expose the sheathing allows thorough inspection of the deck itself and of flashing that may need to be repaired or replaced.
Before starting tear-off, be sure there’s a plan that protects the area surrounding the house from damage from falling debris. Be sure the plan minimizes possible damage to driveways and/or lawns by utilizing heavy trash containers. Don’t perform tear-off when rain is anticipated, and don’t expose more roof deck area than can be recovered with underlayment on the same day. If there’s a recycling facility for tear-off debris in your community, make arrangements to dispose of the waste there.
Roof Deck Preparation
Inspect the roof deck for decay and replace sections where needed. Some decks on older homes were created with spaced boards; fill the gaps with suitable material of the same thickness. Check the surface for protruding fasteners and other sharp items that could tear underlayment and/or cause shingles to not lie flat. Check the nailing pattern of the sheathing to verify that it meets current standards for your area.
For basic uplift for inland areas with winds up to 80 mph, use 8d ring-shank nails spaced six inches on-center at supported panel edges. Nails within the panel field should be spaced no more than 12 inches apart. For high-wind areas, apply 8d ring-shank nails no more than six inches on-center at panel edges and within the field.)
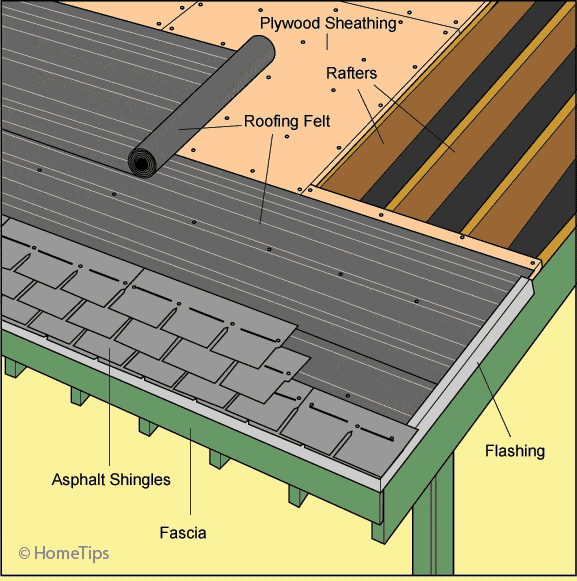
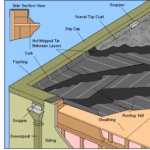
Drip Strips at Eaves and Rake Edges
Apply metal drip strips of suitable design to protect sheathing edges and prevent wind-driven rain from blowing under roofing along the eaves and rakes.
Overlap ends of drip strips at least one to one and a half inches where more than one length is required to protect a roof edge.
Self-Adhering Underlayment
Self-adhering underlayment—a.k.a. ice and water shield or peel-and-stick—is recommended for application along the most vulnerable areas, such as eaves, rake edges and valleys (click link for assembly details).
At eaves, successive courses should be applied over the drip edge and bonded to the bare roof deck, overlapped at the upper edges according to the manufacturer’s instructions so that the uppermost course extends at least 24 inches past the exterior wall supporting that part of the roof. Application of peel-and-stick is essential along the eaves of roofs prone to ice dams, and it’s also good insurance along rake edges and as valley flashing on all roofs regardless of climate.
Standard Underlayment
In standard asphalt roofing assemblies, the roof deck is covered with asphalt-impregnated felt before shingles are applied. No. 15 felt is usually the specified minimum; No. 30 is a bit heavier and more reliable. But organic felts are a bit fragile—prone to tearing under foot traffic and tend to wrinkle if they get the slightest bit wet. Synthetic underlayments, which are made from polyethylene or polypropylene, are waterproof, lighter, more tear-resistant and can be left to the weather for months without damage.
Well-Crafted Flashing
Joints between the roof deck and any feature that protrudes through or abuts it require special treatment—generally referred to as flashing. Note that more roof leaks originate from faulty flashing than any other aspect of a roofing assembly.
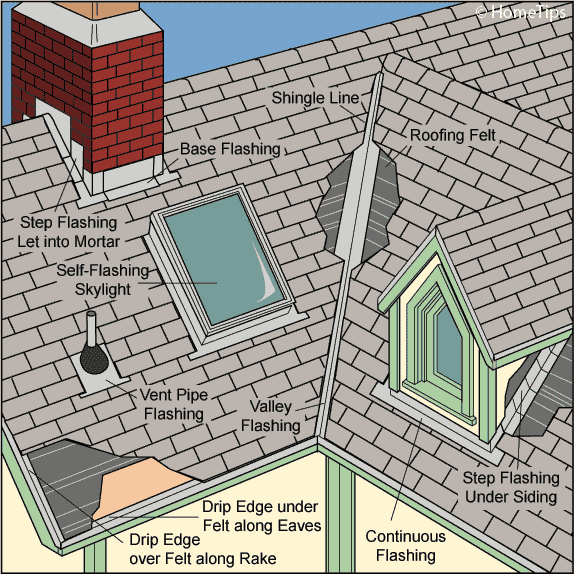
The most reliable flashing is created with sheet metal—aluminum or copper—sometimes in combination with self-adhering underlayment and/or roof cement. The best flashing assemblies require exceptional craftsmanship and must be fastened in place with methods that account for expansion and contraction with temperature cycling. (Click links to see preferred assemblies for chimney, sidewall and vent flashings.)
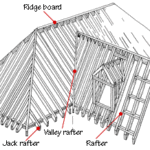
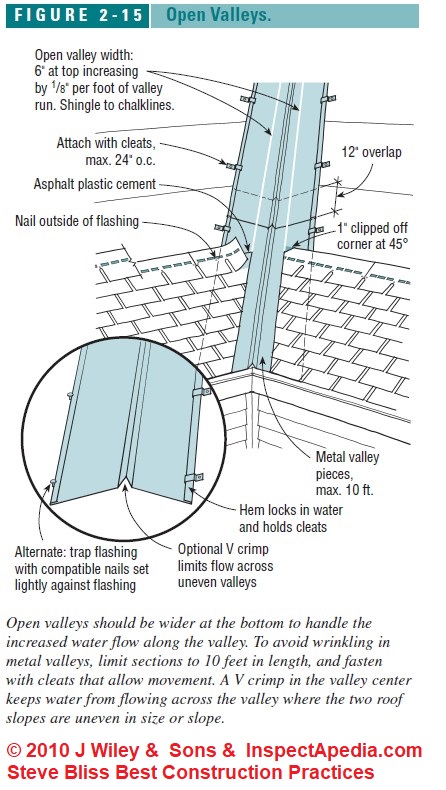
Valleys formed where two roof planes meet need special treatment to stand up to the volume of rushing water that is channeled down through them. A number of assemblies can be considered best practices. (Click links for details of an open valley with metal flashing and a high-quality closed-cut valley.)
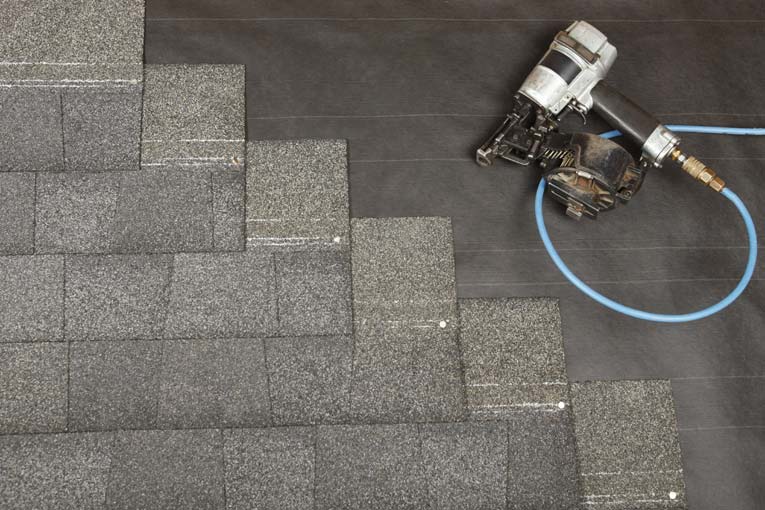
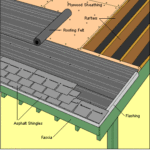
Proper Shingle Application
Shingle application begins with a starter course, which can be fashioned by cutting the tabs off of three-tab shingles and nailing the remaining solid strips in place with the self-sealing adhesive band oriented downslope, overhanging the drip strip at the eaves a half inch to one inch. Special starter-strip material is also available and sometimes used in applications of “architectural” or “dimensional” shingles, which differ from three-tab designs.
As successive courses are laid up, the first shingle in each course should be trimmed so that vertical butt joints are offset from the course above and below (click link for an illustration that shows trimming increments to keep aligned joints seven courses apart).
Proper nailing is critical (click link for illustrations of best and worst fastening practices).
Galvanized roofing nails with a 12-gauge shank and a minimum head diameter of 3/8 inch are preferred to staples. Shanks should be long enough to penetrate through the sheathing at least 1/4 inch.
Nail position and pattern requirements differ for three-tab and laminated shingles and also vary for normal and high-wind regions (click links for three-tab variations and laminated shingles in normal and high-wind conditions).
Rooftop Conditions
Overheating and prolonged exposure to high temperature shortens the life of an asphalt-shingle roof. For generations, the common wisdom has been that a well-ventilated attic is essential to keeping roofing as cool as possible, but that notion has become controversial. For one thing, recent research suggests that ventilated attics in hot, humid climates may encourage condensation to form on the underside of roof sheathing, potentially leading to formation of mold and/or rot. The study also showed that attic ventilation didn’t actually mitigate the roof surface temperatures much during exposure to intense sunlight.
Current theory contends that orientation of the roof surface toward the sun and color selection of shingles has far greater impact on peak temperatures than ventilation. While you can’t do much about your home’s orientation, if you suspect that your roof might fail prematurely due to overheating, choose light colored shingles.
A roof can fail prematurely from an aesthetic point of view when it becomes stained with growths like moss, lichens, mold and algae.
Such stains can be easily removed with the application of a 50-50 solution of chlorine bleach and water.
The easiest way to prevent stains from organic growths, however, is to place a zinc or aluminum strip near the roof peak. Microscopic shedding of these sacrificial materials kills growths before they become visible. It’s also a good idea to trim tree branches away from roof surfaces and clear away leaves and branches that may accumulate on your roof.
While no roof will last forever, you can improve the odds that the manufacturer and installer can keep their promises by insisting on installation that observes the best practices. It’s of paramount importance to hire a qualified professional who understands your situation and will do the job right the first time and provide a solid warranty.
Michael Chotiner is a roofing expert who has many years’ experience in the construction industry as a general contractor. Michael writes on construction topics of interest to homeowners for Home Depot. You can view a full range of range of Home Depot roofing solutions on the company’s website.


