One of the best ways to transform a gloomy family room or kitchen is by installing a new patio door.

If you are an experienced do-it-yourselfer with excellent carpentry skills, the project can be accomplished in a weekend.
In addition to the new patio door, you will need wood shims, roofing paper, drip edge flashing, silicone caulk, nails and screws, interior molding, and molding for the outside edge of the threshold. Your toolbox will likely already contain a hammer, level, drill with screwdriver bit, flat pry bar, and circular saw.


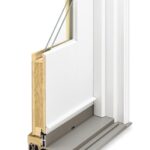
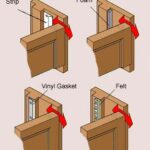
Start by purchasing a door suitable for your climate and situation. If you have severe winters, be sure to get thermally insulated glass. Low-e coating on the glass limits the passage of heat, keeping your room cooler in summer and warmer in winter. Also, be sure the door seals tightly when closed and that the weatherstripping is durable. If you plan to keep the door open in the summer, see that the screen door seals tightly as well. For more, see Patio & Sliding Doors Buying Guide.
Once you get your new patio door home, here is how to install it:
1. Frame the opening. If you’re working with new construction, this is probably already done. If you’re cutting a new door into an existing wall, you’ll have to do the necessary framing. Before cutting and removing any framing from the opening, the ceiling must be temporarily supported with posts and a beam to avoid structural damage to your house. The opening must then be framed correctly, with a large horizontal header spanning the length of the door overhead. For more about this, see Wall Framing for a Window.
Literature that comes with your door will tell you the exact size of the required opening. Make sure your opening is very close to perfectly square: Use a level to check the sides for plumb and the top and bottom for level.
2. Cut the siding. Unless you’re working with new construction, you’ll need to cut the siding where the new door will go. In most cases, you want the door’s exterior molding to fit inside the house’s siding rather than sitting on top of it. With a helper, hold the door up against the house, check it for level and plumb, and mark the siding for cutting. Cut the siding with a circular saw, taking care not to cut too deeply. Set the door in place again to make sure it will fit.
3. Flash the opening. With existing construction, pry back the siding and slip in 10-inch-wide pieces of roofing paper. Staple the paper to the framing so that all exposed wood is covered. Cut a piece of drip edge flashing to fit over the door. Slide it under the siding. Don’t nail it, just slip it in tightly. With new construction, just fasten the roofing paper and flashing to the studs and framing.

4. Position and level the door. With a helper, set the door in the opening. Have the helper hold the door in place from the outside while you work on the inside. Check all four sides for level or plumb.

5. Tap in shims and fasten. Gently tap in shims every 6 inches or so, and recheck the jamb for plumb and level. Do not drive the shims too tightly or the jamb will bend. Test to see that the door operates smoothly and with the right tolerances.
6. Fasten the door. From the outside, drive galvanized deck screws through the door’s flange and into the house’s framing. Recheck side jambs for plumb and the top for level as you work. Inside, drive finishing nails through the jambs and into the framing, one nail near every shim. Cut the shims off flush. If you’re working with an existing wall, add install interior molding to cover the gaps between the door and the wall.

7. Seal the door. Install a piece of molding against the threshold, tight up against the bottom of the vertical molding pieces. Seal all outside joints with exterior-grade caulk so there is no place where rainwater can seep in. With new construction, finish applying the siding after all doors and windows are installed.
For information on securing a patio door, see Security for Patio Doors.