What is the best radiant floor heating for your home? This unbiased buying article will help you choose the right type and install it step-by-step.

Unlike forced-air heating, radiant floor heating doesn’t stir up dust or allergens, and it cuts down on heat loss through infiltration. A forced-air heating system pulls air out of rooms, heats it, and blows it back into the rooms. This pressurizes a house, pushing warm air out through cracks and openings.


Because a home heated solely by radiant heat isn’t under pressure, the room air—and heat—stays inside. And, because of the way radiant heating works, you needn’t be as concerned about warm air escaping when you open a door. Although you will still feel a draft, a room heated radiantly recovers quickly.
Radiant heat warms your body and other objects rather than just the room’s air. This means you can keep the thermostat turned 2 to 3 degrees lower than normal without losing comfort. It’s kind of like standing in the warm sun on a cold day.
Of course, radiant heating is just heating. It will not cool your home or clean the air. If you live in a climate where cooling is necessary, you’ll need additional equipment for the job, such as room air conditioners. An exception is a radiant heating system that utilizes water warmed by a heat pump, which can also provide cooling in the summer.
If you’re considering a radiant floor heating system, you will need to choose between electric and water (hydronic) systems. You’ll also need to consider whether the installation will be “wet” (embedded in a concrete slab or lightweight concrete) or “dry” (attached on top or beneath the subfloor or sandwiched between two layers of subflooring).
The right choice will depend on whether you’re dealing with new or existing construction, the type of finish floor you have or wish to install, energy costs in your area, and your budget.
Another type of radiant heating is the old-style hot water heating system, which employs a boiler and network of pipes that delivers heated water (or steam) to convectors or radiators located in rooms. If you have such a system and need advice on maintenance, see Repairing a Steam Heating System.
Hydronic Radiant Floor Heating
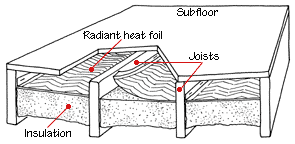
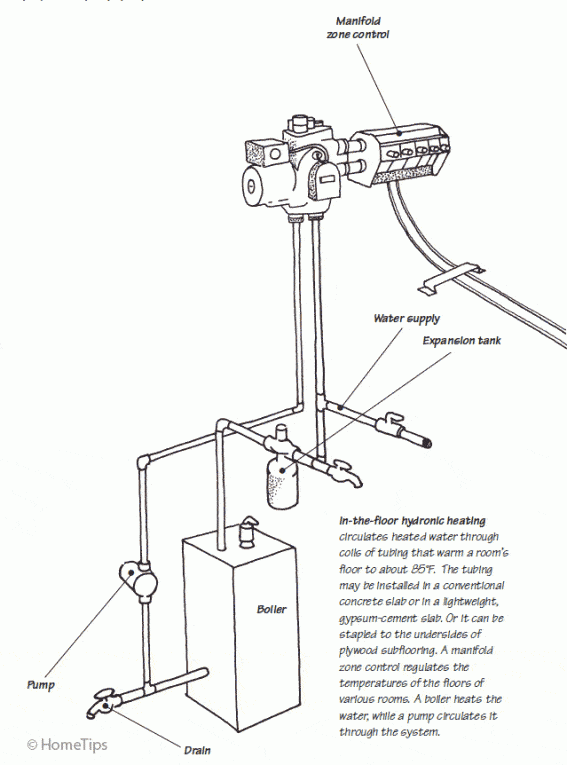
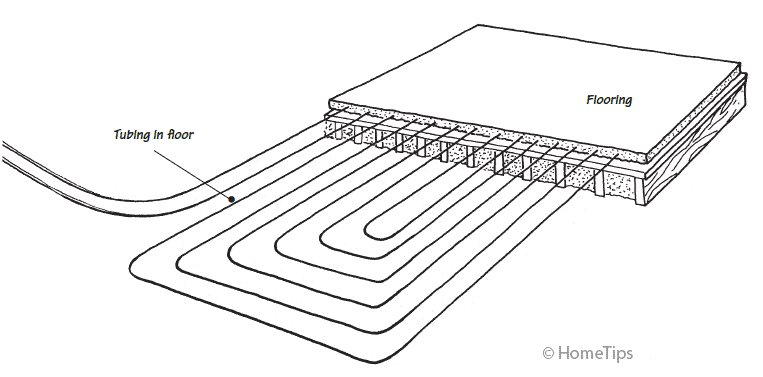
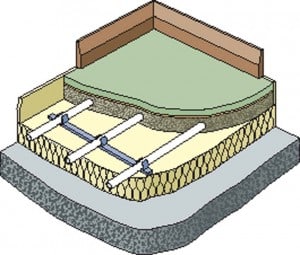
With a hydronic floor heating system, hot water circulates through lengths of tubing that loop back and forth on the subfloor. The tubing is usually encased in a slab of concrete or lighter-weight gypsum cement. In some cases, the tubing can be fastened to the underside of subflooring instead.
A clear advantage of hydronic systems over other forms of heating is that you can use a variety of energy sources to heat the water: a gas water heater, electric boiler, wood boiler, heat pump, solar collector, or even geothermal energy. If, in a few years, your heating source, such as oil for a boiler, becomes too expensive, you can change over to solar or some other source.
Another advantage is that the water retains residual heat longer than electric wires. The heated water warms floors to about 85 degrees F. (or cooler—it generally feels similar to a tile floor warmed by direct sunlight). A zone control adjusts floors of various rooms to the desired temperatures.
Hydronic heating’s reputation was tarnished in the 1940s and ’50s when temperature control was marginal and metal piping corroded, leaving leaky pipes that were difficult, if not impossible, to repair.
But manufacturers of today’s water-circulating systems have learned from those mistakes and taken advantage of modern technology and materials to produce high-quality, low-maintenance systems. These utilize sophisticated control manifolds and polybutylene or synthetic rubber tubing that has proven its durability under extreme test conditions.
Electric-Resistance Radiant Floor Heating
Electric-resistance radiant floor heating works like a toaster. When electric current travels through electric wiring, it generates heat.
With this type of heating system, special floor-heating cables or woven mats, foils, or panels with built-in wires are installed on, in, or under the subfloor. Then they’re hooked up to an electrical circuit and a control such as a thermostat.
When the control is turned on, electric current that moves through the cables or wires heats the floor.
With cable systems, a fairly large electric heating cable is wound back and forth on the subfloor. Concrete or gypsum cement is poured over it, resulting in a slab with the cables inside.
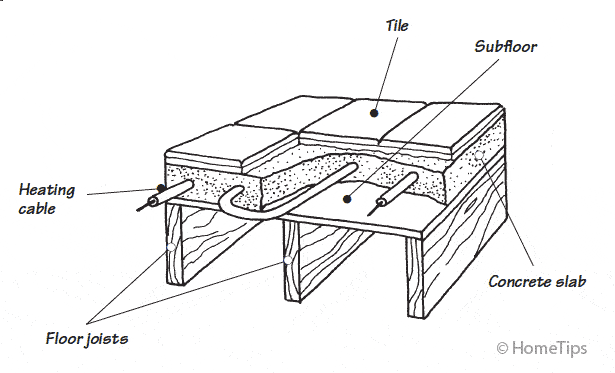
This base, perfect for finish flooring such as tile or stone, is flat, solid, and full of thermal mass for retaining and slowly releasing heat. If your utility company offers lower rates during off-peak hours, you can save money by heating such a floor during those hours; the floor will retain the heat and then release it slowly during peak hours.
Because of the high cost of electricity in most regions, electric radiant floor heating is generally reserved for bathrooms, kitchens, or small room additions that are expensive or difficult to heat by extending the existing heating system.
Radiant floor heating is at its absolute best in bathrooms with stone or tile floors that would otherwise be cold underfoot. Manufacturers suggest that a 120-square-foot room may cost only about 40 cents a day to heat, but the actual cost in your home will depend entirely on the cost of your electrical power.

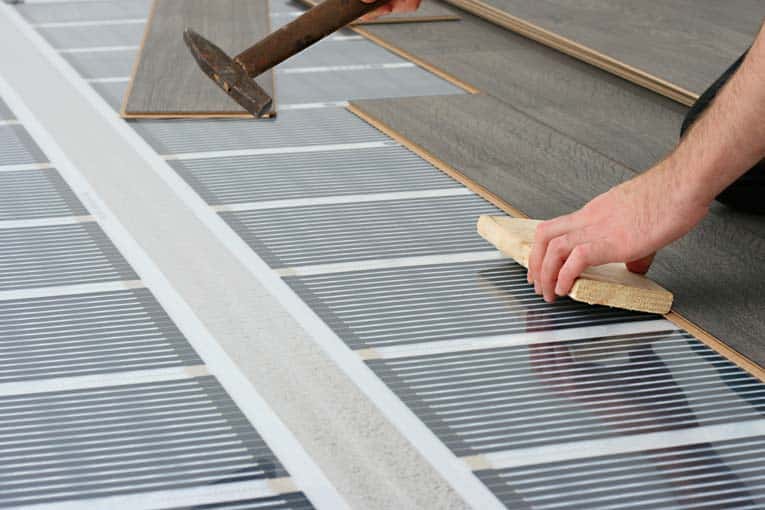
Most mats, foils, and panels are fastened between floor joists, laid between joists on top of fiberglass insulation, or embedded in the subfloor. A relatively new foil product, the Environ II System made by WarmlyYours, has a UL rating that allows safe installation directly beneath a carpet or laminate floor on the underlayment pad. In the universe of radiant floor heating, this is very easy and inexpensive to install and, because it is placed so close to the floor’s surface, it is very responsive and effective at heating.
How to Install Radiant Floor Heating
Of the various types of radiant floor heaters, one of the easiest to install is a fiberglass mesh–backed matting that contains electric-resistance cables.
Here we show you the basics for installing this type. (The product shown is TempZone by WarmlyYours.)

For information about types of radiant floor heating systems, please see How to Buy Radiant Floor Heating.
Before ordering, you’ll need to figure out how much material your floor will require. To do this, create a basic layout of your floor area on graph paper, noting basic dimensions, and calculate your material needs according to the size of the mesh. You can omit mesh wherever a warm floor is unnecessary: under cabinets, behind toilet, and so forth.
For the system shown, you can simply send a floor plan of the room to the manufacturer; the company will calculate the amount of material needed and send you a layout showing exactly where to cut and position the mesh for the best coverage and easiest installation.
Step-by-Step Radiant Floor Installation
Before beginning, discuss electrical requirements with an electrical contractor. Your system may require a dedicated circuit and will definitely require protection by a ground-fault circuit interrupter (GFCI). You’ll also want the electrician to do the final hook-up (Step 4).
Please note: Follow the manufacturer’s instructions implicitly. The steps below are meant to be a general overview of the installation sequence.
Before beginning, check out this video, which walks you through the process of installing a Warmly Yours radiant floor, including some good tips.
1 Use a pair of scissors to cut the mesh backing according to the layout. This creates rectangular panels that can be positioned across the floor and fitted around fixtures and cabinetry. Cut only the mesh—not the cables.
")
2 Apply thinset or adhesive. After using the supplied tester to make sure the cables are intact and working, apply a 1/8-inch coating of thinset cement or flooring adhesive over the top of the mesh. (You can staple or glue the mesh—but not the cables—to the subfloor to hold it in place before applying the thinset.)

3 Embed the floor tiles in an additional layer of thinset cement. (For more about this, see Laying a Ceramic Tile Floor.)

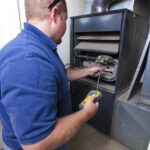
4Have the system wired to a thermostat that’s installed in a standard 2-by-4- or 4-by-4-inch wall box. The rounded plastic piece shown here is a tester used to ensure that the system is working.