Expert advice on how to fix a bouncy floor or a springy floor that can cause tile or stone flooring to crack. If your wood floor sags, this DIY article will help you repair it.

When a wood floor bounces or flexes underfoot, rigid, brittle surface flooring such as tile and stone can crack. Most of the time, a floor flexes if the subfloor is too thin, inadequately attached, or poorly supported by joists and beams. Sometimes the solution may be as easy as driving screws through the subfloor and into the joists. However, other times it may involve more extensive structural work to support the floor, or even foundation repairs may be needed.
So how do you fix a bouncy floor? Here are some common methods of improving a sagging or bouncy floor’s rigidity that don’t require a structural engineer.

Maximum Joist Spans
If a bouncy floor seems generally weak despite having adequately thick subflooring (at least 5/8-inch thick), it’s likely that the joists are undersized. Check your local building codes, but generally, joists should use the following guidelines if they are spaced 16 inches apart, which is standard. Just be aware that maximum joist spans ares complicated—they depend upon the lumber’s species and quality, and the load on the floor in addition to the joists’ sizes. If your joists are indeed too small, see some of the methods below to firm them up.
How far should flooring joists span between beams or supports? See the table below for common joists made of Douglas fir or larch.
| Joist Size | Maximum Span |
|---|---|
| 2″ x 6″ | 8’6″ |
| 2″ by 8″ | 11′ |
| 2″ by 10″ | 14′ |
| 2″ by 12″ | 17′ |
How to Add a Sister Joist (or Support Beam)
If you suspect a sagging floor joist to be the cause of your floor problem, be careful about driving additional screws through the flooring. This sometimes has the unfortunate effect of pulling the floorboards down, making the finish flooring dip instead of becoming stronger.
Sagging or bouncy floors problems are often caused by a weak floor joist that has sagged under the load of people walking on the floor above. If the issue is caused by just one or two joists, you can probably handle it yourself by attaching a “sister joist” to the original ones. If multiple joists are involved or DIY work like this isn’t your thing, call in a carpenter to add greater structural support.
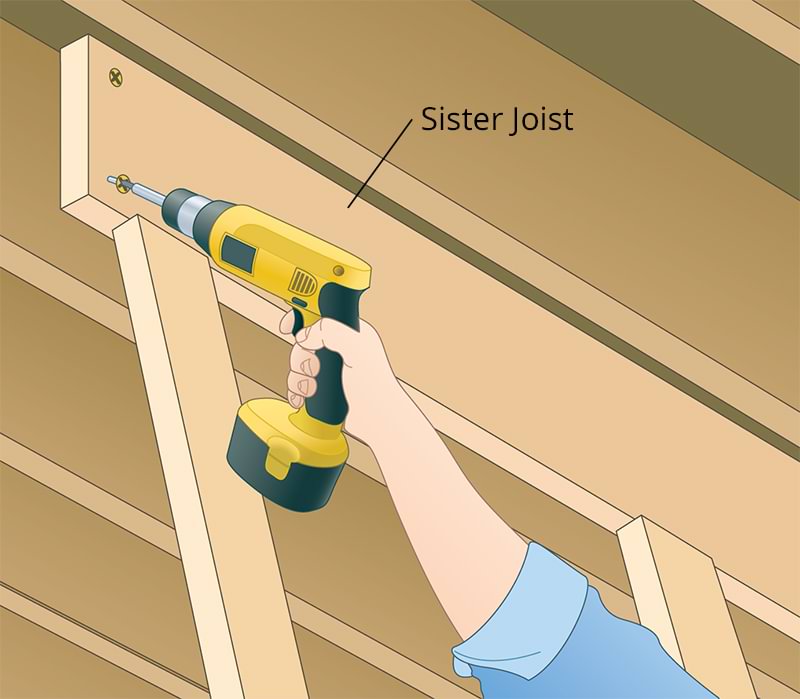

A sister joist is just an additional joist that pairs up with the original one to help carry the load.
If the underside of the floor is accessible from the basement, that is ideal. But many first story floors will require it to be approached from a crawl space beneath the house. Either way, you’ll need to gain access to the subflooring to measure before cutting sister joists to length.
Cut the sister joist out of 2-by lumber, ideally at least 6 feet long. It can be the same width as the original joist, but it’s easier to fit it into place if it’s narrower, as shown in the illustration above.
Press it up against the bottom of the subfloor and hold it temporarily in place by wedging vertical 2-by-4 supports under it as shown. Drive pairs of 3-inch wood screws every 8 inches to secure the sister to the original joist.
Pros: In many cases sistering joists this way can be the most effective way to fix floors that have minor deflection problems. By installing sister joists, you are effectively doubling or tripling a joist’s rigidity.
Cons: This can only be accomplished if the under floor area is not crowded with plumbing pipes, electrical cables, vents, ducts, or other obstructions.
QUICK TIP
To repair a cracked joist, attach plates of reinforcing metal gussets or panels of 3/4-inch plywood. Use screws that are long enough to penetrate most of the width of the joists without poking through on the back side.
Want help with your project?
Find a Pre-Screened Local Wood Flooring Repair Pro
How to Fix a Bouncy Floor by Installing Blocking
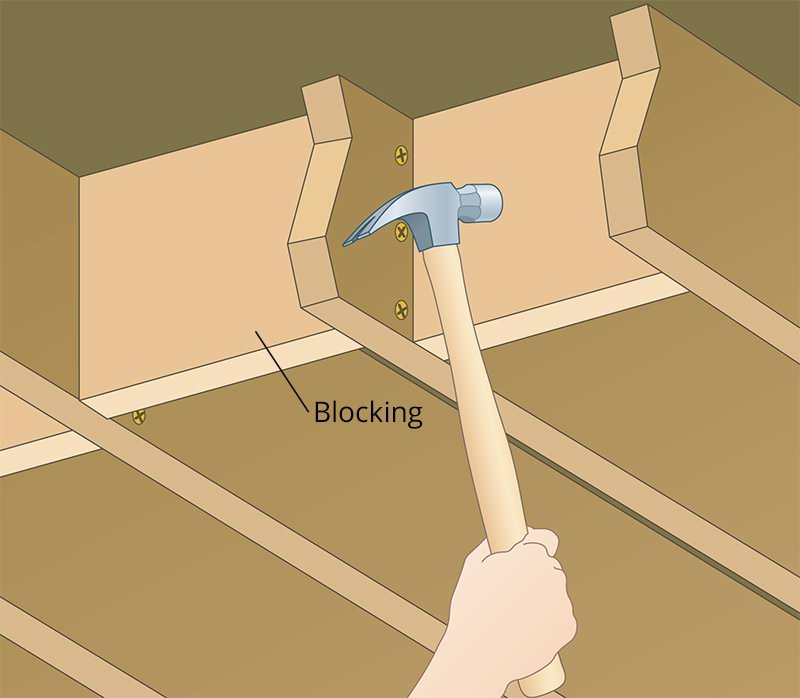
To fix sagging floors while strengthening the entire surface, install blocking between pairs of joists. From 2-by stock that is the same width as the joists, cut pieces so they fit snugly perpendicular to the joists (see image below).
Again, you’ll need to access the underside of the floor either from the basement or a crawl space. Carefully measure the distance between joists, numbering them if necessary when distances vary.
Tap each block into place between the joists, using a hammer. Offset or stagger each block from the one next to it by 1 1/2 inches to make nailing or screwing into the ends easy as shown below. Use 3-inch screws or 16d nails to secure the blocking to the joists to support the floor above.
Pros: This is a relatively easy job for most DIYers.
Cons: Might have a smaller impact on bounciness compared to other methods.
Adding Metal Bridging
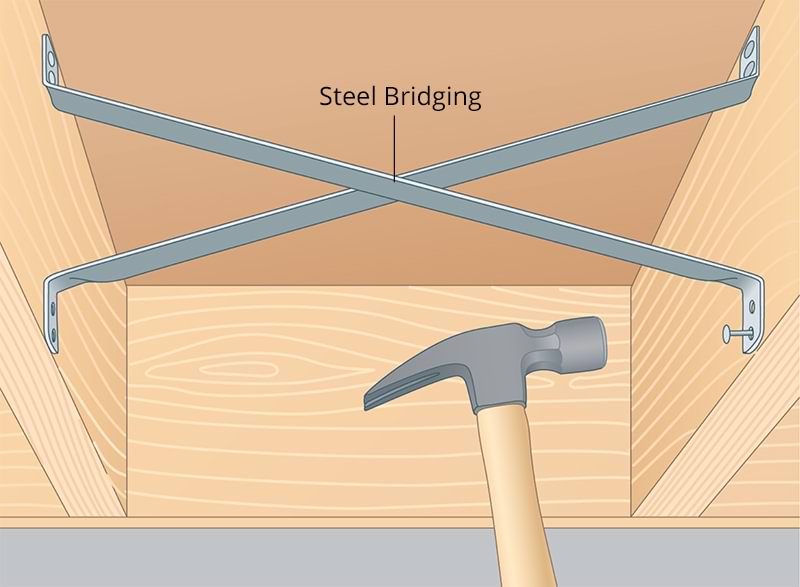
Steel bridging (below) doesn’t add as much strength as blocking, but it does prevent joists from twisting. It provides a measure of reinforcement and cuts down on squeaks, too—and it’s is easier to install than blocking.
Purchase steel bridging pieces that are made to fit the spaces between your joists, typically 14 1/2 inches long. Wedge each piece tightly into position as shown in the illustration below, and drive a 1 1/2-inch nail or screw through each hole. Where the spacing between joists is less than the standard 14 1/2 inches, use wooden blocking instead.
Pros: Easy installation (and removal if you don’t get the desired result). Materials are cheap.
Cons: Will have varied results based on your flooring materials and the severity of the problem.
Firming the Floor from the Top
Another way to firm-up a floor is to add more than one layer of subflooring that is 1/2 inch or thicker. What you’ll use for this usually depends on the finish flooring. Plywood is best for strength, but cement backerboard is better if you are installing ceramic or stone tile, and 1/4-inch underlayment works well for vinyl tiles or sheet flooring.
Increase the strength by using plenty of fasteners. Drive long screws every 6 inches into joists, and drive shorter screws (just long enough to penetrate all the way through the subfloor) in a grid every 8 inches between the joists. Fixing plywood in flooring adhesive will also add firmness.
How to Silence Floor Squeaks
You can solve some floor squeaks simply by driving in additional nails or screws. Of course, this is not a good solution if you’re dealing with a hardwood floor or some other flooring where the fasteners would be visible. For more about fixing floor squeaks, see How to Fix Squeaky Floors.
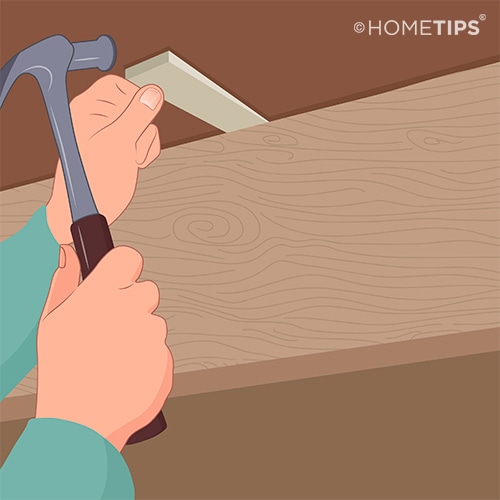
How to Install Shims
If a joist sags so that you can see a space between the subfloor and the joist, buy a few wooden shims. Gently tap them into the gap with a hammer (hitting them too hard may cause the floor to rise). Tap-in a shim every 2 to 3 inches. After you have inserted a group of shims, go back and gently tap each one to make sure they are all snug.
Pros: Materials are extremely cheap. Easy to install and remove. Can be very effective for smaller, targeted areas of bowing floors.
Cons: If too much pressure is applied too quickly, you can run the risk of damaging the flooring surface above. So make small adjustments, and consider increasing the upward pressure over the course of a few days.
Special Terminology
Additionally, there are a couple specific terms relating to bouncy floors:
Deflection: Another term used for a minor (normal amount) of sag in a floor. (Also: Changing the subject when you’re losing an argument.)
Creep: Permanent sagging of the flooring surface or subfloor components, like joists. (Also, a song by Radiohead.)
Flitch Plates / Flitched Beams: These are joists specifically made to prevent bowing of the flooring above. They consist of a steel plate “core” sandwiched by two wooden layers. The three layers are usually secured together using metal bolts. These are an alternative to “sistering” (above) which usually require more planning, installation help, and budget.
NEXT SEE:
• How to Repair a Hardwood Floor
• Installing Hardwood Floors Over Concrete
• Recoating a Polyurethane Wood Flooring Finish