Learn the best methods for removing old wallpaper, based on the types of wallpaper and surfaces. Includes DIY solutions like steaming, enzyme removers, and more. Tips, tricks, and step-by-step procedures.

Are you ready for new home decor but dreading the removal of your outdated wallpaper? It’s time to make it happen! With the right tools, techniques, and a bit of effort, you can conquer this home improvement task.
In this article, you’ll find six tried-and-true methods for stripping old wallpaper. While each method has its merits, for most DIY wallpaper removal projects, we recommend first trying an enzyme-based remover. It’s effective on a wide range of wallpaper types, including those with stubborn adhesives. Then again, if you’re dealing with very delicate wallpaper or unsure about the type of adhesive, the fabric softener or vinegar solution might be a gentler place to start.

| Wallpaper Removal Method | Best For | Tools | Additional Considerations | DIY Difficulty |
|---|---|---|---|---|
| Enzyme-Based Remover | Multiple wallpaper types, especially with tough adhesive | Enzyme solution, spray bottle, scraper | Breaks down adhesive for easier removal; often eco-friendly | Easy |
| Soaking and Scraping | Traditional wallpaper | Warm water, scoring tool, scraper, sponge | Simple and cost-effective | Easy |
| Steaming | Stubborn wallpaper or multiple layers | Wallpaper steamer, scraper | Most effective for loosening tough wallpaper | Moderate |
| Chemical Stripper | Difficult-to-remove or painted-over wallpaper | Liquid stripper, scoring tool, scraper, gloves, eyewear | Strong chemicals require caution | Moderate |
| Fabric Softener Solution | Non-vinyl wallpaper | Fabric softener, warm water, spray bottle, scraper | Gentler alternative for delicate wallpaper | Easy |
| Vinegar Solution | Non-vinyl wallpaper | White vinegar, warm water, spray bottle, scraper | Natural and inexpensive option | Easy |
| Professional Removal | Extensive removal, delicate walls, or hands-off approach | Varies | Most expensive, but saves time and effort | Not DIY |
Enzyme-Based Remover
Enzyme-based removers work by breaking down the adhesive at a molecular level, often making wallpaper removal a breeze. They’re considered a safer and more eco-friendly option compared to chemical strippers, making them a good choice if you’re concerned about harsh chemicals and fumes. While slightly more expensive than some DIY methods, the ease of use and effectiveness often outweigh the cost. Typical brands are Zinsser DIF Enzyme Wallpaper Stripper and WP Chomp Wallpaper Stripper.
- Best for: Multiple wallpaper types, especially those with stubborn adhesives
- Pros: Effective on various wallpaper types, biodegradable and less toxic than chemical strippers
- Cons: Can be more expensive than other DIY options at $15–$30 per bottle or up to $100 per gallon
Step-by-step process
- Prepare. Move furniture, cover floors with drop cloths.
- Score. Lightly score the wallpaper surface with coarse sandpaper or an inexpensive wallpaper-scarifying tool to help the solution penetrate.
- Apply. Follow product instructions for application (usually sprayed or rolled on).
- Wait: Allow the solution to sit for the recommended time (often 30–60 minutes).
- Scrape.The wallpaper should peel away easily with the help of a scraper tool. Reapply if needed.

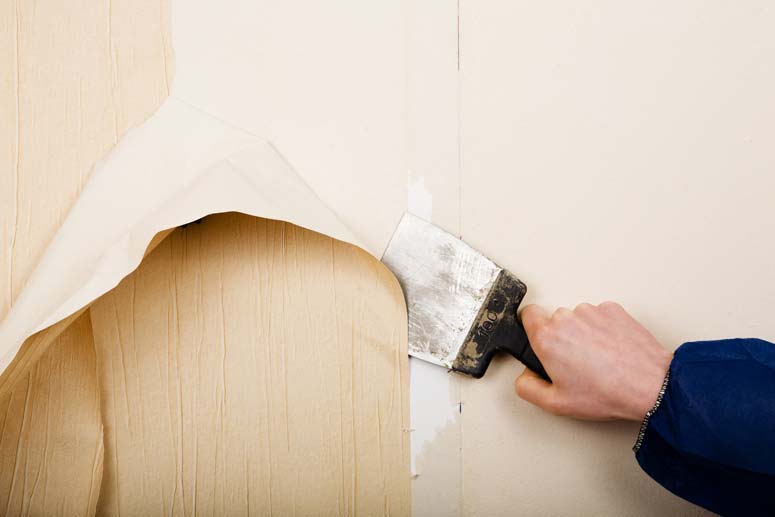
Soaking and Scraping
A classic and often effective method, soaking and scraping is the go-to for many DIYers tackling traditional wallpaper. It’s inexpensive and straightforward, but can be messy and time-consuming, especially with multiple wallpaper layers or stubborn adhesive.
- Best for: Traditional wallpaper that has been applied with regular paste (not strippable or vinyl-coated)
- Pros: Simple, cost-effective, requires minimal tools
- Cons: Time-consuming, can be messy, may not work well on stubborn wallpaper
- Typical cost: $10–$20 (for a scoring tool and scraper)
Step-by-step process
- Prepare. Move furniture, cover floors with drop cloths.
- Score. Use a scoring tool to perforate the wallpaper surface, allowing water to penetrate.
- Soak. Apply warm water with a sponge or spray bottle, ensuring even coverage. Let it soak for 15–20 minutes.
- Scrape. Starting from a seam or corner, use a scraper to gently lift and peel away the wallpaper. If it resists, reapply water and wait.
- Repeat. Continue soaking and scraping in sections until all wallpaper is removed.
Steaming
A proven technique for loosening stubborn wallpaper, steaming is a popular choice for those who want to avoid harsh chemicals. While it’s typically more effective than soaking, it does require renting or buying a steamer, which can be a bit cumbersome to use.
Note: If the wall is old, damaged, or particularly porous plaster, a steamer could damage it, so test it in an inconspicuous place.
- Best for: Stubborn wallpaper or multiple layers, particularly if you’re concerned about damaging the wall underneath
- Pros: Effective for loosening adhesive, less messy than soaking, faster than scraping alone
- Cons: Requires a steamer, and there’s potential for steam burns if not handled carefully
- Typical cost: $30–$50 per day for rental, or $100+ to purchase
Step-by-step process
- Prepare. Move furniture, cover floors with drop cloths.
- Fill and heat. Fill the steamer with water and let it heat up according to the manufacturer’s instructions.
- Steam. Hold the steamer plate against the wallpaper for 10–20 seconds until the paper becomes soft and pliable.
- Peel. Gently peel away the loosened wallpaper with a scraper.
- Repeat. Move on to the next section, refilling and reheating the steamer as needed.
Chemical Stripper
This method is known for its powerful ability to dissolve even the toughest adhesives. While effective, it’s important to exercise caution when using chemical strippers due to their potential for wall damage and harsh fumes, making them a last resort for particularly difficult wallpaper
- Best for: Very stubborn wallpaper, painted-over wallpaper, or situations where other methods fail
- Pros: Powerful for dissolving adhesive, can be the only solution for difficult cases
- Cons: Harsh chemicals require careful handling, strong fumes, potential for wall damage if overused
- Typical cost: $20–$40 per gallon
Step-by-step process
- Prepare: Thoroughly protect the work area, open windows for ventilation, and wear gloves and eye protection.
- Apply. Following the product instructions, apply the stripper evenly to the wallpaper.
- Dwell time. Let the stripper sit for the recommended time (usually 15–30 minutes).
- Scrape. The wallpaper should peel away easily with a scraper.
- Neutralize and clean. After application, many strippers require neutralization with water or another solution. Follow the instructions carefully.
Fabric Softener Solution
If you’re looking for a gentle, DIY-friendly option, a fabric softener solution might be worth trying. While it may not be as powerful as other methods, it’s inexpensive and readily available, making it a good choice for lightly adhered or delicate wallpapers.
- Best for: Non-vinyl wallpaper
- Pros: Inexpensive, readily available ingredients, gentler on walls than chemical strippers
- Cons: May not be as effective as other methods, requires multiple applications for stubborn wallpaper
- Typical cost: $5–$10
Step-by-step process
- Prepare. Move furniture, cover floors with drop cloths.
- Mix. Combine equal parts fabric softener and warm water in a spray bottle.
- Spray. Thoroughly saturate the wallpaper with the solution.
- Wait. Let the solution soak for 20-30 minutes.
- Scrape. Gently scrape the wallpaper, reapplying the solution if needed.
Vinegar Solution
Similar to fabric softener, a vinegar solution offers a natural and inexpensive approach to wallpaper removal. The acidity of vinegar can help break down adhesive, but it may not be strong enough for tougher jobs.
- Best for: Non-vinyl wallpaper
- Pros: Similar to fabric softener but with a readily available acidic solution to help break down adhesive
- Cons: May not be effective on tougher wallpapers
- Typical cost: $5
Step-by-step process
- Prepare. Move furniture, cover floors with drop cloths.
- Mix. Combine equal parts white vinegar and warm water in a spray bottle.
- Spray. Thoroughly saturate the wallpaper with the solution.
- Wait. Let the solution sit for 15–20 minutes.
- Scrape. Gently scrape the wallpaper, reapplying the solution if needed.
Professional Removal
Though it’s the most expensive option, professional removal guarantees results and is often the best choice for large-scale projects, delicate or historic wallpapers, or if you just don’t want the hassle of removing wallpaper yourself.
- Best for: Large areas, delicate or historic wallpaper, or if you lack the time or desire for DIY removal
- Pros: Saves time and effort, expertise in handling different types of wallpaper and adhesives
- Cons: Most expensive option
- Typical cost: Varies widely depending on the size of the area, type of wallpaper, and location. Get quotes from several professionals for comparison.
Important Wallpaper Removal Tips
- Always test the removal method on a small, inconspicuous area first.
- Protect your floors and furniture with drop cloths.
- Work in small sections to prevent the wallpaper paste from drying out.
- Wear gloves and protective eyewear when using chemical strippers.
- Be patient—wallpaper removal can be a time-consuming process.
- Once you’ve successfully removed the wallpaper, you may need to clean the walls with a damp sponge to remove any residue. Allow the walls to dry completely before priming and painting or applying new wallpaper.
FAQs for Wallpaper Removal
Q: What’s the easiest way to remove wallpaper?
A: The easiest way to remove wallpaper often depends on the type of wallpaper and how it was installed. However, for most standard wallpapers, using an enzyme-based remover is often considered the easiest DIY method. It breaks down the adhesive effectively and is less messy than soaking or steaming.
Q: How do you remove old wallpaper without a steamer?
A: You have several options for removing wallpaper without a steamer:
- Soaking and scraping: Use warm water and a scraper to loosen the wallpaper.
- Fabric softener or vinegar solution: These solutions can help soften the adhesive for easier removal.
- Enzyme-based remover: This is a popular option as it’s effective and easy to use.
- Chemical stripper: This is the most aggressive method and should be used with caution.
Q: Does vinegar remove wallpaper glue?
A: Yes, vinegar can help remove wallpaper glue. Mix equal parts white vinegar and warm water in a spray bottle, apply it to the wallpaper, and let it soak in for about 15-20 minutes. The acidity of the vinegar helps to break down the adhesive, making it easier to scrape off. However, vinegar might not be effective on all types of glue, especially very old or stubborn adhesive.
Q: Can I paint over old wallpaper?
A: While it’s technically possible to paint over old wallpaper, it’s not recommended. The wallpaper may not adhere well to the wall, leading to bubbling, peeling, or an uneven finish. It’s best to remove the old wallpaper first to ensure a smooth and long-lasting paint job.
Q: What if the wallpaper is painted over?
A: If the wallpaper has been painted over, removal can be more challenging. You may need to use a chemical stripper or score the wallpaper surface to allow moisture or remover to penetrate. In some cases, it might be best to consult a professional.