An expert DIY guide on the best ways to install wallpaper. Includes planning the layout, cutting, soaking, pasting, and booking wallpaper, and more.

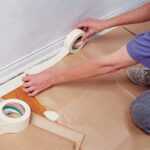
Wallpapering Tools & Supplies
Planning Wallpaper Layout
Estimating Wallpaper Amounts Needed
Cutting Wallpaper
First Wallpapering Steps
Installing the First Strip of Wallpaper
Hanging the Next Wallpaper Strips
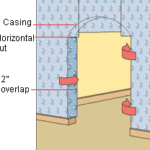
Wallpapering Borders
Wallpapering a Ceiling Border
Making a Chair Rail Border
Above & Below Borders
With proper preparation and the right tools, you can master the basic techniques of cutting, pasting, and hanging wallpaper. Always thoroughly review the manufacturer’s instructions, and try to work during the day—you’ll match patterns better and see seams more clearly. When you’re done for the day, cover wet wallpaper rolls and tools with plastic (if possible, put them in a refrigerator).

The first step in any wallpapering project is deciding where to hang the first and last strips. Since the pattern on the last strip you hang probably won’t match that of the strip it meets, you may want to choose your end point first.
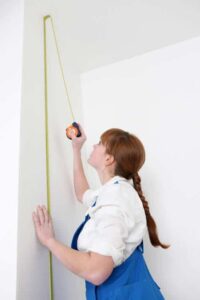
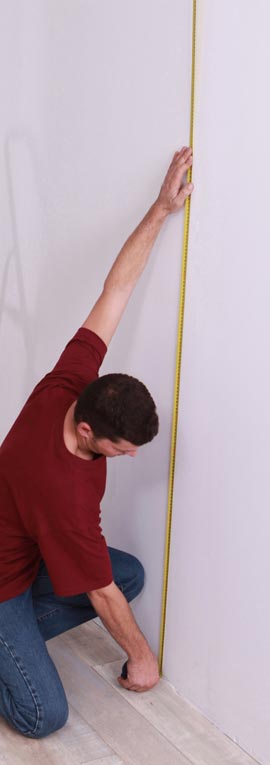
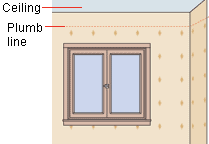
Because most house walls are not plumb—that is, at perfect right angles—you’ll need to establish a plumb line on each wall to properly align the first strips and thus all succeeding strips. To draw a plumb line, use a plumb bob and a carpenter’s level. Once you’ve determined your layout strategy and established plumb lines, you’re ready to start papering the walls.
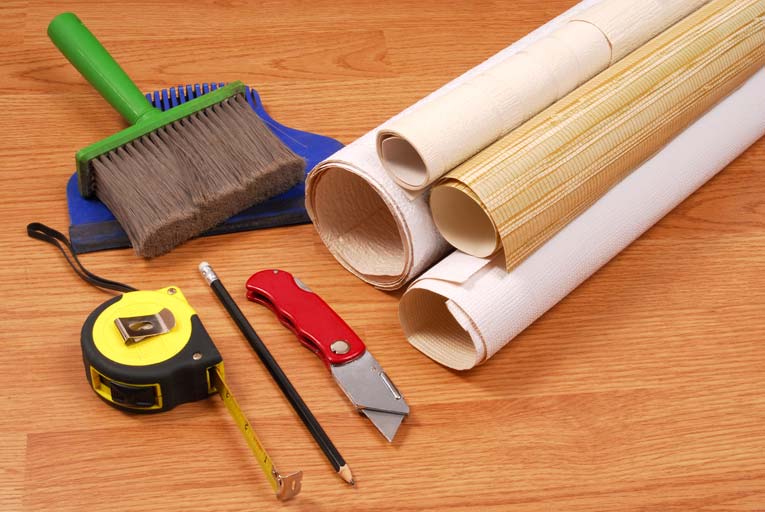
Wallpapering Tools & Supplies
Following are the tools and supplies you will need to have on hand to wallpaper a room:
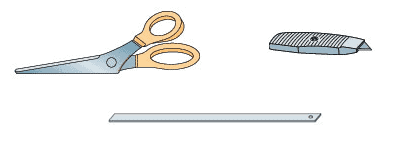
Cutting Tools
You will need a razor or utility knife to cut the paper. Buy plenty of blades because dull ones will create tears. Also have on hand a metal straightedge and large utility shears or scissors.

Layout Tools
You’ll need a measuring tape and, depending on your project, a plumb bob or a long carpenter’s level for aligning vertical lines. A short level is handy for use in small spaces and to check the straightness of the paper as you work.

Removal Tools
To remove existing wallpaper, depending on its type, you’ll need a broad knife, a sanding block (or scarifying tool), and a tool for helping release the old wallpaper—either a steamer, a canister-style garden sprayer (available for rent), or a sponge. Enzyme-based gel wallpaper remover goes on with a roller; it is the least messy alternative.
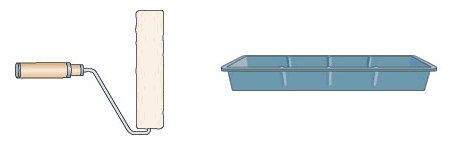
Pasting Tools
For pasting, use a short-napped paint roller with a paint tray, or a pasting brush with a bucket. A whisk works well for mixing dry paste. For pre-pasted paper, you’ll need only a water tray.
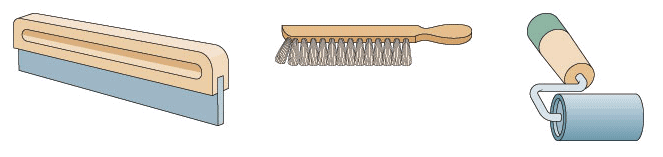
Smoothing Tools
For smoothing, work with a wallpaper smoother, a rag, a sponge, or a high-quality smoothing brush. Whichever tool you choose, it should allow you to apply pressure evenly yet feel whether the wallpaper is smooth or uneven.
With textured or embossed paper, always use a smoothing brush. After the paper has dried for about 15 minutes, smooth with a smoother or sponge; using a seam roller (on conventional wallpapers only) helps flatten seams and make them unnoticeable.
Primers & Sizing
Primers and sizing are formulated to facilitate the application and adherence of wallpaper to a wall.
Priming for Wallpaper
In most cases, wallpaper adheres more easily if primer sealer is applied to the wall. This compound keeps the wall surface from absorbing moisture from the adhesive and also protects the wall from damage if the covering is later removed. Walls painted with a high-quality flat alkyd paint may not need a primer.
Choose a primer sealer designed as a wallpaper undercoat. Apply it with a roller at least 24 hours before hanging the wallpaper to allow it to dry thoroughly. When you’re hanging a light-colored paper over existing wallpaper or a colored wall, use pigmented primer sealer matched to the paper’s background color.
Wallpaper Sizing
A liquid coating designed to make wallpaper apply and adhere better and go on more easily, sizing is thought unnecessary in most cases due to advanced technology in primer sealers. You may want to consider sizing if you’re hanging a porous or heavy paper, if the wall is textured or alkyd painted, if the paper isn’t sticking well, or if the wallpaper manufacturer specifically recommends it.
Apply sizing with a roller or brush. It dries quickly, so you can begin hanging the wallpaper immediately unless the manufacturer recommends otherwise.
![]()
![]()
Planning Wallpaper Layout
The three main options for choosing start and end points are: starting and ending above a door, starting and ending in a corner behind a door, and centering the first strip at a focal point in the room.
To determine which option is best, hold a wallpaper roll at the start point and mark with a pencil where the seams will fall, working your way around the room. Ideally, keep seams at least 4 inches away from corners, as well as the edges of windows and doors. In addition, try to plan seams so they fall near the center of windows and doors.
Estimating Wallpaper Amounts Needed
When buying wallpaper, it’s important to be sure that you get enough to finish the job but, because wallpaper can be expensive, you don’t want to buy so much that you waste money. It’s important to buy wallpaper in one batch to minimize color variation that can occur from one lot to the next. Estimating wallpaper amounts needed accurately calls for calculating the area to be covered and allowing for waste.
Once you have made your purchase, store the rolls horizontally rather than upright to avoid damaging the edges.
Measuring Repeat Length
The “repeat length” of wallpaper is the measurement between repeating elements in the wallpaper pattern. Patterns can either be a straight match, where the repeating elements are level with each other, or a drop match, where they are staggered. You can usually find the repeat length printed on the wallpaper though it’s always a good idea to measure it yourself to double-check it.
The repeat length will help you determine a roll’s usable area. The shorter the repeat length, the larger usable square footage a roll will yield. Use the following as a guide:
0 to 6 inches = 25 square feet
7 to 12 inches = 22 square feet
13 to 18 inches = 20 square feet
19 to 23 inches = 18 square feet
To determine how many rolls you’ll need, divide the combined square footage of the walls to be covered by the usable yield. Round up to the next even number as rolls are sold in pairs.
Measuring the Walls
To determine the wall area to be papered, measure the walls from floor to ceiling, then corner to corner, rounding to the nearest foot or half foot. Don’t include baseboards or moldings in your height measurement. Multiply the width and height to determine the total square footage, then add 15 percent to account for waste. Last, subtract the square footage of large windows or doors from the total square footage.
Borders & Multiple Papers
Use the same formula to find the covered area of separate spaces if you’re working around a chair rail. If you’re using a border, divide the length you’ll need by 3, since most borders are sold in 5-yard pieces. Add a little extra for borders around windows or doors so you have enough to miter the corners (cutting the paper at a 45-degree angle).
Cutting Wallpaper
For the most visually appealing results, a wallpaper’s design should be perfectly even at the ceiling line. To determine where to cut a strip, first measure the height of the wall. On the wallpaper roll, locate the design element you want at the top edge, measure 2 inches above that, and cut across the paper with a straightedge and a razor or utility knife (alternatively, you can lightly crease the paper and cut with utility shears or scissors).
Add 2 inches to the wall-height measurement and cut a piece to that length (add 4 inches instead of 2 for a “drop match” pattern). Roll the strip with the pattern side in to straighten it out. Whichever cutting tool you choose, every once in a while, dip it into hot water to remove dried paste, which will make for a cleaner cut.

First Wallpapering Steps
From your start point, mark a line at the ceiling (or molding) equal to the width of your wallpaper plus 1/4 inch (to prevent the plumb line from bleeding through the seam).

Marking a Plumb Line
Starting at the ceiling, hold a carpenter’s level against the mark you’ve just made and make adjustments until the bubble that designates plumb is perfectly centered. Draw a faint line with a pencil along the level’s edge. Move the level down, repeating the process and connecting the plumb lines down to the baseboard.
At first, cut and hang only one strip at a time to ensure that the lengths are adequate for a random or straight match. You can then cut several strips at one time, but cut only enough strips to reach the next obstacle, such as a window, fireplace, or door.
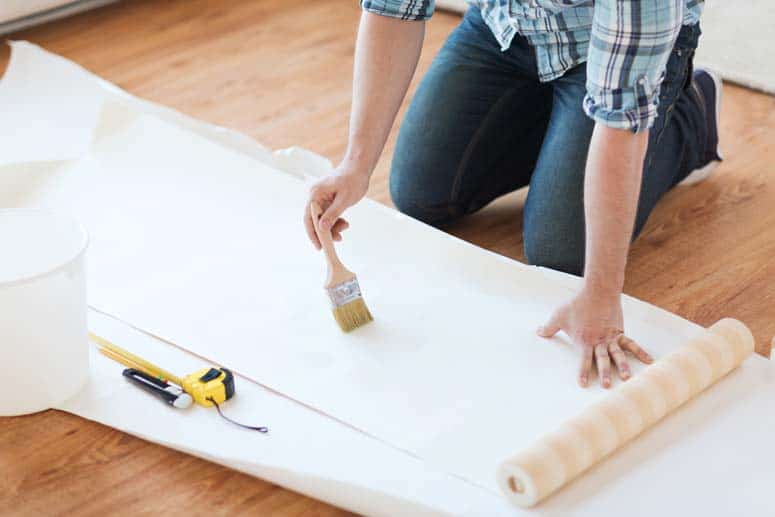
Pasting & Soaking the Wallpaper
Some wallcoverings require applying adhesive to the backing before hanging the strips. Pre-pasted papers simply need to be soaked to activate the paste, so they’re considerably easier to use.
Both methods usually require the papers to be booked (see Booking a Wallpaper Strip, below), a special folding technique that allows the paper to “relax” as it absorbs the adhesive.
The instructions that come with the paper are the best guide to choosing the proper adhesive. Both premixed and dry adhesives are available.
Premixed adhesives are more convenient; if you use a dry adhesive, mix it with distilled water according to the manufacturer’s directions until it’s the consistency of gravy.
Soaking Pre-pasted Paper
Place a long tray filled two-thirds with lukewarm water on the floor next to your worktable. Loosely roll up a strip, pattern side out, and immerse the roll in the water for 10 to 15 seconds. Then pull it up slowly, about a foot per second. Place the strip pattern side down on the table and then book it unless the manufacturer recommends against it.
Pasting Wallpaper
Place the strip pattern side down on the pasting table. Apply the adhesive with a short-napped roller, working from the center of the strip to the edges. Or, use a pasting brush, working in a figure-eight pattern. Cover the paper completely, thinly, and smoothly, especially at the edges. On a hot, dry day, use a bit more paste to keep the paper from drying too quickly.
Booking a Wallpaper Strip
To promote even adhesion, some wallpapers need time before being hung to absorb the paste, or “relax.” To allow for this, use a technique called “booking”:
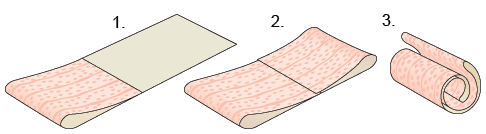
1 Fold the bottom third of the strip over the middle.
2 Then fold over the remaining portion until it slightly overlaps the end of the first portion. Take care to align the edges and not to crease the paper. (If the strip is untrimmed, cut it at this point with a razor or utility knife along the trim marks.)
3 After waiting the time recommended by the manufacturer—usually 5 to 15 minutes—loosely roll the strip to prepare it for hanging and enclose it in a large plastic bag so it can relax without drying out.
ALSO SEE: Hanging the First Wallpaper Strip
Installing the First Strip of Wallpaper
Before hanging the first strip, make sure the wall is well prepared and you have drawn your plumb line. When you’ve finished hanging it, wipe any excess paste off the surface of the strip.
1 Position the first strip
Unroll the first booked strip. Hold the strip by its upper corners and slowly unfold just the top portion. Allow the rest of the strip to drop down. Place the strip against the wall so that the top overlaps the ceiling line by about 2 inches and the edge is close to but not on the plumb line. Then, at the ceiling line, press the strip to the wall so it won’t fall.
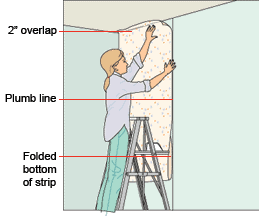
2 Adjust to the plumb line
Adjust the side edge so that it is perfectly parallel to the plumb line, taking care not to stretch the paper. If necessary, adjust the top corners so the paper hangs without wrinkles.

3 Smooth the paper
Smooth the top portion of the strip with a wallpaper smoother in the sequence shown.

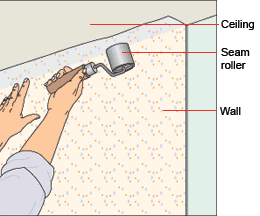
4 Smooth at the ceiling line
Smooth the paper tightly where the wall and ceiling meet with a wallpaper smoother, sponge, or seam roller. If you use the latter, apply only gentle pressure; too firm a touch will squeeze adhesive from the seam.
5 Place the rest of the strip
Unfold the bottom portion of the strip and align and smooth it as you did the top portion.

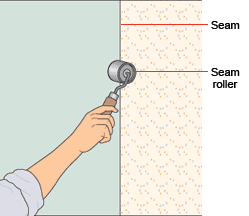
6 Flatten the seam
When the entire seam is straight and smooth, run a smoother, sponge, or seam roller along any edge that will not meet another strip.
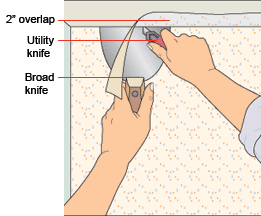
7 Remove the excess paper
Trim the ceiling and baseboard edges with a razor or utility knife, keeping a broad knife between the blade and the wallpaper to ensure a straight cut and to protect the paper. For smooth cuts, don’t pick up the knife blade; leave it in contact with the paper as you move the broad knife. Never move both tools at the same time. Be sure to change blades in the utility knife frequently.
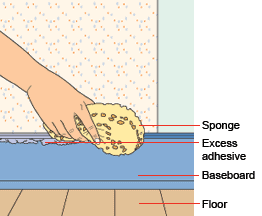
8 Sponge clean
Wipe excess adhesive off the wallpaper, ceiling, and baseboard with a clean, damp sponge. Rinse the sponge often, and clean it thoroughly after hanging each strip.
![]()
![]()
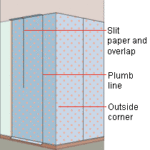
Hanging the Next Wallpaper Strips
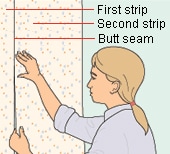
The second strip creates a seam where it meets the first one (and the second, third, and so on). In most situations, a butt seam as shown at right is the best way to join two strips because it’s the least noticeable.
Some wallcoverings, such as hand-screened papers and certain textiles, require double-cut seams as shown in Step 1 below.
Place the strip against the wall as you did the first strip. Working from the top down, align the second strip with the first one, spreading your fingers broadly to create even pressure.
With the other hand, hold the strip away from the wall so that you can align the edge without stretching the wallpaper. When the top portion of the strip butts tightly to the adjoining strip, unfold the rest of the strip and continue aligning it.
Next, smooth it and trim it. Finally, wipe the strip clean with a damp sponge.
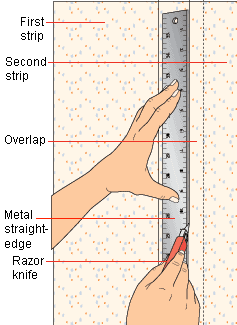
1Set the second strip
Place the strip against the wall as you did for a butt seam, but allow it to overlap the first slightly. Using a razor or utility knife and a straightedge, cut through both strips in the area of overlap, taking care not to cut the wall surface.
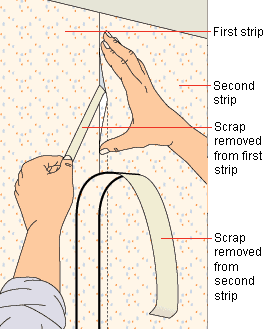
2Remove the excess paper
Carefully lift off the scrap from the second strip. Then lift the second strip slightly and remove the scrap underneath. Press the seam back into place and smooth it. After trimming the strip at the top and bottom edges, lightly roll the seam.
![]()
![]()
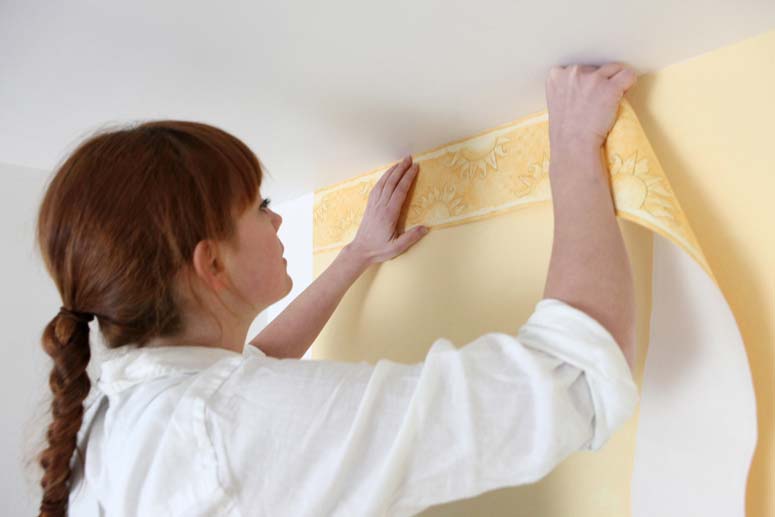
Wallpapering Borders
A wallpaper border can lend an added measure of style to a room. If the wall had been previously painted, see Preparing Wall Surfaces for Wallpaper before starting. To place a border between two wallpapers, wait until the wallpapers are completely dry and then apply a primer sealer just to the area you’re covering.
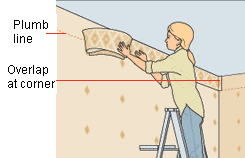
Wallpapering a Ceiling Border
1 Draw plumb lines
First, check the walls you’re bordering for plumb. If the walls are not plumb, subtract the width of the border from the shortest wall. Next, with the aid of a carpenter’s level, draw a plumb line on the walls.
2 Prepare the strips
If you are papering over vinyl wallpaper, use vinyl-to-vinyl paste and then book the border in an accordion fold, taking care not to crease it.

3 Hang the border
To keep the paper manageable, apply only an arm’s length at a time. Smooth out any wrinkles or bubbles as you go, and clean off any extra paste immediately. If the beginning of the next strip matches the pattern at the end of the first strip, simply paste the second strip right next to the first. If it doesn’t, overlap the strips where the pattern matches and then double-cut the seams. Use lap seams at the corners.
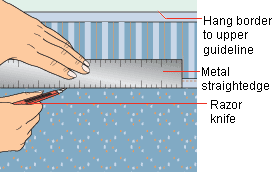
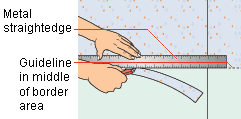
Making a Chair Rail Border
1 Set border guidelines
Using a carpenter’s level, draw border guidelines for the top and bottom edges of the border, allowing the lower guideline to overlap the existing wallpaper.
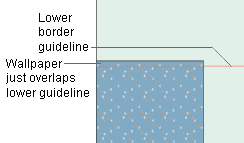
2 Hang the border
Hang the border according to the top guideline. Using a straightedge or broad knife at the bottom edge of the border, cut the existing wallpaper with a razor or utility knife and remove the excess. Then smooth down the border and roll the seam.
Above & Below Borders
1 Draw guidelines
Draw a line on the wall midway between where you want the border to go. Hang the top wallpaper to just below the line and trim.
Finish the job.
2 Finish the job
Hang the bottom wallpaper to butt with the wallpaper above. Then hang the border, aligning it with a design element of the wallpaper above and below.

![]()
![]()