Expert advice on how to install or replace a sump pump, with basement sump pump installation diagrams and tips for installing battery backup sump pumps.
Installing a sump pump is not exactly an easy do-it-yourself job—in fact, it is considered “heavy construction” by many in the building trade. It usually involves renting and using an electric jackhammer to break a hole in the concrete floor, digging a large hole and removing the dirt, punching a hole through the exterior basement wall for the drainpipe, and more. In some cases, it also requires doing electrical work to provide a GFCI-protected outlet for connecting the pump. Be ready for considerable labor if you decide to do this job yourself. If this looks like more than you want to attempt, hire a pre-screened local sump pump professional.
Replacing a sump pump, on the other hand, is a relatively manageable job for those who are handy at DIY work because the site is already prepared. Always be sure to disconnect the power to a sump pump before handling the pump. And never work on live electrical components when standing in water. (For more about how sump pumps work, see What Is a Sump System? Before purchasing a new sump pump, see the Sump Pumps Buying Guide.)
Planing Sump Pump Location
Before beginning construction to install a new sump pump, buy the pump and liner (tank) to help determine the location of the sump pump and the route for the discharge pipe. Also try to identify the locations of any underground pipes or utilities so you can avoid them when digging. There is nothing worse than cutting a big hole in the concrete floor and starting to dig only to discover there is a 4-inch cast-iron sewer pipe in the way.
In addition, choose a location that is at the low point of the basement floor so water will naturally drain to it. Ideally, this location will be a place where it’s easy to work, somewhat near an exterior wall where the discharge pipe can exit, and near an existing GFCI-protected electrical outlet. You may not be able to satisfy all of these variables, but each will decrease the work involved.
One more note about location: In most cases, you will want the pump’s discharge pipe to go very directly from the pump out through a wall. If an existing pump has a discharge pipe that already penetrates the foundation wall, plan to use that portion of the pipe. Otherwise, it is much easier to plan for this pipe to exit through the floor rim joists above the foundation. Be aware that the pipe must carry the discharge at least 10 feet from the house.
Digging for the Sump Pump
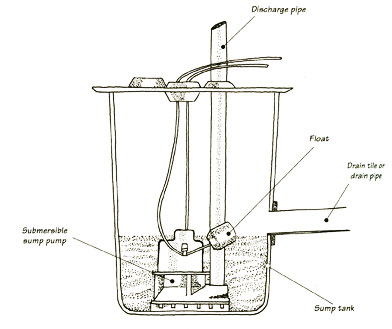
Place the pump liner in position on the floor and outline it. Then draw a second line about 4 inches beyond that outline. Plan to dig to this outer diameter so the hole will be large enough to allow for a layer of gravel around the outside of the liner.
Rent an electric jackhammer and, if you don’t already have them, buy goggles, heavy gloves, a dust mask, and ear protectors to wear when you use it. Also make sure your have a 5-gallon bucket with a handle to make carrying dirt and debris out of the basement an easier job. If the basement slab is reinforced with steel mesh, you may also need a metal grinder or heavy-duty wire cutters for cutting it.
Now for the real work. Wearing all of the recommended safety gear, use the jackhammer to cut along the outline and then to break up the concrete so you can remove it. Clear the debris from the area of the hole and then start digging. Use the jackhammer to loosen the dirt and a shovel to scoop it out. Dig the hole about 12 inches deeper than the full height of the sump liner. Then level the dirt at the bottom of the hole. Shovel a layer of coarse gravel into the hole. Put in just enough so that the rim of the sump liner will be flush with the basement floor.
Preparing the Pump & Liner
Follow any instructions on the sump pump or liner regarding installation and take special note of whether any additional holes will need to be drilled in the liner for drainage.
Place the liner in the hole, its rim level with the floor, and then fill evenly around its perimeter with gravel, stopping about 6 inches shy of the floor. Mix concrete according to label directions (see more about concrete in the article on mixing your own concrete) and fill the remaining hole around the perimeter of the liner up to the floor level. Finish the surface smooth, using a trowel. Allow the concrete to set up overnight and treat yourself to a much-deserved break.
Positioning the Pump
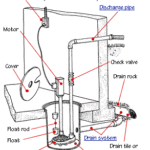
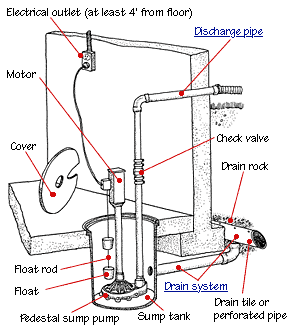
Next, check the pump’s instructions for the size and type of pipes for the discharge plumbing and the proper connections. In most cases, 1 1/2-inch or 1 1/4-inch PVC is used, but the type and size can vary. Attach the discharge pipe to the pump. Then put the sump pump inside the liner and level it (in some cases, plastic shims are required for leveling). Be sure the pump’s float, designed to turn the pump on and off as the water level rises or falls, is unobstructed.
Without gluing the pieces together yet, use elbows to route the pipe as needed to exit through a rim joist and beyond. You can use a combination of a hole saw mounted on a 1/2-inch power drill and a hammer and chisel to cut a round hole through the rim joist for the pipe to pass through.
Once all the piping is properly figured, use PVC cement to glue the pieces together. Use plumber’s tape (flat metal “tape” with holes punched in it) and short screws to secure the pipe to framing members. Caulk around the pipe where it goes through the hole to seal the gap. Be sure the water will drain away from the house.
Testing the Sump Pump
To test the pump, pour 5 or 6 gallons of water into the liner. Then plug it in and make sure it turns on automatically and pumps the water outdoors.





 Don Vandervort writes or edits every article at HomeTips. Don has:

