Also see: How to Repair an Ice Maker

Refrigerator not working right? This expert refrigerator troubleshooting and repair advice includes how to fix refrigerator problems such as poor cooling, refrigerator noises, and unwanted freezing of foods.
Though refrigerators generally operate very dependably, they can break down, and, when they do, the food inside can spoil in a hurry. Though troubleshooting refrigerator problems often calls for a refrigerator repair person, you can handle some simple refrigerator troubleshooting and repairs yourself. As a result, you can save money, time, and the hassle of waiting for help.
DIY refrigerator repairs involve checking the power, controls, condenser coils, and other parts outside of your refrigerator’s sealed, hermetic system.

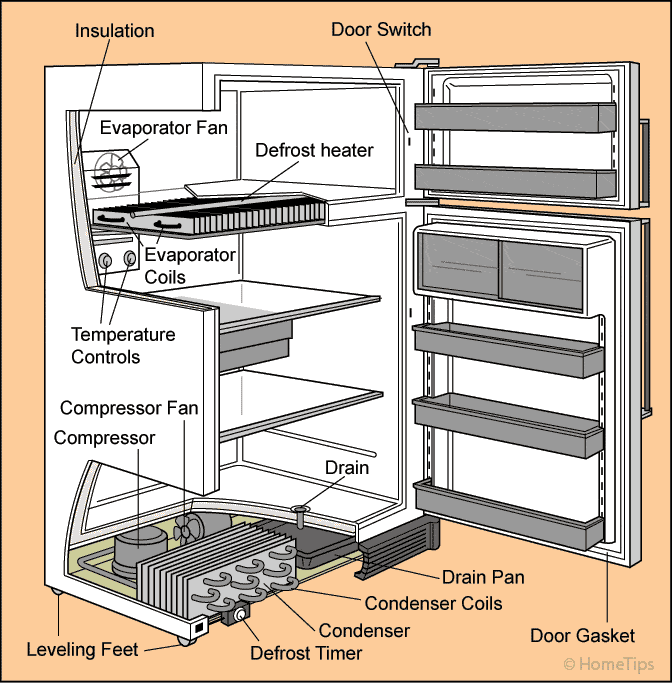
The best way to increase the life of a refrigerator is to clean the condenser coils at least once a year. In fact, it pays to clean condenser coils on certain types of refrigerators, such as side-by-side and built-in models, at least twice a year. (For instructions on how to do this yourself, see How to Clean Refrigerator Coils.)
A refrigerator with black coils mounted on the back doesn’t require semi-annual coil cleaning, but do periodically vacuum the coils.
Refrigerator Runs Constantly
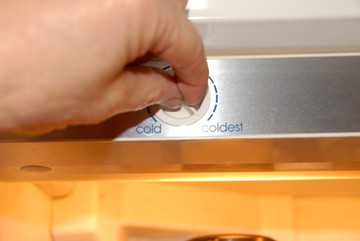
A refrigerator will run constantly if it tries to cool but can’t get the job done. Typical causes are: 1) the door is left open frequently, 2) the condenser coils need cleaning, 3) the door doesn’t seal against the refrigerator box, 4) the cold control is set too cold, or 5) something is blocking the flow of cold air inside the fridge.
A refrigerator will run more when completely filled with food, the door gets opened too frequently, or the kitchen is too warm.
This video shows how to tell if the refrigerator door doesn’t properly seal, and then how to access and clean the coils. Note: Use a vacuum to help suck the debris out of the coils.
First refrigerator troubleshooting step: If the refrigerator’s light bulb works and you can hear the refrigerator running but it hardly ever stops running, make sure nothing is blocking the passageway between the freezer and the refrigerator compartments. If for example, a loaf of bread shoved in front of the passageway restricts air flow, the refrigerator won’t get cold. Hence, the refrigerator will keep running in an effort to reach the set temperature.
If your refrigerator runs without stopping, its refrigerant could be low. A refrigerator with low refrigerant cannot reach the low temperature of the cold control dial setting. You’ll need a refrigerator repair person to test and/or boost refrigerant levels.
More likely, a faulty component in the automatic defrosting system causes a refrigerator to run without stopping. The faulty component could be a defrost heater, a defrost timer, or a defrost terminator. Browse defrost heaters, timers, and terminators on Amazon.
Before you call a repair person, do the following (also see Fridge Is Too Cold or Not Cold Enough, below):
Step-by-Step Repair for a Refrigerator That Runs Too Much
1. Determine whether the refrigerator section is being cooled. If you see frost at the top of a frost-free refrigerator even when the cold control is set low, it means the refrigerator probably has a full charge of refrigerant but the thermostat is faulty or out of calibration.
2. Try turning the cold control both up and down. The cold control may be broken if it doesn’t shut off the compressor. Call a refrigerator repair person. Also consider having the defrost timer and heaters checked to ensure they working correctly.
3. Look at the condenser coils, located at the bottom of the refrigerator (behind the kick plate) or, in some cases, at the back. These coils disperse heat from inside the refrigerator out into the room with the aid of a fan. If the coils are dirty, the refrigerator won’t operate efficiently. Clean the coils on a regular basis as shown in the video above.
4. Make sure the drain tube isn’t plugged. The drain tube is under the evaporator coils, which goes to a pan underneath. Water should drip into the pan when the refrigerator is defrosting.
5. To put off having the refrigerator repaired for a few days, you may be able to defrost it manually with a hair dryer—if you can access the cooling coils in the freezer section. Excessive moisture in the coils can turn into a frozen mass, reducing efficiency.
 Caution: Be very careful when using the hair dryer near a water source as there is a serious risk of electrical shock. Also be careful not to melt the refrigerator’s plastic parts.
Refrigerator Not Cold or Too Cold
As a rule, refrigerators maintain 36 to 40 degrees F. in the refrigerator box and 0 to 5 degrees F. in the freezer box. If your refrigerator compartment freezes its contents, even when the cold control is set to its lowest setting, the problem is likely to be a defective refrigerator temperature sensor or cold control. You can check the temperature with a refrigerator thermometer. Find temperature control kits on Amazon.
The following video does a good job of showing how to replace the temperature sensor yourself.
If replacing a temperature sensor looks like it’s beyond your DIY abilities, call an appliance repair person.
If a refrigerator doesn’t cool at all, the electrical controls almost always cause the problem—not the need for a more refrigerant. The sealed, hermetic system probably isn’t causing the problem; these types of malfunctions happen rarely. Instead, the unit may have dirty condenser coils, a door that does not seal tightly, or a defective temperature control.
Step-by-Step Repair for a Refrigerator That’s Not Cold Enough
Before you call in an appliance repair person:
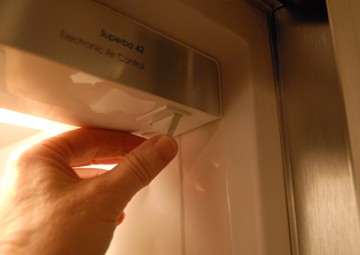
1. Check the cold control. Be sure it is set to COLD. Normally, the temperature inside the refrigerator should be about 37 degrees F.
2. Listen for the freezer fan inside the freezer. When freezer fan runs, it means the defrost timer and the cold control in the refrigerator are both set to COOL.
3. Listen for the compressor fan (which will also tell you where the compressor is located—typically behind or beneath the refrigerator). Most of the time, when the freezer fan is operating, the compressor fan should also be working. If one of the fans is not working or the compressor is off, the refrigerator will offer very little cooling or none at all.
Refrigerator Not Working at All
If the refrigerator’s light doesn’t work and its motor doesn’t run, here is the basic refrigerator troubleshooting you can do:
1. Check its electrical power. Make sure the refrigerator is plugged into a live receptacle that’s receiving power (plug in a working lamp or an outlet circuit tester). If the receptacle doesn’t work, check for a tripped circuit breaker or blown fuse.
2. Be sure the cold control is correctly set.
3. Get help if necessary. If you discover that the refrigerator is plugged into a working outlet, its circuit breaker hasn’t flipped, and the cold control is appropriately set but the device still shows no signs of life, leave the door closed to retain the cold air and call an appliance repair person.
Fridge Smells, Rattles or Leaks
If your refrigerator smells bad inside, even after you’ve removed all suspicious foods, unplug it and remove the drawers and shelves to give it a thorough cleaning with soap and water. Next scrub it with a solution of 1/2 cup of baking soda dissolved in warm water.
Also, clean the drip tray underneath the refrigerator (if it has one)—it can become moldy and funky. If the smell still doesn’t go away, try putting few charcoal briquettes in shallow bowls and placing them on the shelves inside the refrigerator to absorb odors.
Vibrating noises generally come from loose parts such as loose condenser coils, compressor tubing rattling, or rollers and feet that sit unevenly on the floor.
Look for any part that is loose and tighten it with a wrench or screwdriver. Then remove the bottom trim piece by lifting it off its supports and check the feet at the front of the unit to be sure they are all bearing the weight of the appliance—the refrigerator should not rock. As necessary, turn the adjustable feet up or down so they contact the floor squarely.
Leaking under a refrigerator generally comes from a condensation tube that doesn’t drain into a pan. A clogged freezer drain can also cause leaking.
Fridge Door Does Not Close or Seal
A common cause of energy inefficiency in refrigerator operation is a door that doesn’t close or seal properly. If the door doesn’t swing closed, the hinge (sometimes called a “cam”) at the bottom of the door may be worn out. This cam is basically a round pin that goes into a circular hole. You can try lubricating it with a squirt of WD-40, but the chances are good that you’ll need to replace it. This is a relatively easy job, as shown in this helpful video:
During your refrigerator troubleshooting, use a business card to see if the door gasket is sealing solidly around the door’s perimeter, as shown in the video above. If you test your door and realize it doesn’t have a decent seal, then either adjust the door or—more likely—replace the door gasket to remedy the problem.
You can buy a new refrigerator door gasket in an appliance repair shop or online.
How to Replace a Refrigerator Door Gasket
Here are instructions for adjusting or replacing your refrigerator door gasket:
1. Remove any coverings that conceal the hinges. For side-by-side freezer-refrigerator models, slightly loosen the top hinge using a nut driver. For models with the freezer on top, adjust the top hinge of the freezer door with a nut driver and the bottom hinge of the refrigerator with a socket wrench.
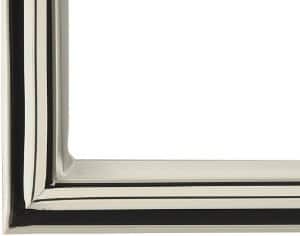
2. Put a level on top of the refrigerator door and move the door around until it is level. Hold it in place, and refasten the screws. Reaffix any coverings that you removed earlier.
3. Retest the door’s seal. If it is still faulty, open the door and peel back the rubber gasket. Along the top and partway down the door’s sides, loosen the screws that fasten the strip. Take off the gasket in this area.
4. Apply a new gasket, slipping it underneath the metal retaining strip and then slightly tighten the screws.
5. Follow steps 3 and 4 with the bottom half of the door. Finish securing all of the screws once the new gasket is entirely in place.
Refrigerator Light Stays On
Do you suspect that your refrigerator’s interior light stays on even when you close the refrigerator door? A refrigerator light bulb that stays on will warm the refrigerator’s interior, cutting down on its efficiency.
Of course, you may not be aware that this is happening because, obviously, you can’t see what’s going on inside the refrigerator when you close the door. But, with most refrigerators, you should be able to see the light go off when the door is a fraction of an inch from closing.
You can also feel the bulb when you open the door—but do so carefully. If it has stayed on, it will be hot. It’s actually very easy to tell whether this is happening. Test the light-switch button that the door closes against. When you push it in all the way, the light should go off. If it stays on, you must replace the light switch.
If you are adept at simple repairs, this is a job that you may be able to handle yourself, but be sure to unplug the refrigerator before working on it. You can buy a replacement refrigerator door switch online at Amazon; be sure to get one that matches your model of refrigerator. Instructions for replacement will be inside the package.
Refrigerator Troubleshooting – Doesn’t Defrost
Most modern refrigerators defrost automatically. They have a defrost heater, a defrost timer, and a defrost terminator. Browse defrost heaters, timers, and terminators on Amazon.
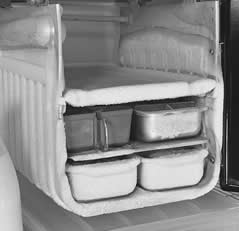
When a frost-free refrigerator is running, it builds up frost on the tubing in the back of the freezer wall. Normally, the defrost timer cycles the refrigerator to defrost for about 20 minutes every six to eight hours—it essentially heats up coils to melt the ice. If it isn’t working right, ice remains on the tubing and, eventually, restricts airflow through the refrigerator.
You can manually advance the defrost timer with some refrigerators. This small black box may be located almost anywhere but usually mounts on the ceiling of the fresh food section. Advance it until it clicks into the defrost mode (you should hear the heaters come on). If this works, the fridge has a defective defrost timer that needs to be replaced.
If this technique doesn’t work, the problem is probably the heater or the terminator.
You can replace a defective defrost heater yourself fairly easily, if you have DIY repair skills and tools. See the above video for how to replace the refrigerator defrost heater.
The video shows you how to this with a GE refrigerator, using steps that are fairly typical. You can order a GE defrost heater online. Otherwise, call the manufacturer for advice or call in a qualified refrigerator repair pro.
NEXT SEE:
• Refrigerators & Freezers
• How to Repair an Ice Maker
• Buying the Best Refrigerator: Refrigerators Buying Guide
• How to Clean Refrigerator Coils