Is the power out in part or all of your house? This expert advice shows you how to diagnose the cause of a power outage and how to turn the power back on.

When the electrical power goes out in all or part of your house, the first thing to do is determine the extent and source of the problem.
First question: Is the problem in your home’s electrical system or with the utility company’s electrical supply to your home?
Neighbors don’t have power. If the electrical power is out throughout your entire house and your neighbors appear to have lost power too, use a cell phone to call the utility company.
Neighbors do have power. If your neighbors have power and/or any part of your home’s electrical power works, the problem is with your home’s system.
This means you need to check the other rooms if the lights or outlets are out in one room.
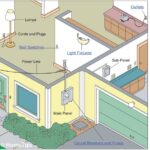
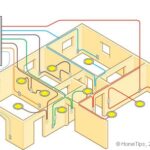
If you’re not familiar with how electricity is delivered throughout a home via electrical circuits, be sure to check out How a Home Electrical System Works.
How to Check for An Overloaded Electrical Circuit
If your neighbors do have electrical power—or if some of your home’s electricity works—the problem is generally caused by an overloaded circuit, a short circuit, or loose wiring.
You can usually figure that the problem is an overloaded circuit if it occurred when someone was using a hair dryer, electric heater, air conditioner, or some other electrical appliance that draws a lot of electrical current.
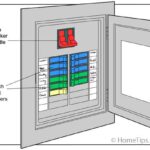
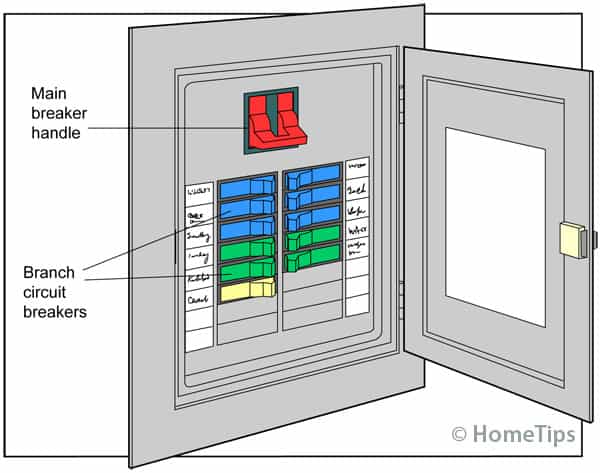
Checking the Main Panel
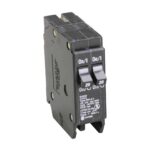
As discussed in The Main Electrical Panel & Subpanels, circuit breakers (or fuses in older electrical panels) automatically shut down an electrical circuit if too much current flows through wires or if the electrical system has a failure. If the circuit is overloaded, a circuit breaker should trip or a fuse should blow, shutting off the entire circuit.
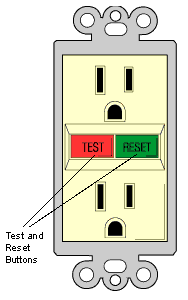
Some circuits are protected by GFCI electrical receptacles (outlets) or circuit breakers. These circuits, typically outlets in a kitchen, bath, or outdoors, are particularly sensitive to shorts and overloads. If the GFCI receptacle of breaker has tripped, it may also shut off all of the receptacles connected to it. You can often solve the problem by simply pushing the reset button on the GFCI device. For more about GFCI outlets, see Electrical Receptacle Buying Guide.

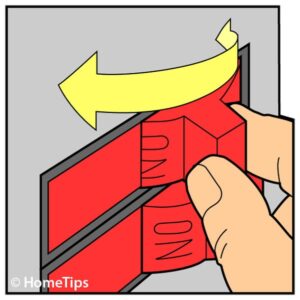
If the circuit that isn’t working doesn’t include a GFCI device, check the electrical subpanel or main panel that serves the circuit. Look to see whether one of the circuit breakers has flipped off. This may not be as obvious as it sounds. A tripped circuit breaker won’t necessarily be in the “Off” position—it may be halfway between “Off” and “On.”
Turn off or unplug everything from the troubled circuit. Then reset the breaker. Turn it all of the way to “Off” and then to “On.”
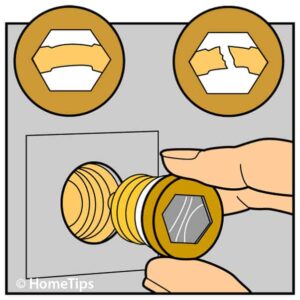
If your system is protected by a fuse box instead of an electrical panel with circuit breakers, replace the fuse that is “blown.” Look for aa broken element beneath the fuse’s glass surface. It’s best to use a tool called a fuse puller to remove and replace the faulty fuse. Do not touch the metal parts with your fingers!
Find an Electrical Pro Near You
If the circuit blows immediately after you reset the breaker or change the fuse, call an electrician. A charred wire or defective device in the circuit will probably need replacement.
If the circuit doesn’t blow, turn the lights back on and plug in appliances one by one to check for the overload or short circuit.
Evaluating Electrical Loads
If one device that draws a lot of current seems to overload the circuit, you can turn off other devices when using it, but it is probably a better idea to have your electrical service upgraded. If the lights or receptacles still don’t work, a loose wire is probably causing the problem.
If lights dim with appliances kick-on, the cause is too many electrical devices drawing power from one circuit. If plugging some devices into receptacles on other circuits doesn’t solve the problem, you may have to upgrade your home’s electrical service panel.
For today’s electrical needs, a main electrical panel should deliver 100 amps of power or more; 150- or 200-amp services are even better for homes fitted with generous lighting and electrical amenities.
A main panel sized smaller than 100 amps may be overloaded, which can cause lights to dim when appliances kick on and may lead to frequent home power outages. If this is the case in your home, talk with an electrical contractor about installing a new, larger electrical service panel.
Do not do your own electrical repair unless you are accomplished at and knowledgeable about electrical work. If you are capable of doing this work, be sure to follow all safety precautions:
• Never work on live electrical wires. Always shut off the circuit first.
• Do not stand in water or on a damp floor, even when working on low-voltage wiring such as telephone wires.
How to Trace a Short Circuit
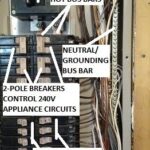
Short circuits happen when a hot wire touches a neutral or ground wire; the extra current flowing through the circuit causes the breaker to trip or a fuse to blow.
Although it’s often easy to tell when you have a short or overloaded circuit—the lights go dead when you plug in the toaster oven—it isn’t always as simple to tell where in the electrical system this has occurred.
Check for black smudge marks on the cover plates of non-working switches or receptacles. Then look for frayed or damaged cords or damaged plugs on lamps and appliances.
Replace a damaged cord or plug, and then replace the fuse or reset the breaker. If the circuit goes dead after an appliance has been in use for a short time, you probably have an overloaded circuit. Move some of the lamps and appliances to another circuit, and replace the fuse or reset the circuit breaker for the first circuit.
If you find none of these signs of trouble, you must trace your way through the circuit following the steps below.
If these steps do not solve the problem, your wiring is faulty. In this case, it is best to call in an electrician to correct the problem.
Here is the sequence to follow for tracing a non-working circuit.
- Turn off all wall switches, and unplug every lamp and appliance on the dead circuit. Then reset the tripped breaker or install a new fuse as discussed above.
- If the circuit goes dead right away, the problem could be a short circuit in a receptacle or switch. With the power off to the circuit, remove the cover plates of suspect switches and outlets. Inspect the wiring for bare wires that may be grounding against other wires or the metal box. Be sure to look (and smell) for charred wire insulation. Replace or repair any problem wiring.
- After resetting the circuit breaker or resetting the fuse, if the circuit breaker does not trip or the new fuse does not blow right away, turn on each wall switch, one by one. If one of them trips the circuit breaker or blows the fuse, you’ve identified the source of the problem. This means there is a short circuit in a light fixture or receptacle controlled by that switch, or there is a short circuit in the switch wiring. Replace or repair a faulty switch, fixture, or wiring.
- If turning on a wall switch does not cause a problem, the trouble is likely to be in the lamps or appliances. Plug them in one at a time to test each. If the circuit does not go dead, the circuit probably failed because it was overloaded. Move some of the devices to another circuit. If the circuit does go dead just after you plug in a device, you have found the problem. Check the cord first. Then consider having an appliance repair person check the appliance’s switch and other electrical parts.
How to Test for Electricity at An Outlet or Switch
Checking to see whether an electrical outlet or switch is connected to “live” electricity is easy to do.
Using a Non-Contact Voltage Tester. The quickest, safest, and easiest tool to use for checking to see whether an outlet or switch is receiving voltage is a non-contact electrical tester. With this tool, you just press the non-conducting tip into a receptacle or hold it next to a switch to check for power. You can also buy a simple plug-in voltage checker for electrical outlets. Both of these are sold together on Amazon for under $20.
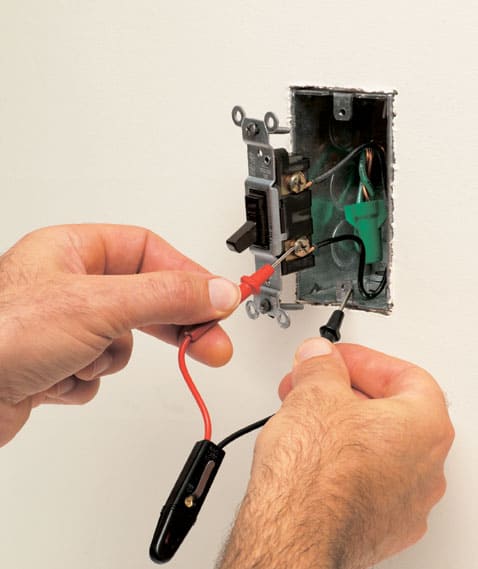
Using a Neon Tester. To see if a receptacle is dead, insert the probes of a circuit tester or a neon tester (shown) into the slots. Do not touch the metal ends of the probes with your fingers when the probes are plugged-in. The circuit is hot (charged) if the neon tester lights up.


To see if a light switch is receiving power, first remove the switch’s cover plate. Touch a non-contact electrical connector against both screw terminals. If one of them causes the tester to signal, the wire is charged. Do not touch the screw terminals or bare parts of the wires!
If you’re using a neon tester, unscrew the switch from its box, being careful not to touch the bare wire ends or metal terminal screws. Holding the insulated parts of the neon tester probes, touch one probe to a hot wire or the terminal it is connected to. Then touch the other probe to a bare neutral wire or terminal, to a grounding conductor, or to a grounded metal box. If the circuit is live, the tester will light up.