Expert step-by-step advice on how to replace cracked or broken ceramic tile, how to re-grout tile, and more. Includes diagrams.

Most problems with ceramic tile installations have to do with stained or cracked grout or cracked or broken tiles.
Though grout is tough, when left unsealed, it is quite porous and will stain. If applied improperly, it will crack, and, when that happens, tile will eventually work loose.
Tile usually cracks or breaks either because something is dropped on it or because the surface that supports it shifts because of settling, wind, or earthquakes. Or, in the case of floors, a supporting subfloor may not be strong enough to handle the floor loads without deflecting—and deflection can cause cracks.
Of course, deflection doesn’t occur when tile is laid on a concrete slab. Many wood subfloors, however, should be reinforced with an extra layer of plywood subflooring prior to tiling.
Because both grout and porous tiles can be stained by liquids and foods, they should be treated with sealers that resist moisture. Be aware, though, that the sealers can change the natural look of stone or unglazed tile. It pays to test a sealer in an inconspicuous place before using it.
If a tile has a small, narrow crack, you may be able to fill the crack with paintable caulk and, if necessary, touch up the caulk with an artist’s paintbrush and acrylic paint. Try this, but if the repair is too obvious, you’ll have to move on to Plan B, which is quite a bit more involved. Plan B is to remove the tile and replace it with another just like it, as explained below. If you happen to have a matching tile around, you can do this. Otherwise, you may have a very difficult time finding a replacement that is a perfect match.

If you are installing a new floor, countertop, or wall, put some extra tile aside so that you have a replacement on hand when you need one,
If you have new glazed or unglazed ceramic or stone tile, follow the manufacturer’s recommendations for cleaning. Wipe up any spilled food or liquid promptly because porous surfaces—and especially the grout—will stain easily.
Replacing Cracked or Broken Tile
Replacing a cracked or broken tile isn’t as difficult as you might think. Of course, you can only replace the tile if you have or can find a match. If you can’t find a match on your tile dealer’s shelf, ask if there is a “bone pile” of rejects or extras you can check.
Before installing the new tile, make sure there are no sub-surface problems that will cause more trouble. Once your have verified this, here’s how to do it:
1. Use an inexpensive grout saw or a lever can opener to scrape most of the grout out of the surrounding joints.
2. Wearing eye protection, use a hammer and nailset to punch a hole in the center of the damaged tile. Be careful not to chip or crack any of the surrounding tiles, and avoid driving the nailset into the material underneath.
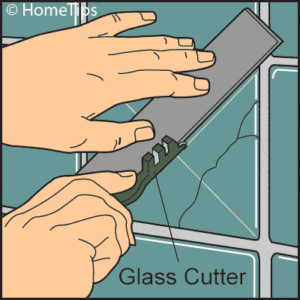
3. Score an X across the face of the tile, from corner to corner, using a glass cutter.

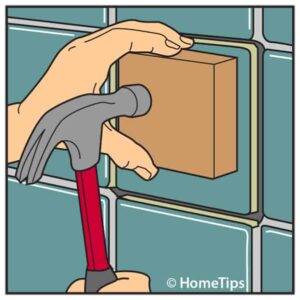
4. Rap a cold chisel lightly with a hammer to break away the tile, starting at the center.
5. Pry up the pieces using a putty knife, an old chisel, or a prybar. Brush the debris from the area, and vacuum it clean.
6. Paint the surface with latex primer (fill with vinyl spackle, if necessary) and allow it to dry.
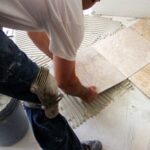
7. Using a small notched trowel, apply tile adhesive.
8. Set the new tile into place and press it in with a slight twisting motion, taking care to maintain even grout joints all the way around.
Using a rubber mallet or a hammer and block of wood, tap it gently to level it with the surrounding tiles. Remove any excess adhesive from the grout joints with an old screwdriver.
9. Allow the adhesive to set up and then, wearing rubber gloves, mix the grout to match the existing grout. Apply it to the joints with your finger. Clean any excess grout from the tile surface with a damp sponge.
How to Re-grout Tile
Ceramic tile is especially useful in kitchens and bathrooms because it is water-resistant, easy to clean, and extremely durable.
Made from a mixture of clays and fired at high temperatures, tile is used for wall coverings, floors, showers, countertops, bath surrounds, and more. Tiles used on walls and counters are generally glazed.
Grout, a kind of mortar, is spread between tiles to lock them in place and fill the joints between them. Grout may be white or colored with pigment.
Ceramic tile may be applied directly over drywall-if the room is likely to be damp, special moisture-resistant drywall should be used.
Or tile may be applied to a mortar bed or backerboard made of a ceramic aggregate core that is coated with a thin fiberglass mesh.
Professionals apply tiles to walls with a thick bed of mortar; home repairs often call for a thinner mastic or mortar-type adhesive.

Re-grouting is a bit more challenging but within reach even for beginning do-it-yourselfers. However, if re-grouting looks like a job you would rather leave to a professional, ask a local tile supplier for recommendations.
1. Use a grout saw to cut away any cracked or loose grout and to score stable grout between tiles. Clean away dirt and debris with a soft-bristle brush.
2. Wearing latex gloves, mix up the new matching grout according to label directions.
3. Hold the leading edge of a rubber grout float up at a slight angle and apply grout along the tile, working it deep into the crevices. Then use your finger to smooth the grout.
4. Allow the grout to set up slightly. With a damp sponge, wipe off the excess from the surface of the tile. Allow the grout to completely set up for several days and then apply grout sealer with a sponge brush.