Expert advice on how to repair roof flashing and chimney flashing, prevent ice dams, and solve other roof flashing problems.

When a roof leaks, the problem is often due to leaks in and around the metal roof flashing that protects roof edges, valleys, and the junctions between roofing and obstructions such as chimneys, dormers, and vent pipes. Here we look at how to repair flashing that can cause leaks.
How to Repair Roof Flashing

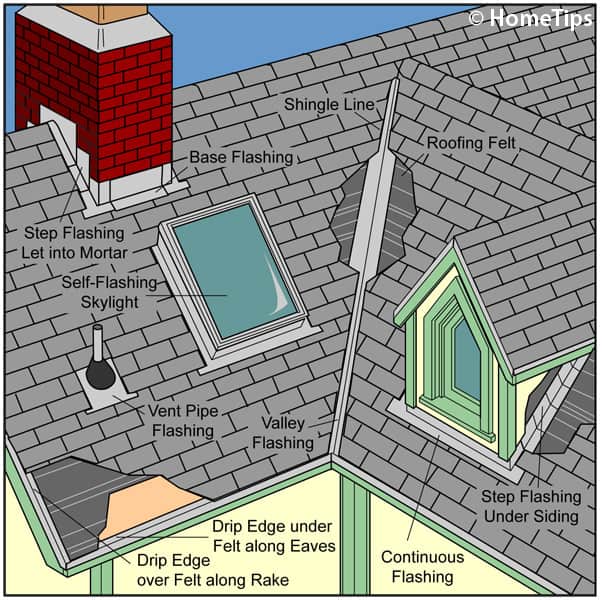
The methods for repairing roof flashing depend upon the particular problem.
Repairing Small Holes in Roof Flashing
Step 1: Roughen the area around the hole with a wire brush or sandpaper.
Step 2: Clean the area thoroughly.
Step 3: Cut a patch larger than the hole from the same material as the flashing.
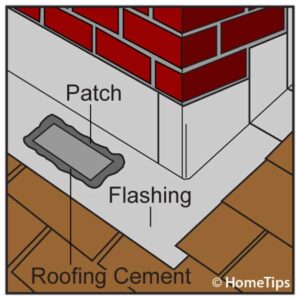
Step 4: Affix the patch with roofing cement.
Step 5: Cover the patch with more roofing cement.
Replacing Damaged Flashing
Flashing that is badly corroded will need to be replaced.
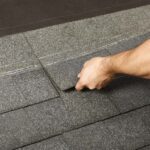
1. Remove Shingles and Old Flashing
Step 1: Remove several rows of shingles to access the old flashing.
Step 2: Remove the old flashing.
2. Install New Flashing
Step 1: Position the new flashing.
Step 2: Nail the new flashing in place.
Step 3: Replace the shingles and cover the nail heads with roofing cement.
Renewing Flashing Seals
The method and material for renewing flashing will depend upon the type of flashing and its location.
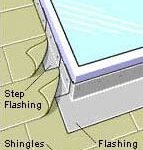
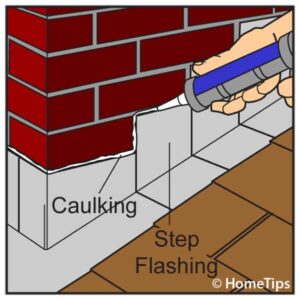
1. Renew flashing seals at a chimney
Step 1: Chip out the old mortar and caulking along the edges of the flashing.
Step 2: Use special masonry caulk to seal the joints between the flashing and the chimney.
Step 3: Seal the seam between the cap and step flashing with urethane roofing cement or silicone caulking compound.
2. Sealing Valley Flashing
Step 1: For valley flashing, lift the edges of the surrounding shingles and spread roofing cement on the flashing about 6 inches in from the edge of the shingles.
Step 2: Press the shingles down into the roofing cement.
4. Sealing Drip Edging
For drip edging, seal the upper edge beneath the shingles with roofing cement but do not seal the drip edge along the eaves.
Replacing Vent Pipe Flashing
Step 1: Remove the shingles covering the flange of the vent pipe flashing at the back and sides.
Step 2: Pry and lift off the flashing.
Step 3: Remove any nails.
Step 4: Position the new vent-pipe flashing over the vent, push it down into place, and nail where shingles will cover it.
Step 5: Replace the shingles and cover the nail heads with roofing cement.
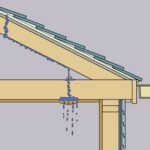
Are Ice Dams Causing Leaks?
Leaks from ice dams are related to flashing problems—when ice dams occur, the flashing and roofing along eaves fail to prevent water from making its way up underneath the roof covering materials. For information on how to prevent ice dams, please see “How to Prevent Ice Dams.“
How to Maintain Roof Flashing
Here are a few suggestions for care and maintenance of your roof flashing.
1. Preventive Tips
Step 1: Check the flashing as well as the condition of your roof shingles regularly.
Step 2: Look for loose nails and holes as well as the seals at the edges of the flashing.
Step 3: Reseal the flashing as needed using roofing cement and caulking.
2. Painting New Flashing
Step 1: Use a stiff brush and solvent to remove flaking paint, corrosion, and dirt.
Step 2: Apply a zinc-based primer and then spray on two or more light coats of rust-inhibiting metal paint.
3. Dormer Flashing
Step 1: Scrape out old caulking compound if any.
Step 2: Brush the flashing with a wire brush.
Step 3: Apply urethane roofing cement between the siding or shingles and the flashing.
Step 4: Seal any obvious seams.
About DIY Roof Repair
Unless your roof’s pitch is relatively low and you have the necessary experience, tools, and confidence to get the job done safely, be wary of doing your own roof repairs—working on a roof can be dangerous. It may be best to leave this work to a professional.