Is the drain under your sink dripping on the floor? Here is step-by-step advice on how to stop that drip either with an easy fix or by replacing it with an inexpensive new one.

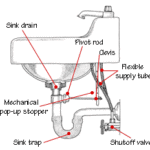
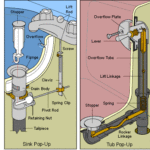
Is the U-shaped drain pipe (called a “trap” or “P-trap”) beneath your sink leaking? If it is, either fix it or replace it with an inexpensive new one before water causes serious damage to the area under the sink. In this article, we’ll show you how to tighten any connections that might be leaking, or how to replace that drain pipe yourself.
Briefly, here’s how to do it:
- Look for the place where the drip is occurring.
- Tighten the couplings that connect the pipes.
- Test to see if it’s still leaking.
- If it is, put a bucket or pan below the drain pipe and disassemble it.
- Buy an inexpensive replacement.
- Install the new drain pipe.
See below for more in-depth information on how to do these things.

Find the leak
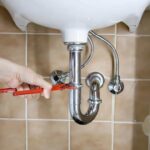
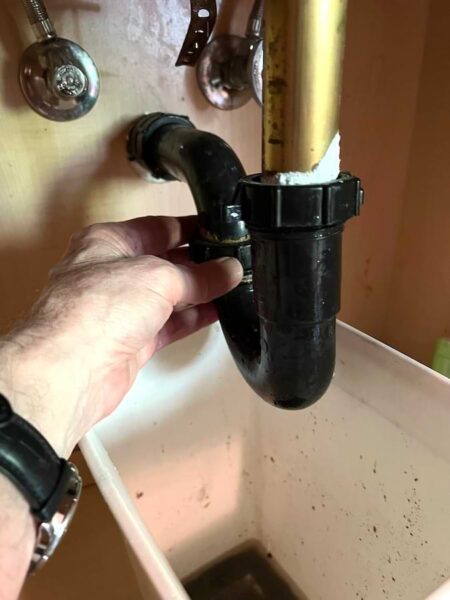
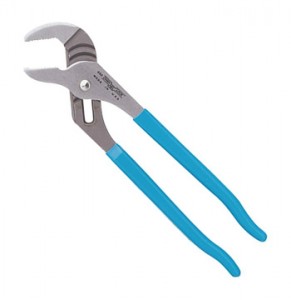
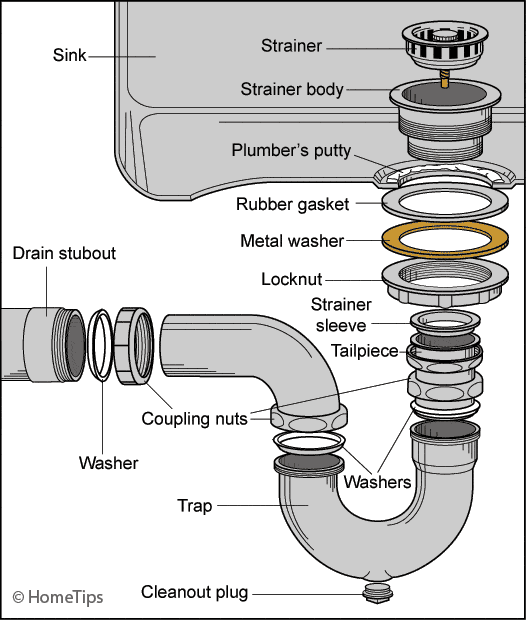
Look for where the drip is originating. In many cases, drips come from loose fittings, especially the coupling nuts that connect the pipe sections together (see illustration below). You can often stop a drip by simply tightening the coupling nuts. A helpful tool for this is a large pair of slip-joint pliers (also referred to as “tongue-and-groove pliers” or by the trade name Channellock® pliers).
How to tighten the coupling nuts
- Open the jaws of the pliers wide enough to grip the coupling nut.
- Tighten the nut by gently turning it clockwise until it’s snug. Apply strong pressure but don’t strip the threads by over-tightening. On a metal trap, tighten the coupling nuts hand tight plus about a half turn, using slip-joint pliers to grip the nut. On a plastic trap, just hand tighten, and, if needed, give the nut about a quarter of a turn with slip-joint pliers.
How to disassemble the sink trap
If that doesn’t stop the leak, you may need to disassemble and replace the leaky sink trap.
- Place a bucket beneath the trap.
- Using slip-joint pliers, disconnect the coupling nuts that hold the trap to the tailpiece and drainpipe. Open the jaws wide enough to grip the coupling nuts, and turn them counterclockwise.
- Be ready for water to briefly pour out of the disconnected pipe. Have some rags on hand to mop-up spills.
- Check the large rubber slip washers or cone-shaped nylon washers that provide the watertight seal at each joint between the trap’s pipes. Rubber washers may leak as the rubber hardens over time—if they’re hard or deteriorated, replace them.
- Plastic-pipe traps are more likely to leak when the pipes or washers become misaligned, so check for alignment.
- Check the pipes for cracks or corrosion. If s pipe is corroded or cracked, take it with you to the hardware store to buy an appropriate replacement. Replace the entire trap.


You can choose between chrome metal and PVC traps. PVC traps are inexpensive, durable, easy to work with, and don’t corrode the way chromed brass drainpipes do.
- If you’re going to re-use the existing trap, take it outside and rinse it out with a garden hose.
- When reassembling the drain trap, first tighten the coupling nuts by hand and then tighten them with the slip-joint pliers, but don’t over-tighten.
- Run the water and look for leaks. If you spot leaks, tighten the nuts a little more. If everything appears to be sound, place a newspaper under the sink and check the paper for signs of any dripping the next day.
If this looks like more than you want to do yourself, you can Get a Pre-Screened Plumber Near You.