Is your sink stopper stuck. Does the tub stopper leak? If a pop-up drain stopper in a sink or bathtub doesn’t work, this expert guide will show you how to fix it quickly. Includes a diagram of how pop-up stoppers work.
Pop-ups are simple mechanical devices that use a system of links and levers to move a drain stopper up and down to seal a sink bowl or bathtub. Though they look complicated, it’s relatively easy to fix a pop-up stopper.
Quick and Easy Pop-up Drain Stopper Fix
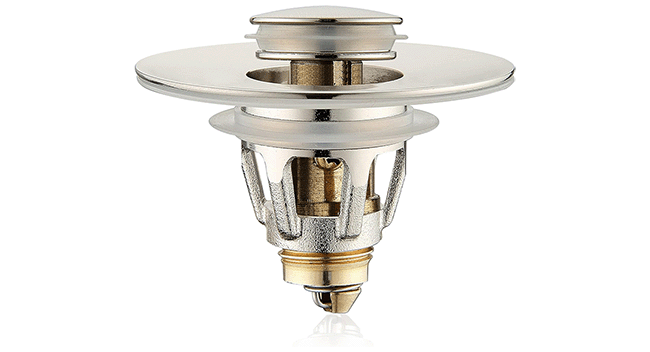
If your pop-up sink or tub stopper doesn’t work, a quick-and-easy fix is to buy a replacement universal drain stopper. These are available on Amazon for from $10–15, and they’re a total no-brainer to install. Measure the size of your sink or tub’s drain hole and buy one that’s sized to fit it. Then just remove the old stopper (see below) and push the replacement into the drain hole. You operate it by pushing down on the center of the stopper to close it, and then pushing it again to release it.
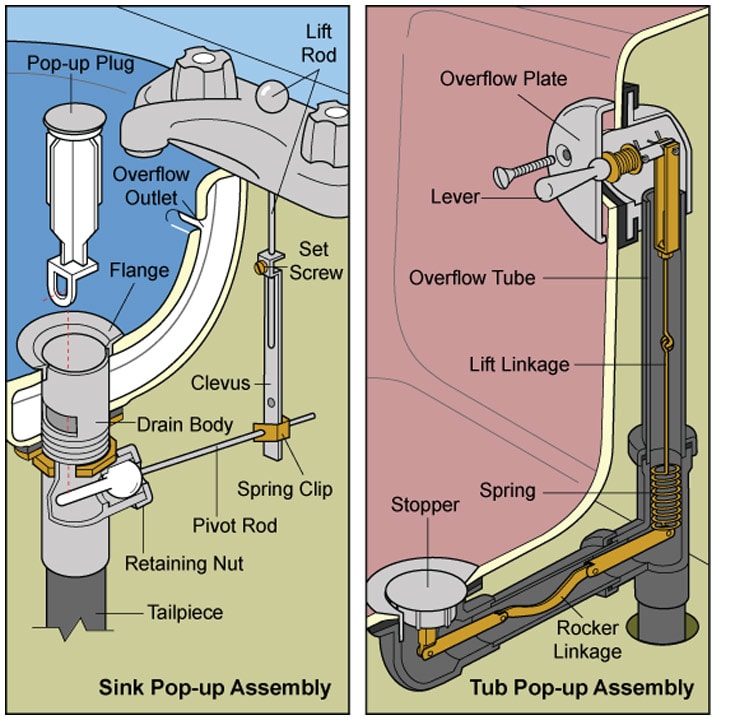
Diagram of a Pop-Up Stopper
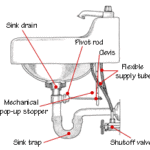
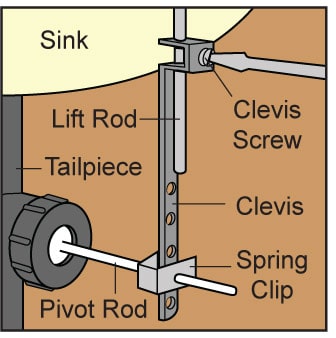
Bathroom sink pop-ups are raised and lowered with a lift knob or lever, usually located on the backside of the faucet. The knob or lever is connected to a lift rod that is fastened in many cases to a flat, slotted bar called a “clevis.”
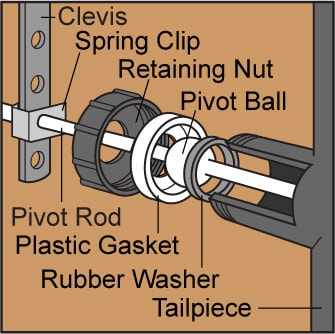
The flat, slotted clevis is connected by a small spring clip to a pivot rod-and-ball assembly—a rod that runs through a rubber pivot ball and slopes slightly upward to the tailpiece of the stopper. This rod pushes the stopper up or lets it drop down into the drain body.
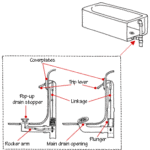
The lever operates a lift linkage that pulls on a spring. The spring pulls a rocker arm that raises and lowers the stopper (see the illustration above).
Pushing the knob down causes the pivot rod to push the stopper up. And vice versa, pulling the knob causes the pivot rod to pull the stopper down. If you want to remove the assembly, you may be able to pull it right out. On a bathroom sink, it’s often necessary to remove the retaining nut and extract the pivot rod first. You may have to twist the drain stopper to unhook it from the pivot rod. It is usually very simple to pull out the stopper and rocker arm linkage.
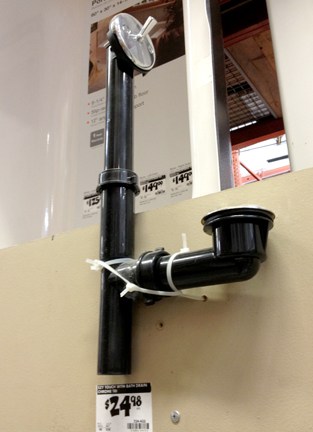
An old-style bathtub pop-up is raised or lowered with a lever at the tub’s overflow plate. Find bathtub pop-ups on Amazon.
How to Remove a Bathtub Pop-Up Drain Stopper
It’s easy to remove a tub stopper to check it for mechanical problems or blockage. You’ll encounter a couple of different types of bathtub pop-ups: old-style mechanisms like the one shown in our illustration above, and newer spring-loaded pop-ups.
To remove an old-style bathtub pop-up:
- Simply grip the stopper body and pull it out of the drain along with the hinged rocker arm.
- Clear the stopper and rocker arm of hair and debris.
- Check the rubber seal for damage and, if necessary, replace it. Remove the old seal and slip on a new one if needed.
- Reinstall the stopper and rocker arm. Make sure the flange is tightly seated and in good shape. (Older tubs may have corroded flanges.)
For removing a newer spring-loaded bathtub pop-up, this video shows the necessary techniques:
How to Fix a Bathtub Pop-Up Drain Stopper
IN BRIEF:
- Remove the screws that secure the overflow cover plate.
- Pull the plate and lever away from the overflow hole, partially pulling out the mechanism.
- Adjust the nut on the linkage—lengthen it to raise the stopper or shorten it to let it drop lower.
- Push the assembly back in and replace the cover plate.
- Lift out the stopper and rocker linkage. Check the seal, remove hair and debris, and then push it back into the drain.
IN DEPTH:
A common problem with bathtubs is that the pop-up stopper doesn’t close fully, fit the drain flange tightly, or open easily when the lever or knob is engaged. Stoppers that don’t close can keep the tub from filling properly, thereby wasting water. Stoppers that don’t open readily or don’t open all the way make tub drain sluggishly.
A bathtub pop-up is a two-part mechanism: first, the stopper, which has a rocker arm that extends back toward the drain, and second, the overflow assembly, a lever that lifts or lowers a rod with a spring-like end. When you flip the overflow lever up, it pushes the rod down on the stopper’s rocker arm, which raises the stopper. Flip the lever up, and it lifts the rod, allowing the stopper to drop down and plug the drain.
Depending upon the type of pop-up, you adjust the way the stopper seats either by adjusting the length of the striker rod or by adjusting the rocker arm.
To adjust the overflow assembly, remove the screws that secure the overflow cover plate, and pull the plate and lever away from the overflow hole, partially pulling out the mechanism. Adjust the nut that lengthens or shortens the rod assembly—lengthen it to raise the stopper higher or shorten it to let it drop lower. Then push the assembly back in and replace the cover plate.
To adjust the stopper, simply lift it out of the drain along with the rocker arm. Check the rubber seal, if there is one, for damage, and replace it if need be. Clean off hair and debris, and adjust the nut on its underside to shorten or lengthen its connection to the rocker arm. Then work the arm and stopper back down into the drain hole to make sure the flange is tightly seated (though older tubs may have corroded flanges).
Keeping the drain clear of hair, soap and shampoo residue, and other debris is one of the best ways to help keep the stopper in good working order.
If the stopper or mechanism is damaged, you can buy a replacement stopper and parts at Amazon.
How to Fix a Sink Pop-Up Drain Stopper
Water may leak or refuse to drain around a sink pop-up for a number of reasons. If your sink pop-up won’t pop up or seat properly, fixing it is quite easy—usually just a matter of adjusting a few parts. The culprit is often a buildup of hair around the base of the stopper or the pivot rod mechanism. Or, the clevis may be out of adjustment (see illustration to identify the various parts).
Pushing the knob and the lift rod down causes the pivot rod to push the stopper up. Pulling the knob causes the pivot rod to pull the stopper down. If the stopper sits too high or not high enough in the drain, go under the sink with a flashlight and identify these parts, per the illustration above. Pinch the spring clip to release the flat bar (clevis) from the pivot rod. Then move the rod up or down into a different hole in the clevis and replace the spring clip.
In many sinks, hair and crud accumulates around the body of the stopper, clogging the drain. You have to extract the stopper to clean it. On some sinks, you may be able to pull it right out. But it’s often necessary to work under the sink. You must remove the retaining nut (slip-joint pliers can help if it’s frozen shut) and pull out the pivot rod first. You may have to turn the stopper to unhook it from the pivot rod.
This video shows how to do this.
Here’s more detail on how to fix the problem:
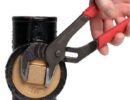
1. With a slight twist, try to lift out the stopper. If it seems to be linked to the mechanism below, reach under the sink and unscrew the pivot rod retaining nut and pull out the pivot rod to disengage it. Use locking-jaw pliers to loosen it if necessary.
2. Lift the stopper from the drain. Clean off all hair and debris. If the stopper is broken or its seal looks worn, replace it.
3. Face the hole at the bottom of the stopper toward the pivot rod’s location, and drop the stopper back into the drain hole. Insert the pivot rod so that it engages the hole in the bottom of the stopper, and tighten on the retaining nut with the stopper in its up position. When the drain is closed, the pivot rod should slope slightly uphill from the clevis to the tailpiece.
4. Loosen the set screw on the clevis and adjust the strap up or down so that it operates the pivot rod to open and close the stopper. Retighten the set screw.
5. If adjusting the clevis screw doesn’t help, reset the pivot rod by squeezing the spring clip and freeing the pivot rod. Move the clip up to the next clevis hole and insert the rod. You may need to keep tweaking this a little to find the right hole on the clevis.
6. If water drips from around the pivot ball, tighten the retaining nut that holds the ball in place. You may also need to replace the gasket or washer (or both) inside the pivot ball-and-rod assembly.
7. If you can’t get it working right, remove the existing stopper and replace it with a universal stopper, as discussed at the top of this article.
Keeping drains clear of hair, soap and shampoo residue, and other debris is one of the best ways to help keep pop-up stoppers in good working order.




 Don Vandervort writes or edits every article at HomeTips. Don has:
