Expert step-by-step advice on how to install ceramic tile on a countertop, from preparation through selecting materials, setting tile, and grouting.

As discussed in the Countertop Materials Buying Guide, many different materials are available for countertops, including solid-surface materials, laminates, concrete, wood, metal, and more.
Nearly all of these require professional installation-in fact, some are only sold through trained applicators.
Ceramic and stone tile, however, can be installed by accomplished do-it-yourselfers. For a successful result, the job requires quite a few tools and experience with laying tile. The keys to success are carefully calculating measurements, protecting the surrounding surfaces, and building an appropriate substrate upon which to set the tiles.
Following is a basic guide to the techniques.
Planning the Tile Layout
Before you prepare the mortar, clean the substrate of all dirt and oils. Place the tiles where they will go, with plastic spacers between them at the grout lines, and make adjustments as needed. Aim for a symmetrical look, with no narrow slivers of cut tiles.
If possible, plan to face tile cuts toward the countertop’s back edge, where they cuts will be covered by backsplash tiles. For a countertop that turns a corner, start the layout at the inside corner. If the layout ends with a very narrow sliver, slightly widening the grout lines may solve the problem. In cutting the tiles, take into account the width of the grout lines on either side.
Temporarily attach a guide strip for edge tiles.

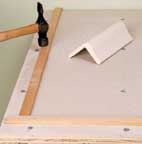
If you’re using edging tiles, mark a line along the edge of the countertop to allow for the tiles plus a grout joint. Then place a guide strip along this line and temporarily attach it to the countertop with nails. Lay out the field tiles from the edge of the strip to the back of the countertop, using a straightedge to align them.
Preparing for Tile Installation
Before tiling a countertop, remove any appliances that abut the countertop, such as a drop-in range. To protect the surrounding area, place a dropcloth on the floor and cloak cabinets with plastic sheeting.
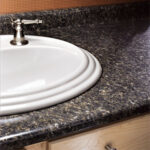
A flush-mounted sink, which sits even with the countertop, should be installed before you build the substrate. A top-mounted (self-rimming) or under-mounted sink should be installed after the countertop is in place.
You will need to create a flat, level, moisture-resistant surface to support the tiles. This substrate is usually made of a 1/4- to 1/2-inch sheet of cement backerboard layered over 3/4-inch plywood.
So that they fit standard kitchen base cabinets, most kitchen countertops are 25 inches deep. Typical height for a backsplash is 4 to 6 inches. You may choose to alter the dimensions of your substrate slightly if doing so means you will have to cut fewer tiles.
When cutting the plywood, note that it should extend beyond the base cabinets by about 1 inch, ensuring that the front edge is substantial enough to support the edge tiles. Install the plywood, facing the factory edge (the straight, precut edge) out toward the room. Attach the plywood to the cabinets with screws, checking to make sure the surface is level; install shims where it is not.
Mark your measurements on the backerboard with a scribe tool or sharp knife, and then simply snap the material apart. Affix the backerboard to the lower layer of plywood with galvanized screws. Apply thinset mortar over the screw heads and fiberglass mesh tape over the seams where sections meet to create a smooth surface for the tiles.
Tiling Tools & Materials
Measure the length and width of your counter to calculate how much tile you’ll need. Remember to take into account special-sized tiles such as bullnose-edge and backsplash tiles when figuring the quantity of tiles needed. Always purchase about 10 percent more so you will have enough after cutting and potential breakage. Then buy the tile.
A tile cutter is a fundamental tool for scoring and then snapping tiles to fit your layout. If the tile you have chosen is particularly hard or many tiles will require cutting, plan to rent a wet saw, available for rent at most home improvement centers. For fine-tuning tile cuts, tile nippers are helpful-they break off small pieces for contours or complicated cuts. Mark cutting lines on the tiles with a wax pencil.

You’ll need other supplies as well, such as plastic spacers, thinset mortar, and grout. The most common method is to install the ceramic or stone tiles in fortified thinset mortar, separating them with plastic spacers and filling the joints with grout. For most tile installations, a square-notched trowel with 1/4 inch notches produces grooves of the right thickness. For thicker tiles, larger notches are recommended.
Before choosing the grout for your tile installation, think about what kind of appearance you want the surface to have. For example, if the grout you choose is similar in color to the tile, the surface will appear very uniform. Conversely, if you contrast the color of the grout with the tile, it will give the surface a geometric feel. It’s smart to obtain some grout samples before deciding and test them out with a few tiles.
Also keep in mind that the width of your grout lines, which can be anywhere from 1/16 to 1/2 inch, will affect the surface’s look. The wider the grout lines and the more contrasting the color of grout with the tile, the more the tile laying must be precise. If, however, you have chosen, say, large saltillo tiles for a floor, slightly irregular grout lines will only add to the rustic effect of the tiles themselves. This is all the more reason it is important to obtain some grout samples beforehand and experiment not just with colors but with the layout.
For lines under 1/8 inch, use unsanded grout; for greater than 1/8 inch, sanded grout. If the grout is polymer- or latex-based, mix it with water; if not, mix it with liquid latex. When the grout has completely set up-and certainly within two weeks-seal it or it can stain. If the installation is in a location where the risk of staining is a likelihood, such as a kitchen countertop, ask your tile dealer about whether or not you can use epoxy grout with the type of tile you have chosen.
Choosing Grout for Tile
Before choosing the grout for your tile installation, think about what kind of appearance you want the surface to have. For example, if the grout you choose is similar in color to the tile, the surface will appear very uniform. Conversely, if you contrast the color of the grout with the tile, it will give the surface a geometric feel. The best idea is to obtain some grout samples before deciding and test them out with a few tiles.
Also keep in mind that the width of your grout lines, which can be anywhere from 1/16 to 1/2 inch, will affect the surface’s look. The wider the grout lines and the more contrasting the color of grout with the tile, the more the tile laying must be precise. If, however, you have chosen, say, large saltillo tiles for a floor, slightly irregular grout lines will only add to the rustic effect of the tiles themselves. This is all the more reason it is important to obtain some grout samples beforehand and experiment not just with colors but with the layout.
For lines under 1/8 inch, use unsanded grout; for greater than 1/8 inch, sanded grout. If the grout is polymer- or latex-based, mix it with water; if not, mix it with liquid latex. When the grout has completely set up-and certainly within two weeks-seal it or it can stain. If the installation is in a location where the risk of staining is a likelihood, such as a kitchen countertop, ask your tile dealer about whether or not you can use epoxy grout with the type of tile you have chosen.
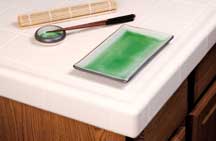
How to Set Countertop Tiles
At the edging strip, press a tile firmly into the mortar and wiggle it slightly as you press down. Continue filling in tiles on either side of the first tile; use plastic spacers to create even gaps for the grout.

Once all the full tiles are in place, cut tiles as necessary to fill in. Then remove the spacers.

Once all the tiles are set, remove the edging-strip guide and add the edging pieces. The simplest way to do this is by “back buttering.” To do this, spread some thinset mortar on the back faces of the edging tile as if buttering a piece of bread. Then position the edging so it butts up against the full tiles, press down, and wiggle to set. After setting tiles in mortar wait at least overnight for the mortar to harden. When it has turned a lighter color, this indicates that it is really dry.
How to Grout Tile
After you’ve finished setting all of the tiles on a surface, wipe the surface with a damp cloth or sponge, cleaning away any residual mortar. In the joints, the mortar should be at least 3/16 inch below the tile surface; otherwise, it may show through the grout. Use a knife, screwdriver, or putty knife to carefully dig away any mortar that is too high. Then brush and wipe away the mortar crumbs.

Mix up sufficient grout to fill in the gaps between the tiles, following the manufacturer’s directions. Pour or scoop some grout onto the countertop. Apply the grout with a grout float held diagonally to the surface, forcing the grout between the tiles. Holding the grout float flat, run it over the surface in several directions, pressing the grout firmly into the joints.
To remove the excess, hold the float at a 45-degree angle and scrape the surface.
Turn the float to about a 45-degree angle and scrape away most of the grout on the surface. Work diagonally to the joints to avoid digging the float into the joints. Use medium pressure. Aim to squeegee away most of the excess grout, but don’t linger and try to get it all; you will clean away any residual grout from the surface later but before the grout fully dries.
Once the grout becomes firm, use a circular motion with a damp sponge to wipe off the excess. Allow the residual film on the surface to dry to a haze, and then buff the surface with a clean, soft cloth, again using a circular motion. Apply a sealer after waiting for the time specified by the manufacturer.